
ProVision 7.2.0 is a major release with new features, improvements and bug fixes.
Local Software Requirements Update
For local installation customers, ProVision versions 7.0.0 and newer have upgraded software requirements (in red, below):
|
|
Required |
Link |
|---|---|---|
|
Operating System |
Linux/BSD/OSX |
|
|
Apache |
Apache 2.4 |
|
|
PHP |
PHP 7.1 |
|
|
MySQL |
MySQL 5.7 |
Note on MySQL: We recommend setting the max_allowed_packet setting in the MySQL configuration file to 128MB (or similar) to account for the typical dataset size handled in ProVision.
Major Features and Improvements in this release:
New Features
IPAM NAT Support
NAT tracking is now supported in ProVision IPAM.
NAT IPAM Metadata
IM/CFR -146: Added NAT association support to IPAM
Track NAT associations between public and private (1918) blocks via the IPAM "NAT" Field.
The "NAT" field accepts a single IPv4 CIDR (block or IP) to associate with the current block, and automatically updates the corresponding block with the NAT association.

For additional information, see below, or view at Working with IP Blocks.
Enable NAT Column...
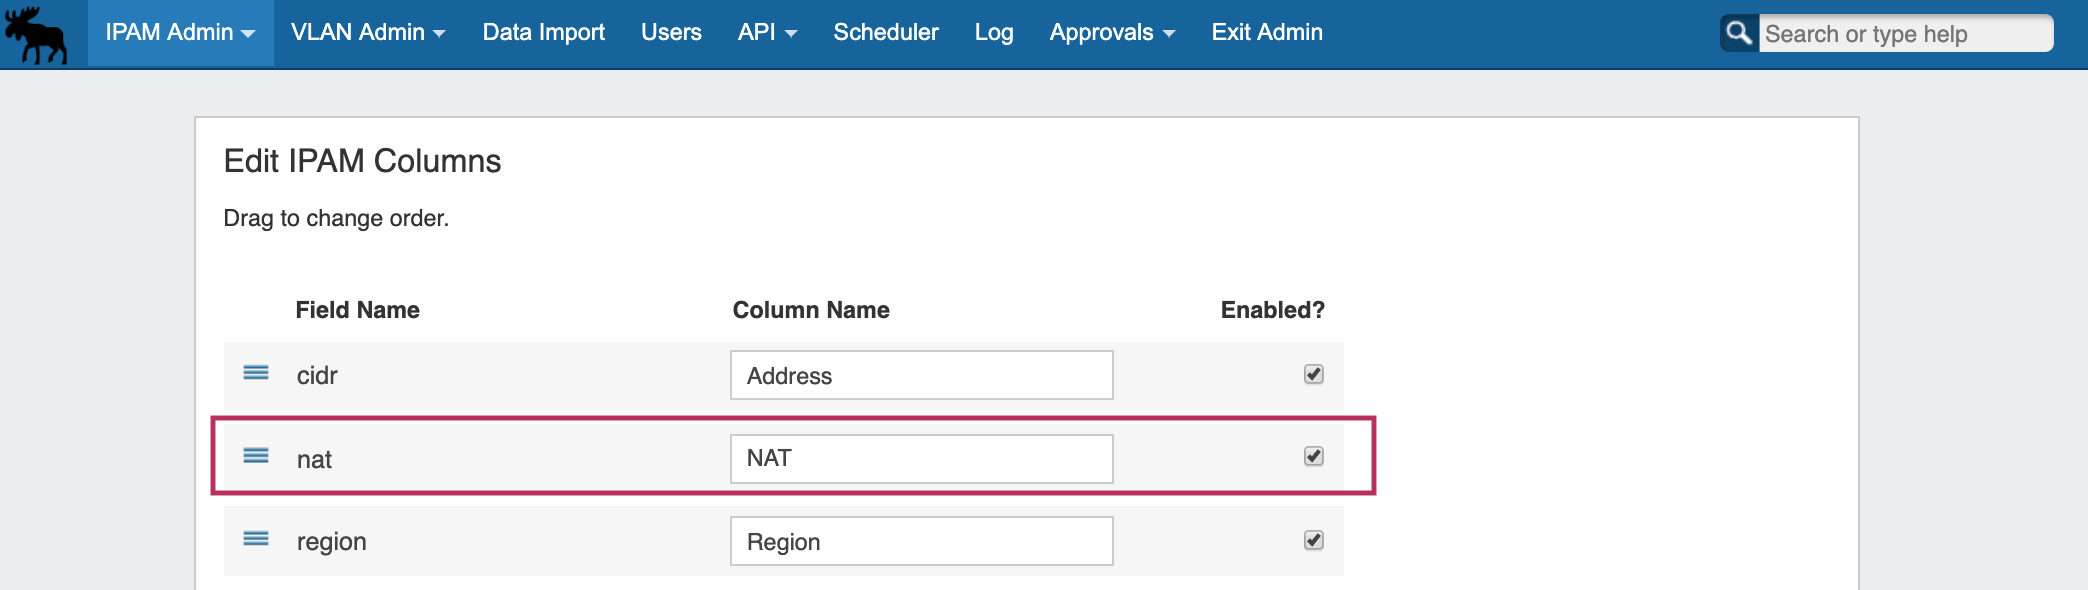
Enable the NAT field by navigating to IPAM Admin → Edit IPAM Columns.
From there, ensure that the NAT column is checked (enabled), and customize the column location if desired. Be sure to click "Update" to save any changes.
Create NAT Association...
Ensure that the two appropriate IP Aggregates (one public, one 1918 private space) containing the desired blocks to NAT have been added into ProVision. (See: Working with IP Aggregates and Working with IP Blocks )
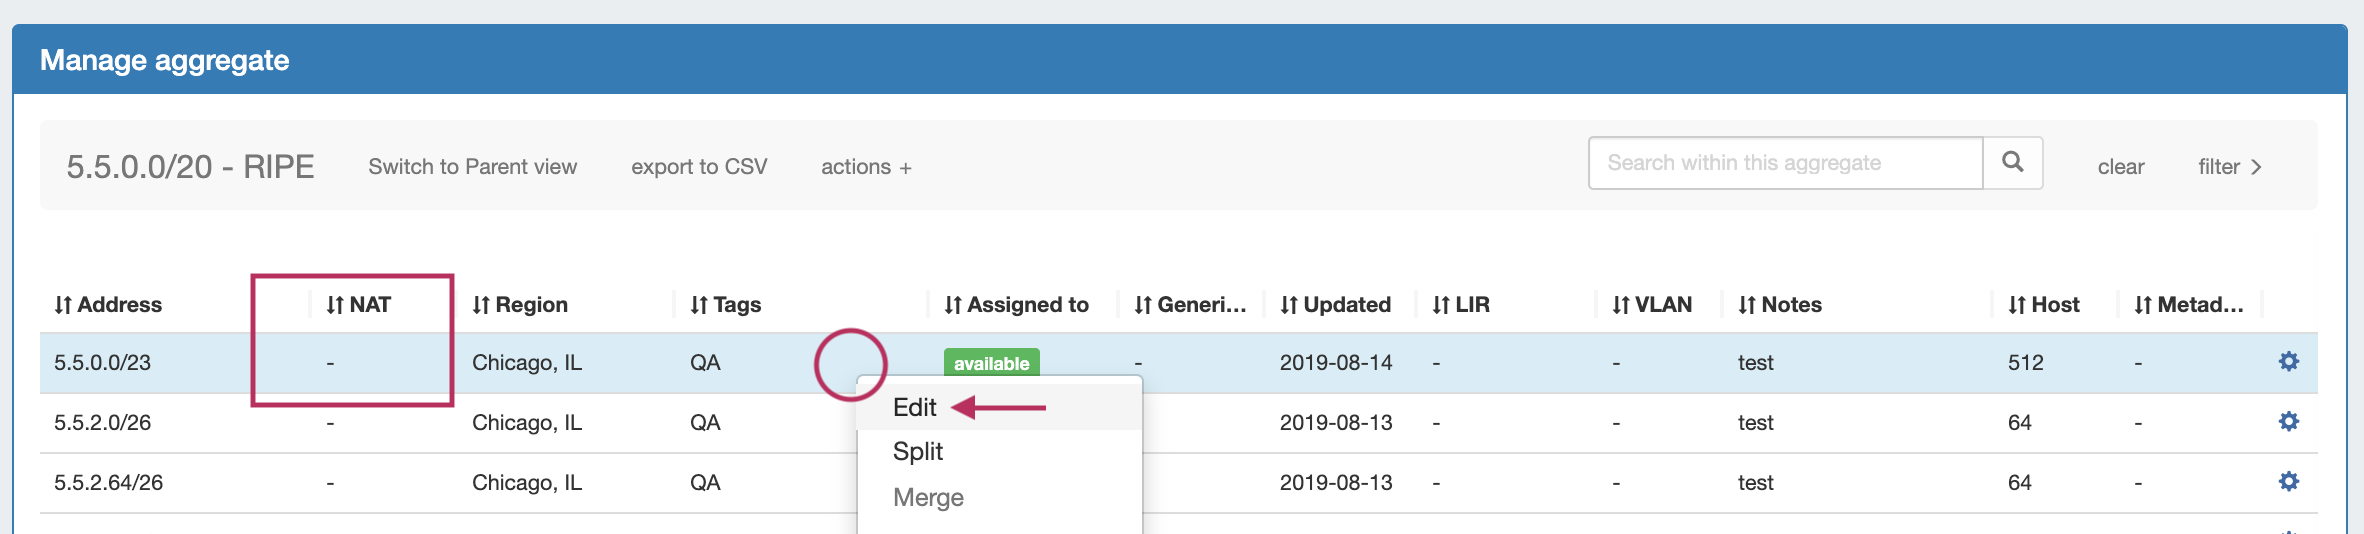
Open IPAM Manage for either aggregate, then open "Edit Block" for the specific block you wish to NAT.
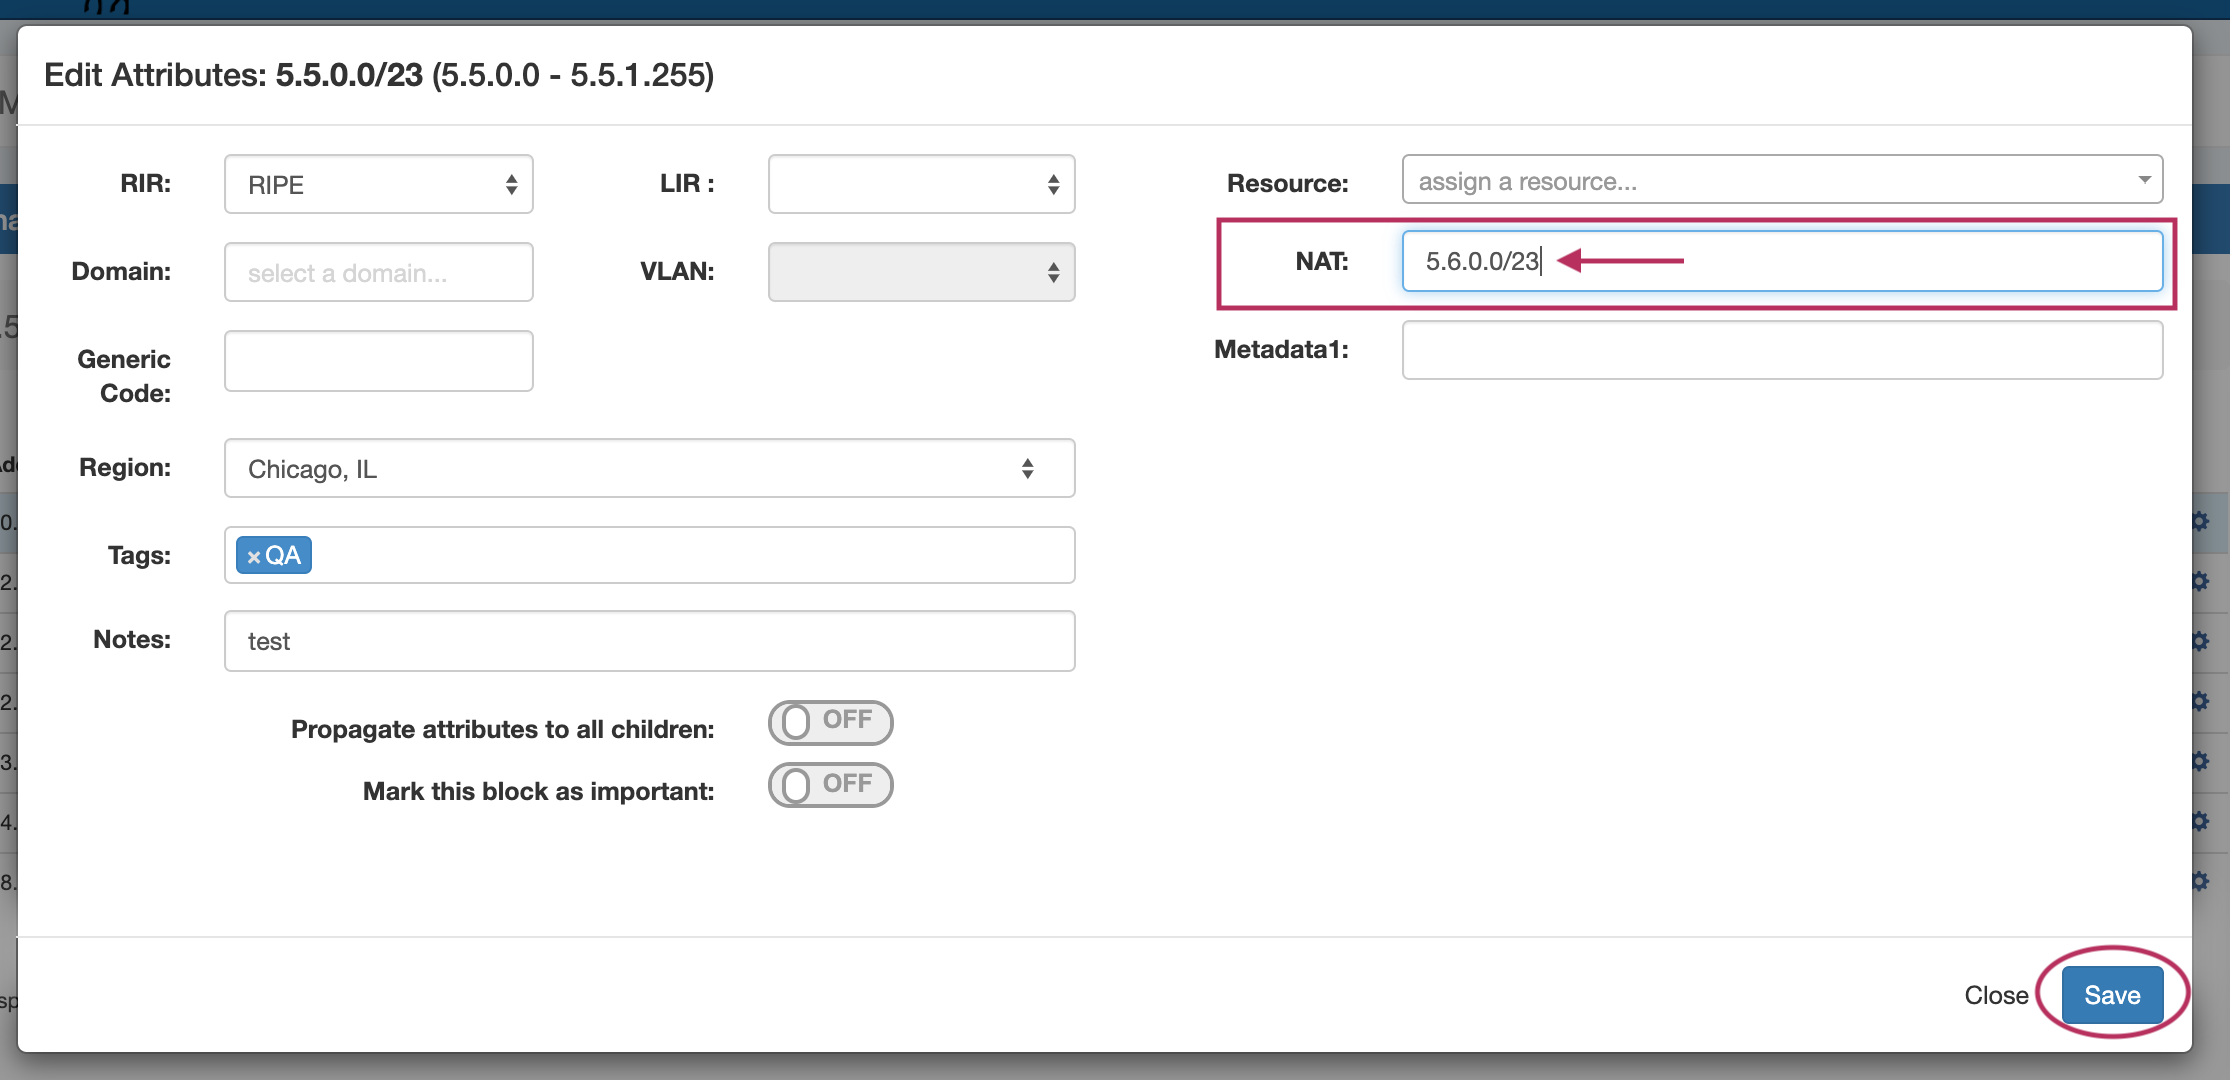
In the Edit Block dialog, enter the IPv4 CIDR of the corresponding NAT block. When complete, click "Save".
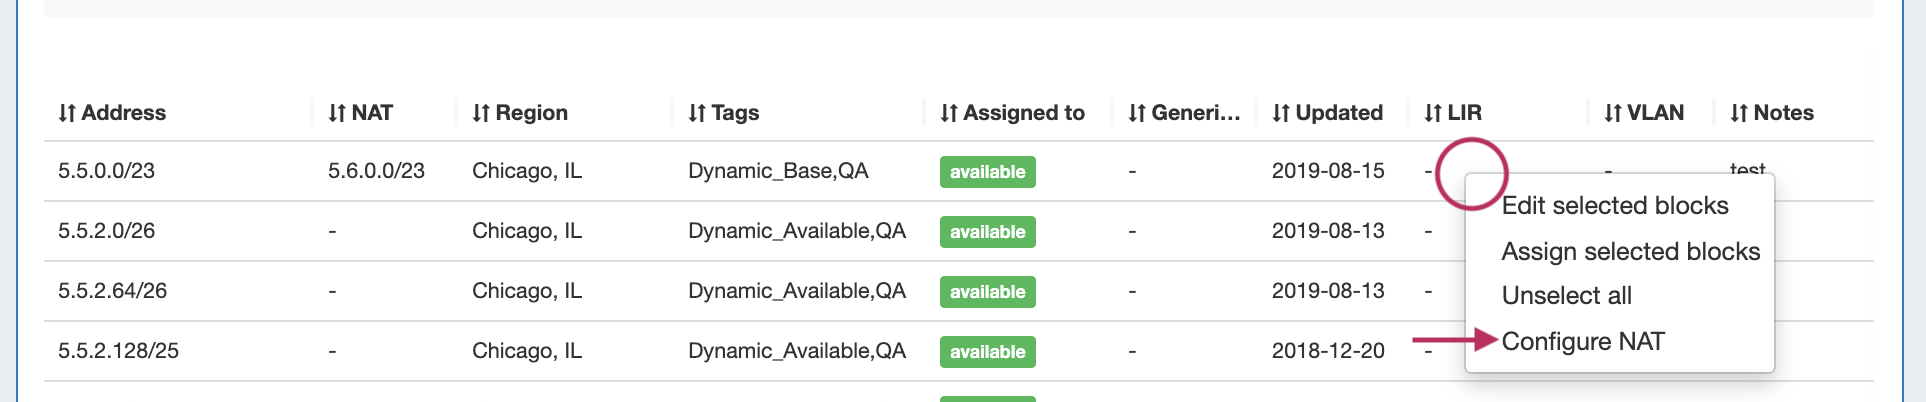
Once the NAT field has been saved, the association will display in the NAT Column.
The corresponding block (here, the private 1918 space block) will automatically have the NAT associated applied - automatically splitting/merging available blocks as necessary to make the association.

Configure NAT to Routers...
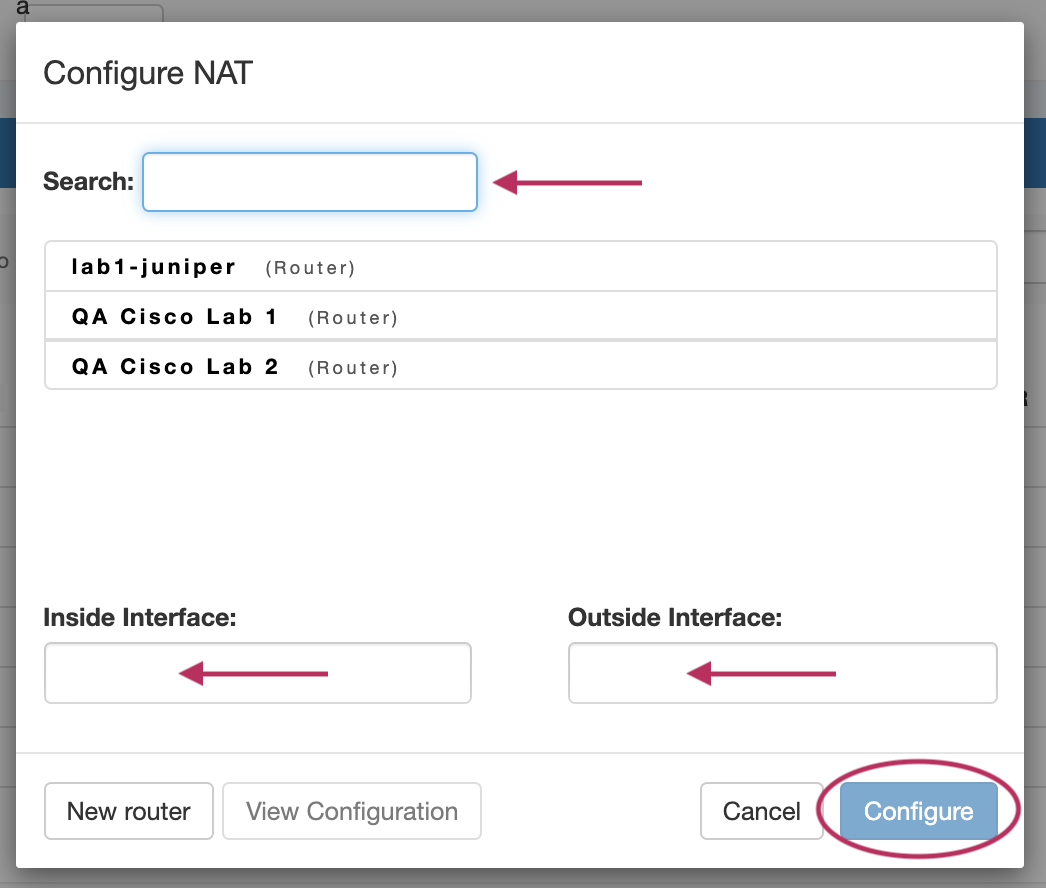
In the IPAM Manage Action Menu, select "Configure NAT" for the NAT'ed block(s).
Then, select the router. Add the custom configuration / interface information for the router and click "Configure".
Working with NAT'ed Blocks
Use caution when managing NAT'ed blocks or aggregates - major actions that change either block's assignment or size (assign, unassign, split, merge, autosplit/cleanup) removes the NAT association.
In this case, complete the necessary high-level block tasks, and then re-save the NAT CIDR association to either block.
NAT/ Scheduler: Rotate Dynamic IPs
IM/CFR - 3373: Added a Scheduler Task, "Rotate Dynamic IPs" for rotation of NAT IP Assignments
The Scheduler task "Rotate Dynamic IPs" reassigns single IPv4 NAT addresses (/32s) after 'x' days to an available address denoted by the Dynamic_Available tags.
Prior to using this task, two blocks (one public, one private) must be NAT'ed in IPAM, the NAT Config pushed to a router, and appropriate blocks tagged with "Dynamic_Base" and "Dynamic_Available". For additional information, see below, or view at Working with IP Blocks and Scheduler Tab.
Add Dynamic Tags to Blocks
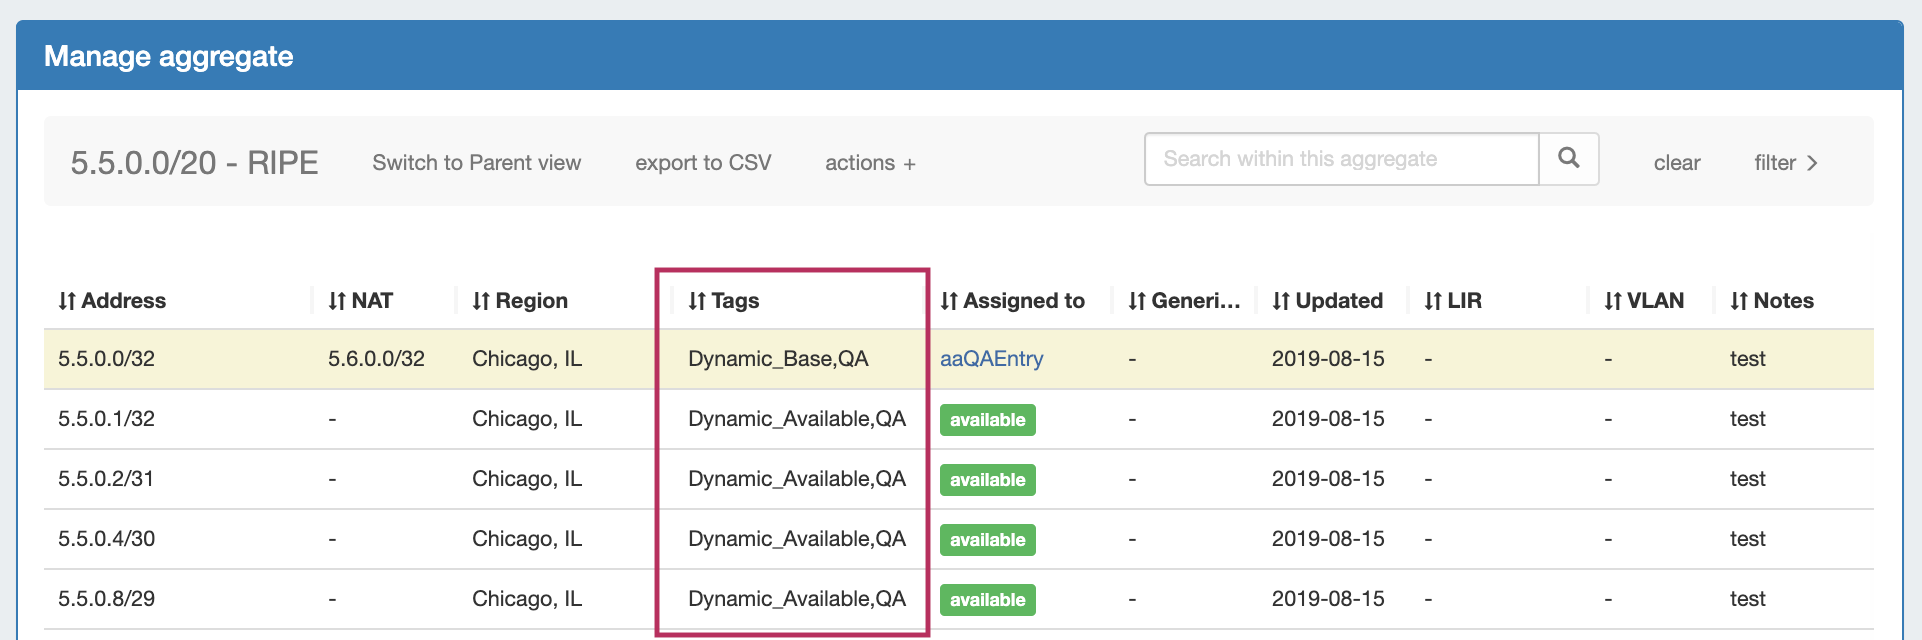
After NAT blocks and aggregates have been set up in ProVision with sufficient size, matching IPAM tags, and NAT metadata, you can identify which blocks to use for dynamic rotation by adding the "Dynamic_Base" and "Dynamic_Available" tags.
Go to IPAM Manage and:
-
Add the IPAM tag "Dynamic_Base" to the /32 block(s) currently NAT'ed.
-
Add the IPAM tag "Dynamic_Available to the aggregate or blocks which match the NAT'ed blocks, and are available for rotation use. If used on a block larger than the Dynamic_Base block, the available block will be automatically split.
Set up Scheduler Task
Go to Admin → Scheduler, Add the scheduler task "IPAM - Rotate Dynamic IPs".
Enter a number for the days to wait (since last configure) until rotation.
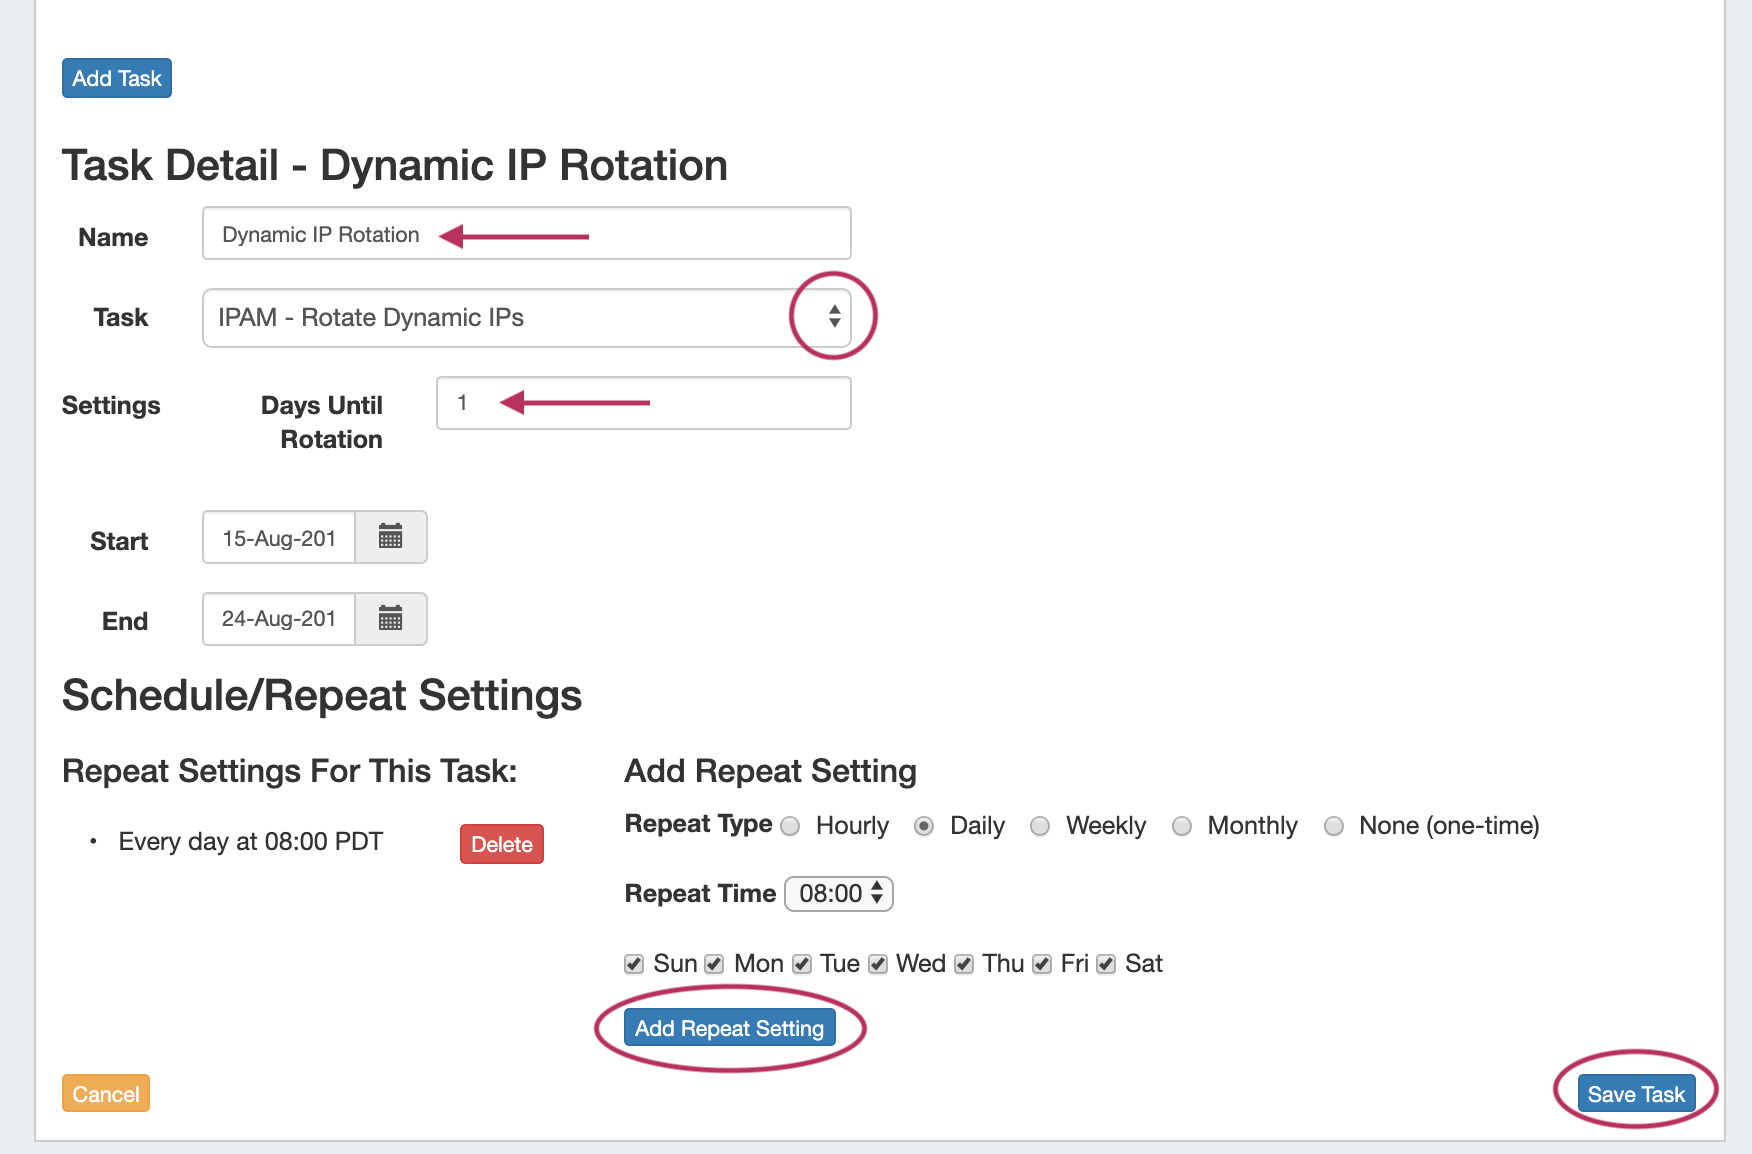
Enter scheduled start / end dates, repeat settings, and click "Save" when complete.
The scheduled task will look for NAT'ed, /32 "Dynamic_Base" blocks that have last configuration times older than the provided day count, and rotate those IPs to "Dynamic_Available" blocks. Dynamic_Available blocks larger than than the Dynamic_Base block will be automatically split.
Numbering Authority
IM/CFR - 3322: Added "Numbering Authority" system to IPAM Admin to generate custom-configured number sequences
Numbering Authority allows Admin users to configure domain sets of values, for use with associated ProVision functions or external number tracking.
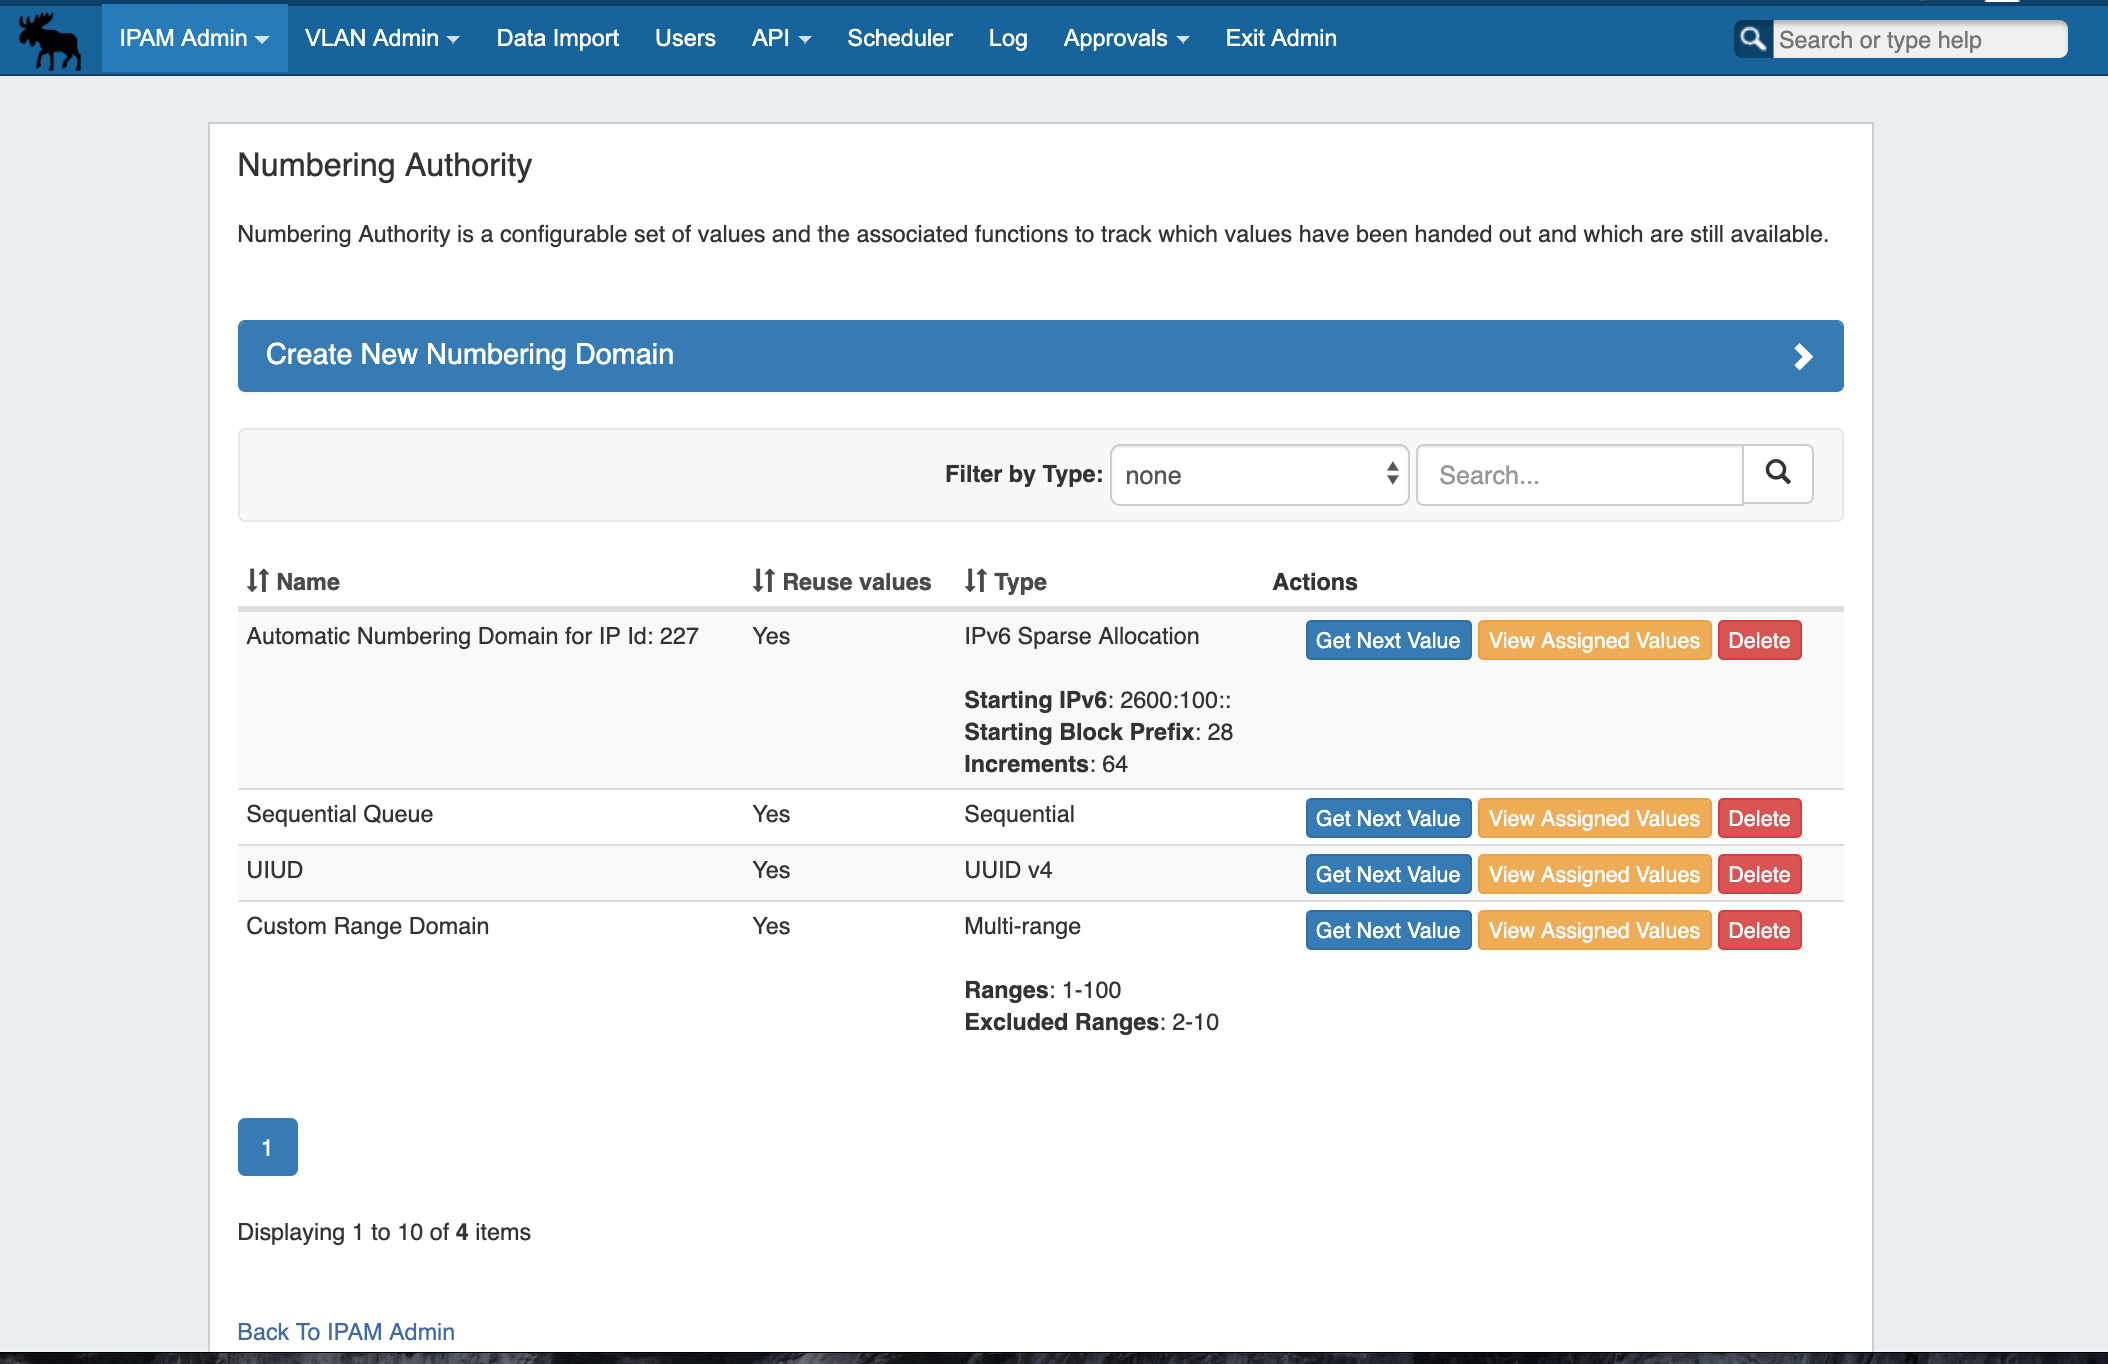
With Numbering Authority, you can create new numbering domains, track which values have been handed out, free values no longer in use, generate the next sequence value, and associate keys-value pairs to a number value. Numbering Domains may be used with ProVision's APIv2 to generate numbers for use within ProVision instances or custom applications.
Available Domain Types
Four numbering domain types are available in Numbering Authority: Sequential, Multi-Range, UIUDv4, and IPv6 Sparse Allocation.
Sequential:
Provides a sequential number domain starting with '0' and progressing in numerical order. Potential Applications: Ticketing Queues, Customer Numbers
Multi-Range:
User-defined numbers and number ranges (e.g.: 2-3,4-6, 25, 27-28) to include or exclude as available. Potential Applications: VLANs
UIUD v4:
Generates a Universally Unique Identifier according to v4 (Random) standard. Potential Applications: Unique Identifiers
IPv6 Sparse Allocate:
Determines the next IPv6 block to assign to evenly distribute assignments throughout the provided range. Used with the IPAM IPv6 Aggregate Sparse Allocate function. See: Working with IP Aggregates Applications: ProVision IPv6 Sparse Allocation
Working with Numbering Domains...
Create a Numbering Domain
Go to Admin → IPAM Admin, and select the "Numbering Authority" page.
Create a new numbering domain by expanding the "Create New Numbering Domain" section, then typing in a name for the new domain and selecting a domain type.
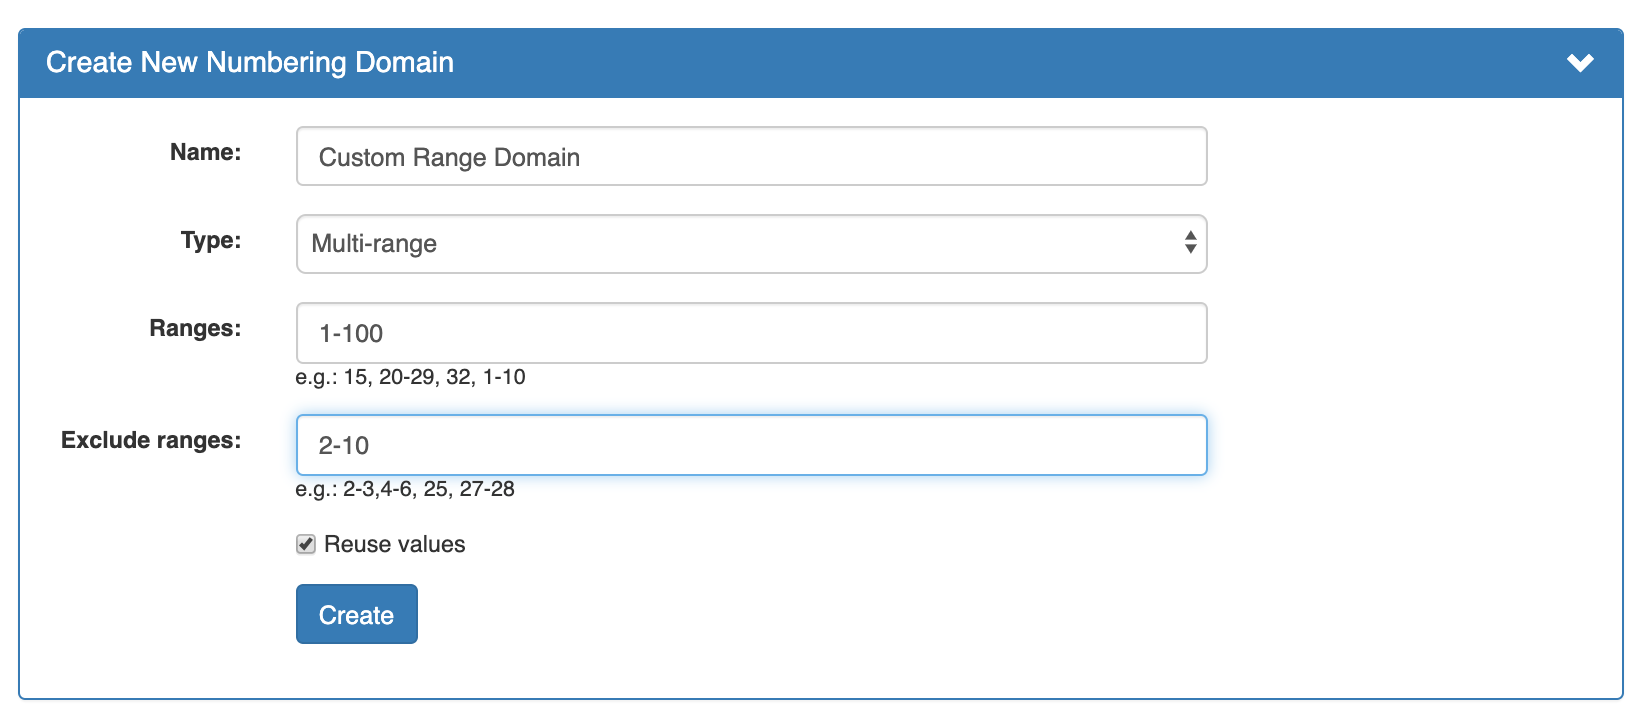
Enter information for the specific domain type, if necessary, and select whether to allow number reuse. When done, click "Create".
Number Domain Actions
Once a numbering domain is created, you may perform the following actions:
Get Next Value:
Gets the next value in the domain, adds it to the list of used domain values (assigns to the domain), and displays that value to the user.
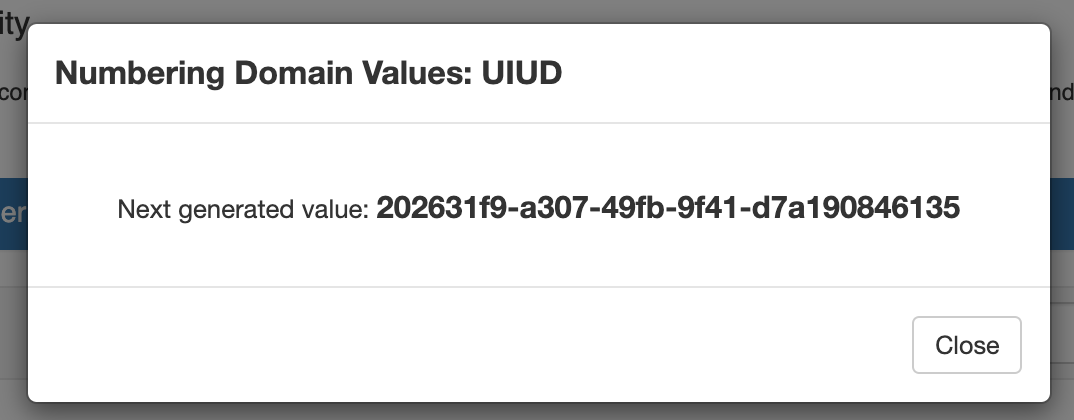
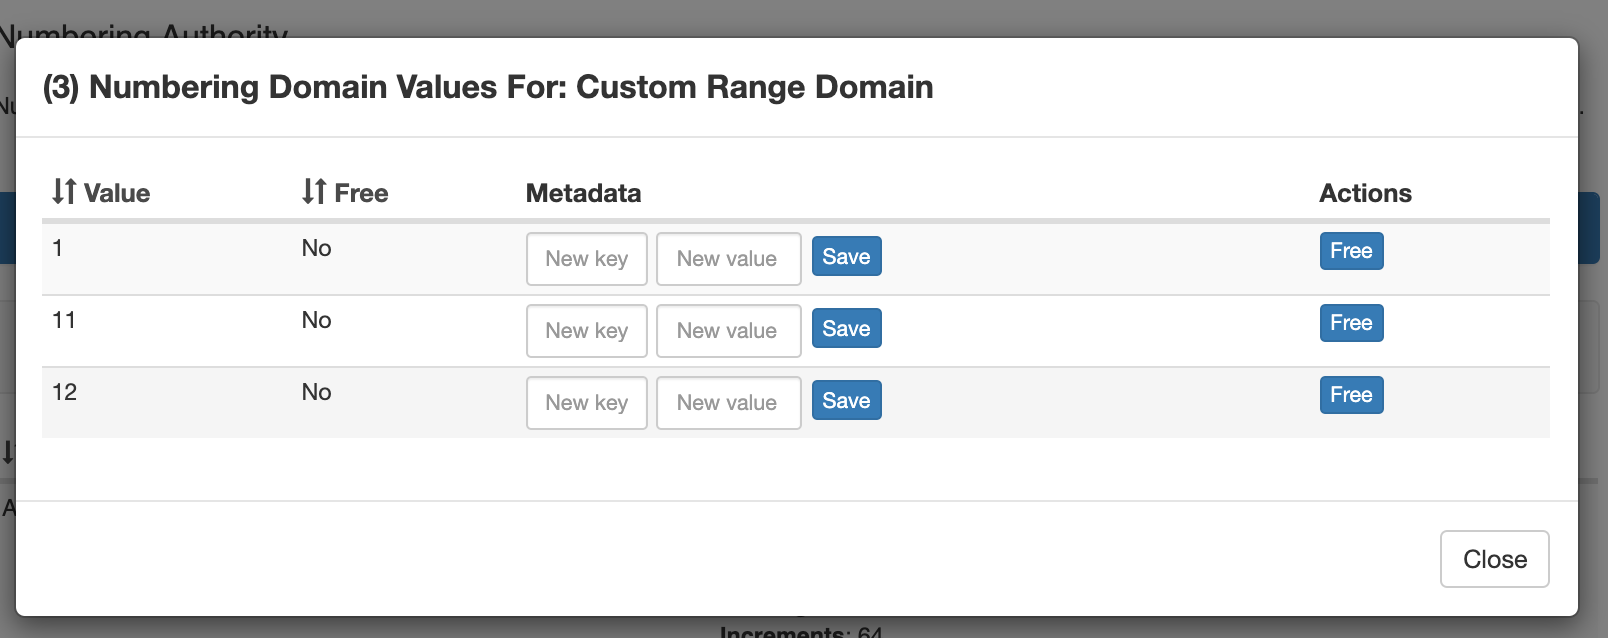
View Assigned Values:
View values that are assigned to the domain, view used/free status, free assigned blocks, and save key-value metadata to values.
-
Sort by Value and Free/Used values by clicking the column names
-
To add metadata to a value, enter your information into the "Key" and "Value" fields under Metadata, then click "Save".
-
Free a value for reuse, if allowed, by clicking "Free" under the value Actions column.
Delete:
Deletes the numbering domain.
IPAM IPv6 Sparse Allocation
IM/CFR - 3322a: Added "Sparse Allocation" assignment for IPv6 blocks
Uses either a manually configured or automatically generated "Sparse Allocate" Numbering Authority domain algorithm to evenly distribute assignments throughout an IPv6 range.
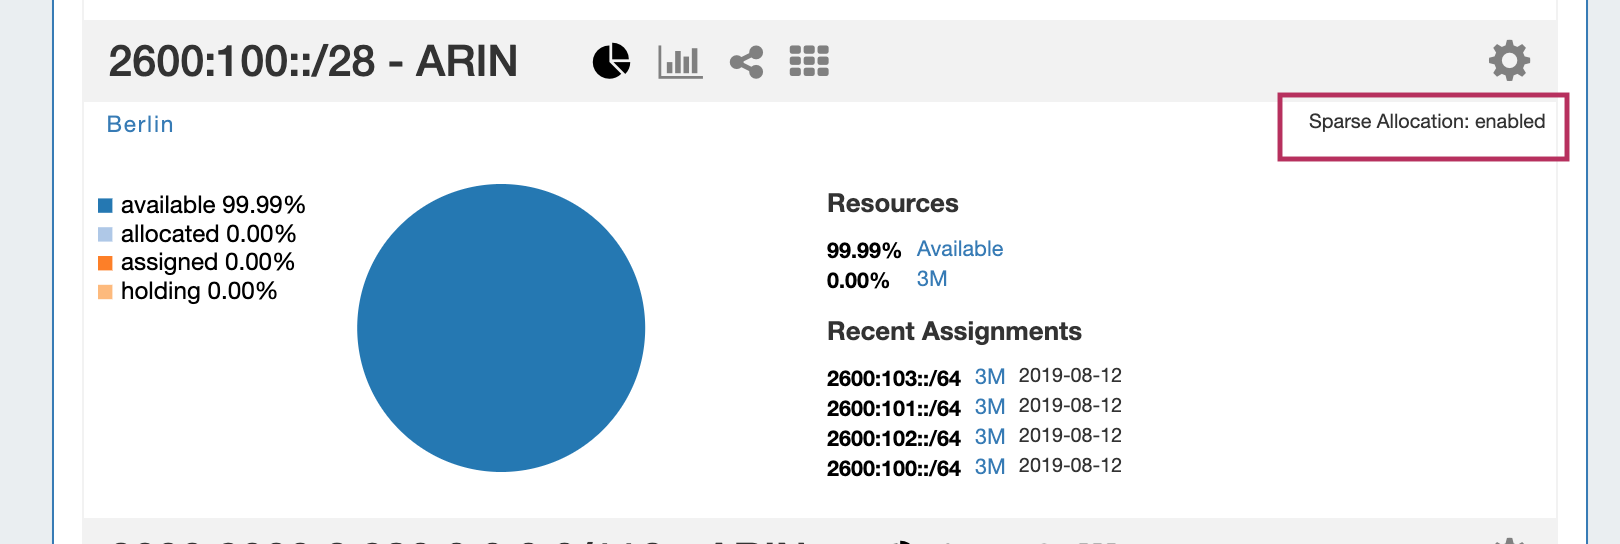
For additional information, see below, or view at Working with IP Aggregates.
Using Sparse Allocation...
Sparse Allocation options are accessed from the IPv6 Aggregate's Action Menu.
From here, you can enable/disable Sparse Allocation for the aggregate, or Sparse allocate assign the next generated IP block.
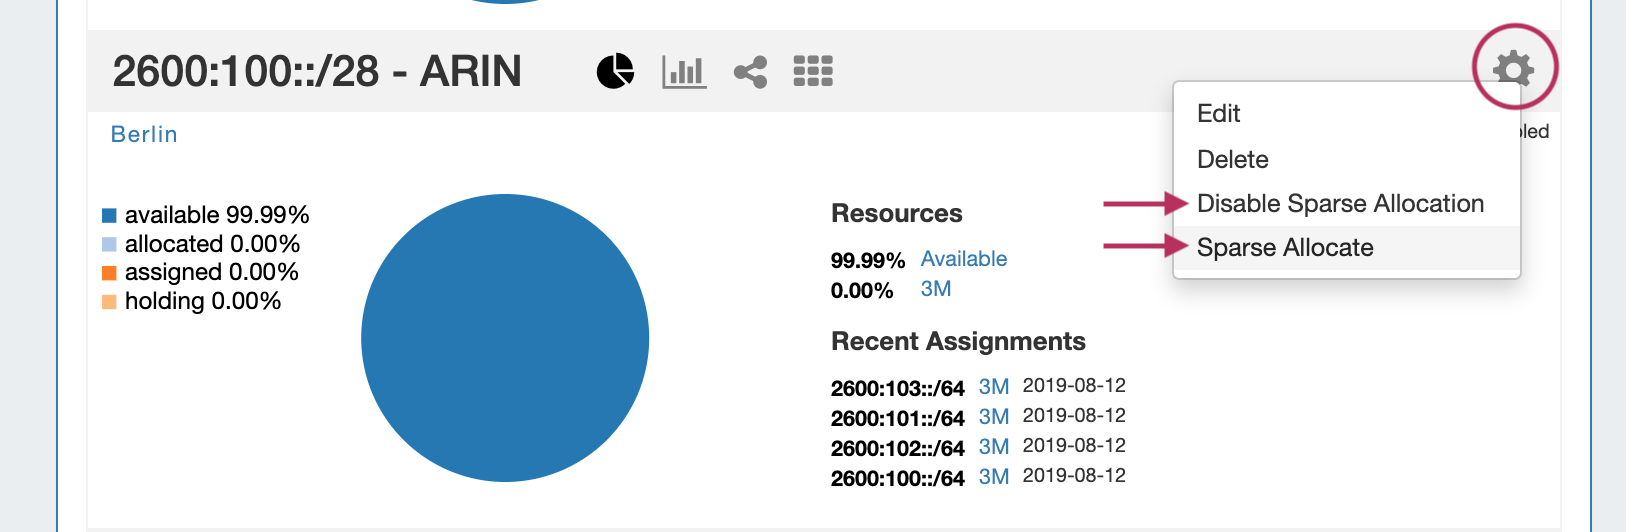
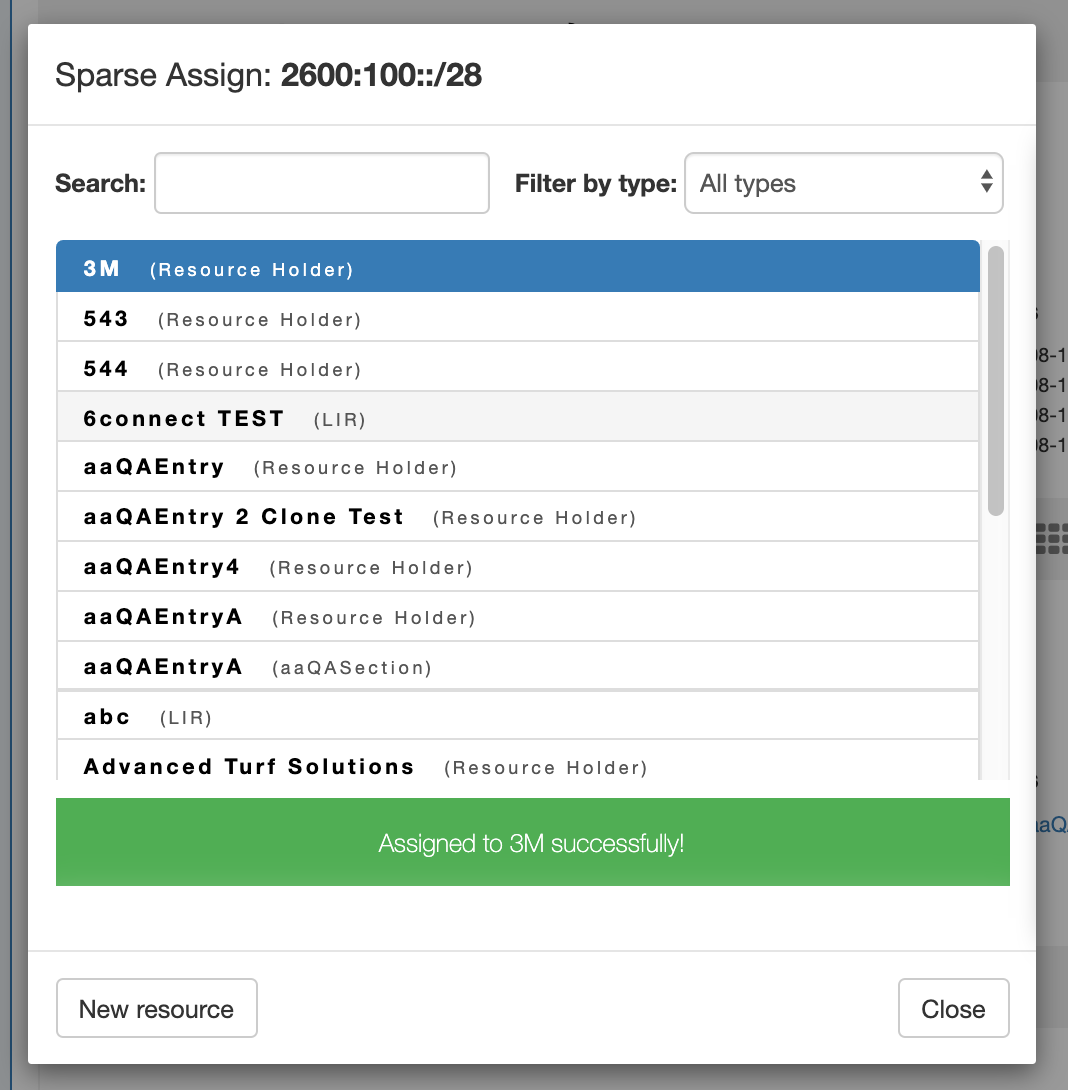
Assign the next IP generated by selecting "Sparse Allocate".
Then, select the resource to assign (or create a new one) and click "Assign".
Resource Field Gadget
IM - 3347: Added the "Resource Field Gadget"
The Field Gadget displays the information fields available for the Section and specific Resource that is being viewed.
Users may add enabled fields to the resource, edit field values, and remove fields from the Resource through this Gadget. Field values in this Gadget (such as Hostname, Username, and Password, among others) may also be used by other Resource Gadgets and Provision modules. This Gadget replaces field edit functions previously performed via "Edit Resource".
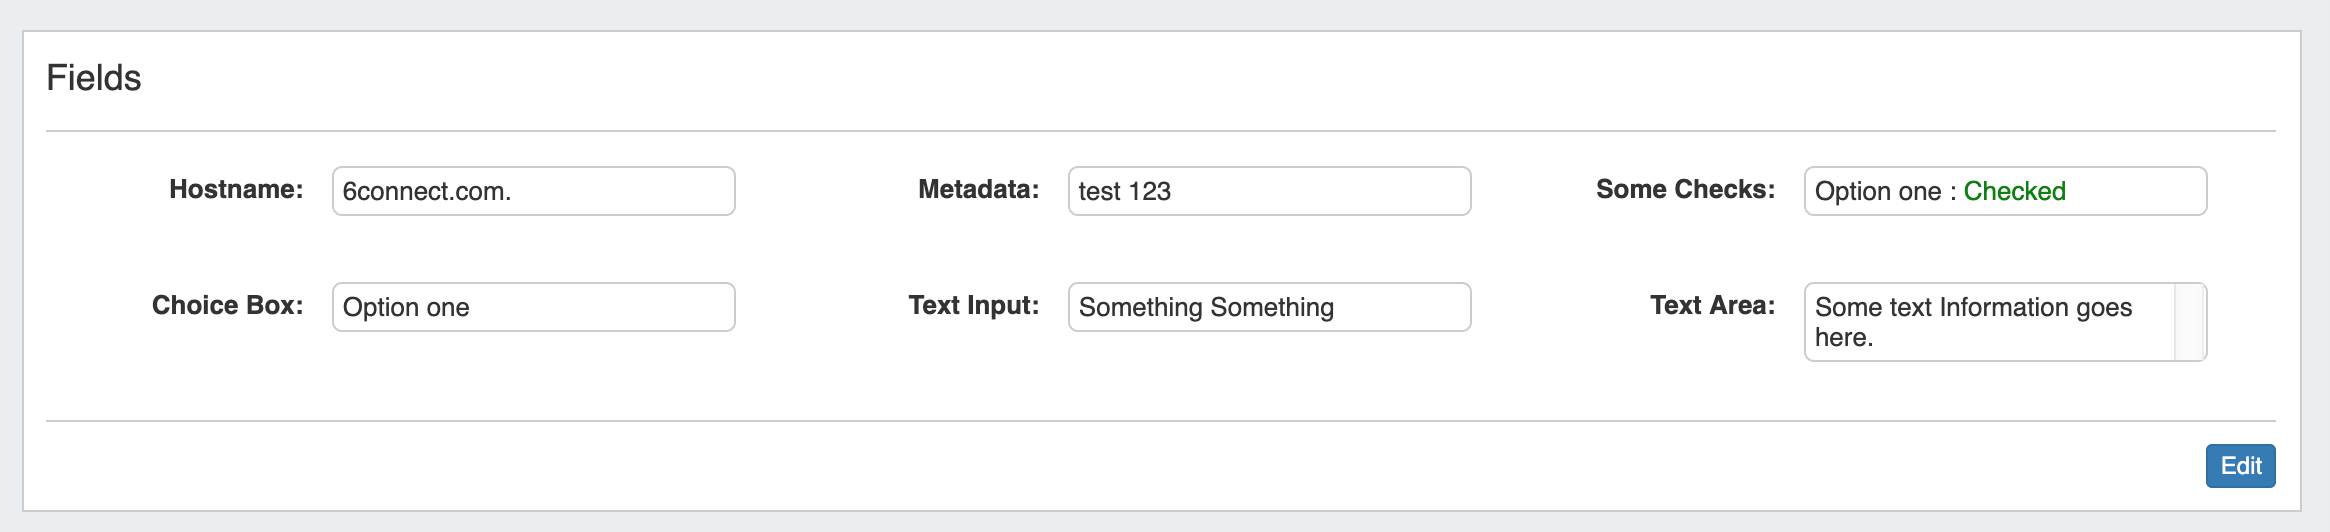
For additional information, see below, or view at Gadgets.
Click to view enabled Section Fields...
Before You Begin
Fields must be enabled and added to the Resource's Section before they can be used in the Field Gadget.
Fields enabled in a Section (pictured below) will be available to add to the Field Gadget for any Resource of that Section.
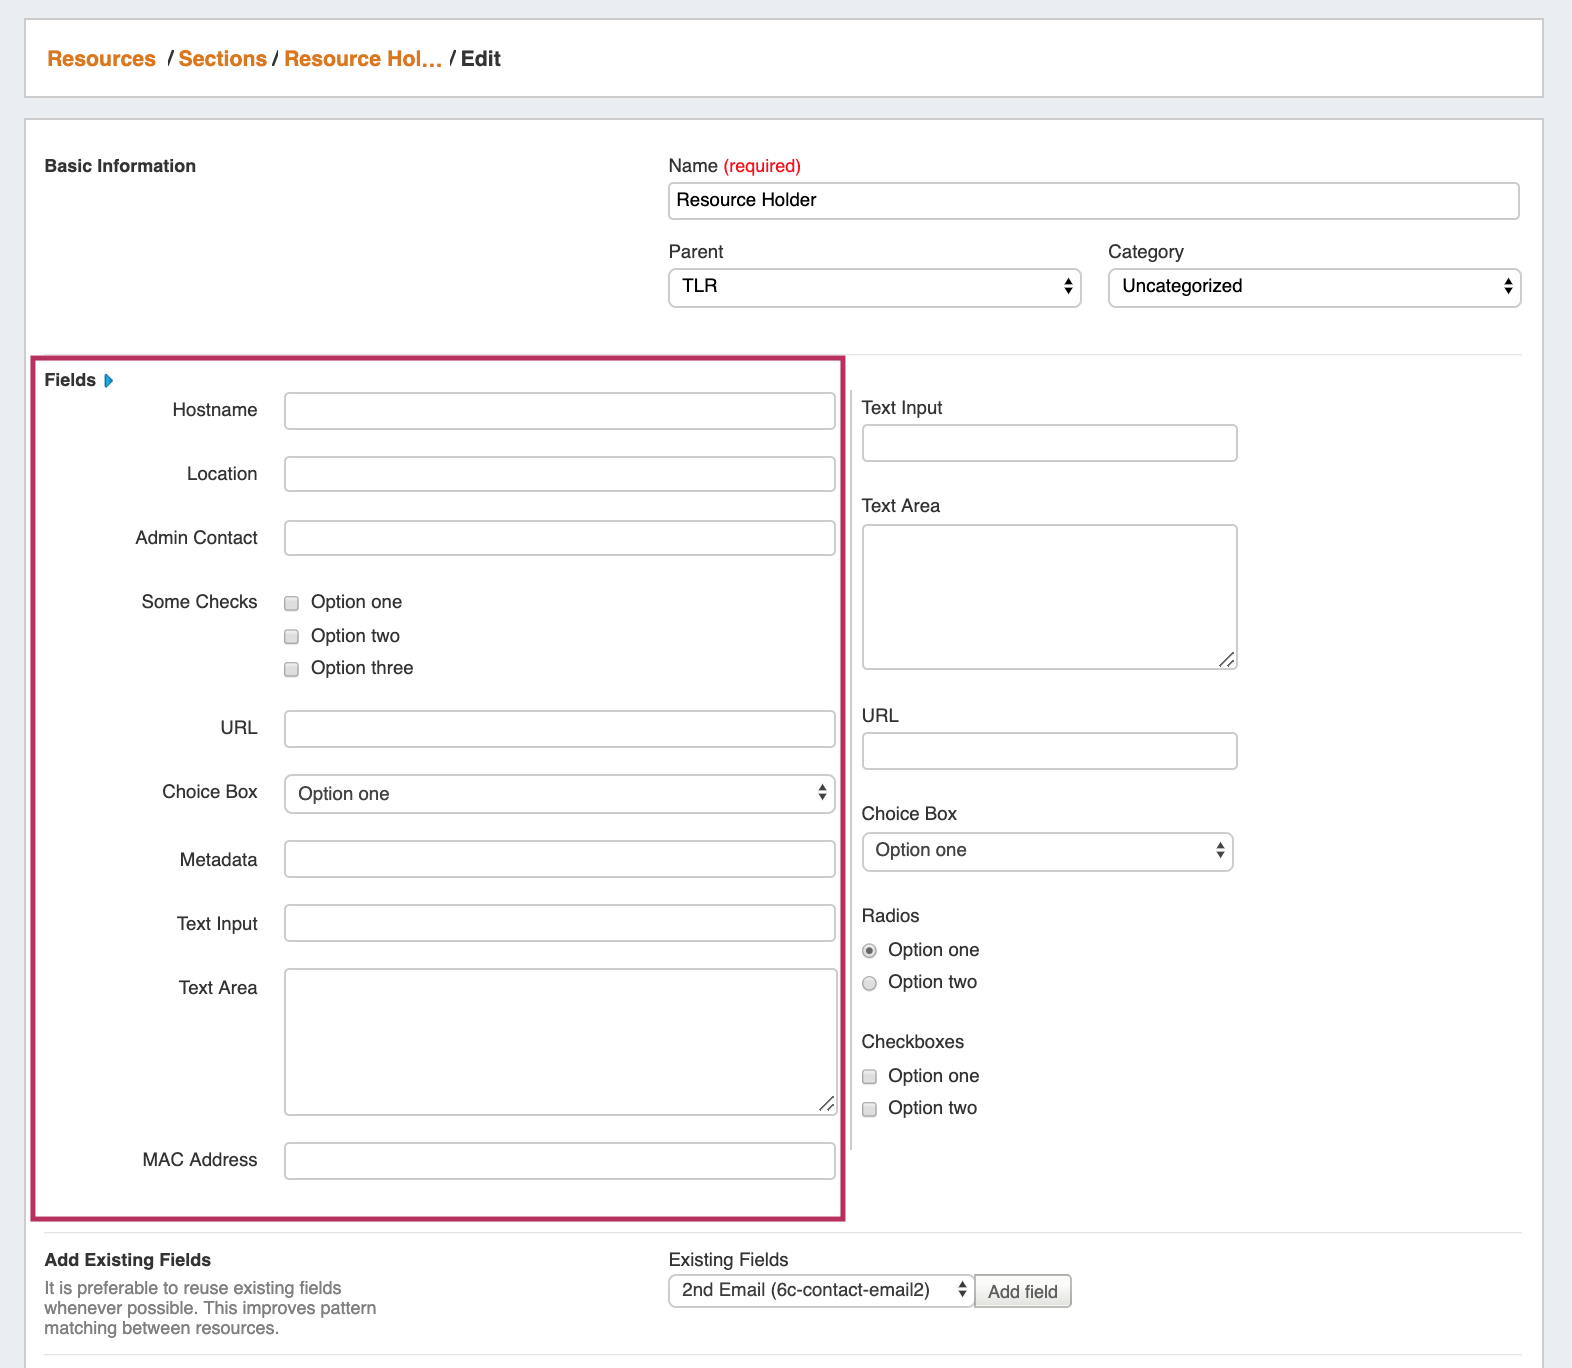
Working with the Field Gadget
Once fields have been enabled for a Section, they will be available to select in the "Add New Field" dropdown.
To Add fields, click the "Edit" Button at the bottom right corner of the Field Gadget.
Then, next to "Add New Field:", select one of the available fields from the dropdown, and click "Add".
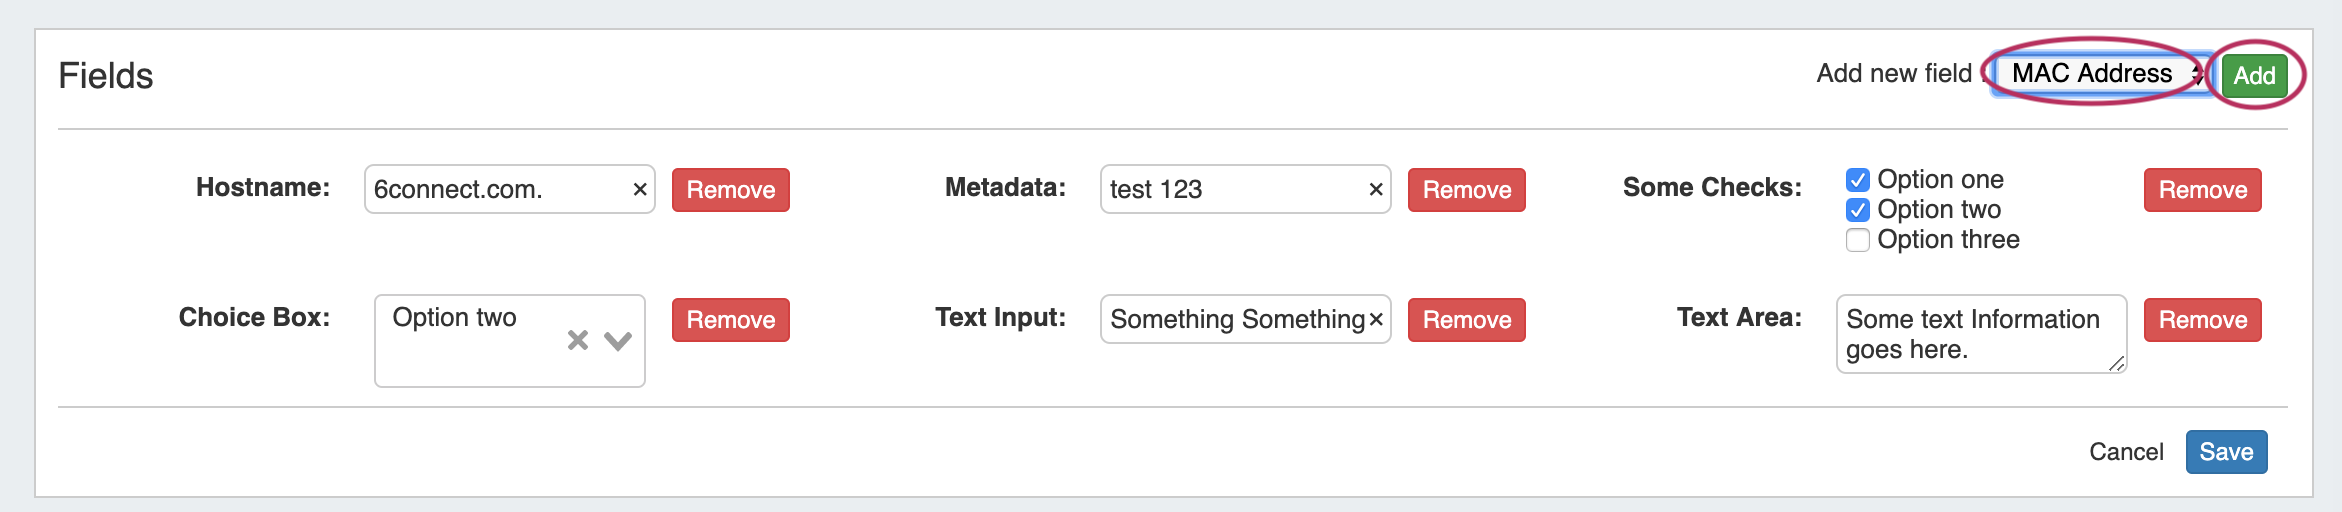
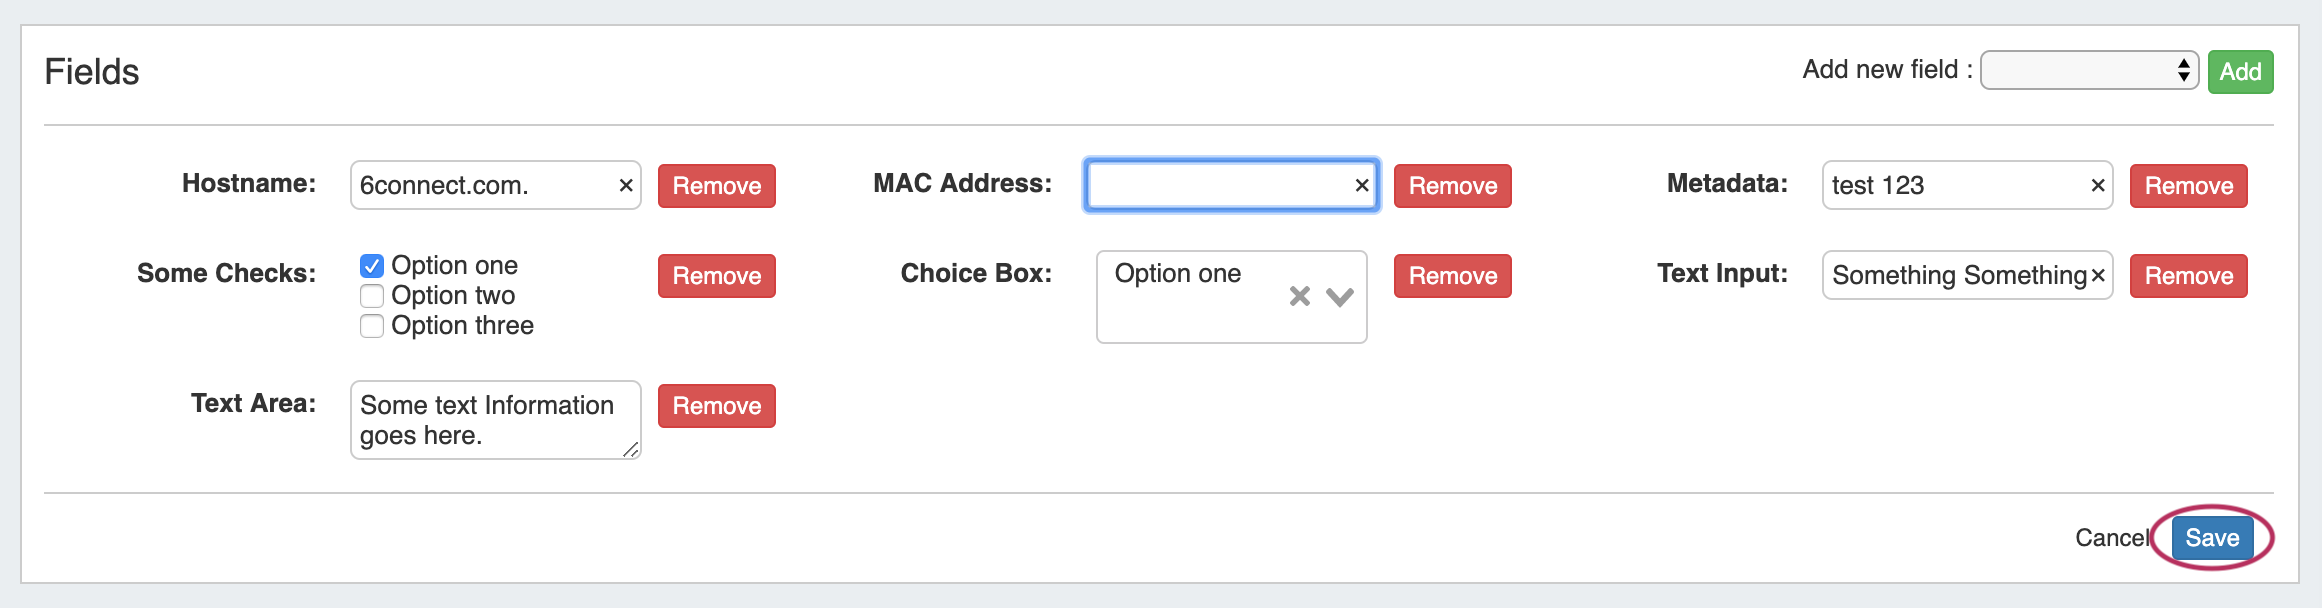
Once added, the field will be available to edit or remove. Edit field value(s) as desired, then click "Save".
DNS Records List
CFR - 151: Added a new DNS Records sub-tab under the DNS Tab
The DNS Records sub-tab provides a global list records for expedited searching, filtering, adding, and editing of DNS Records.
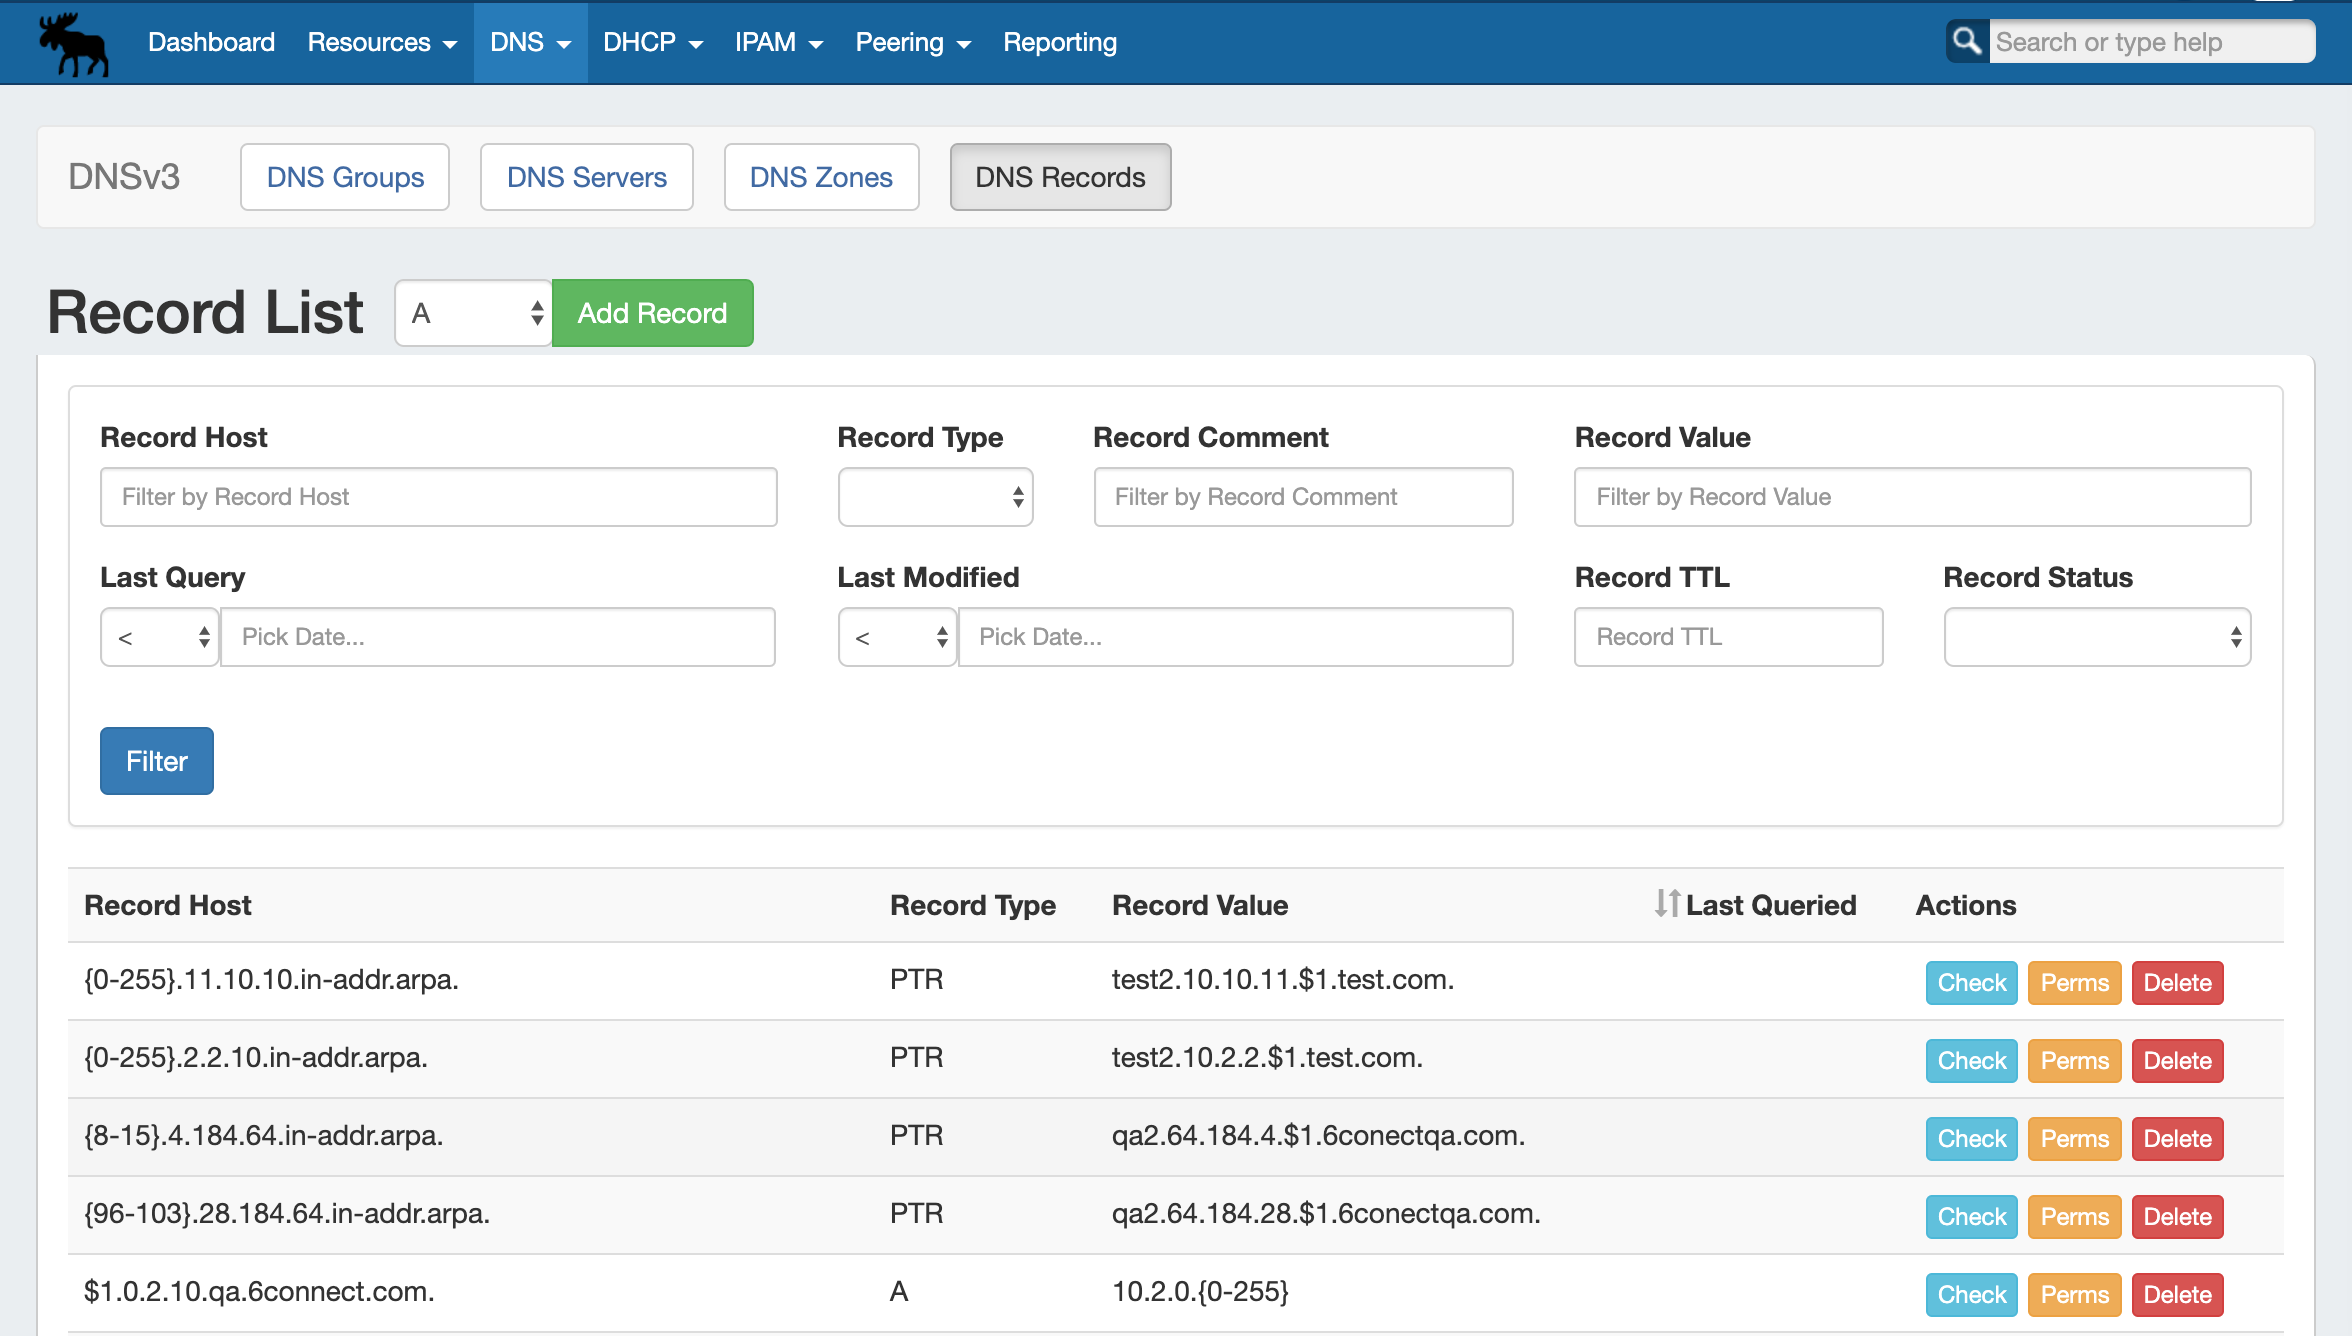
For additional information, see below, or view at Working with DNS Records.
The DNS Records List...
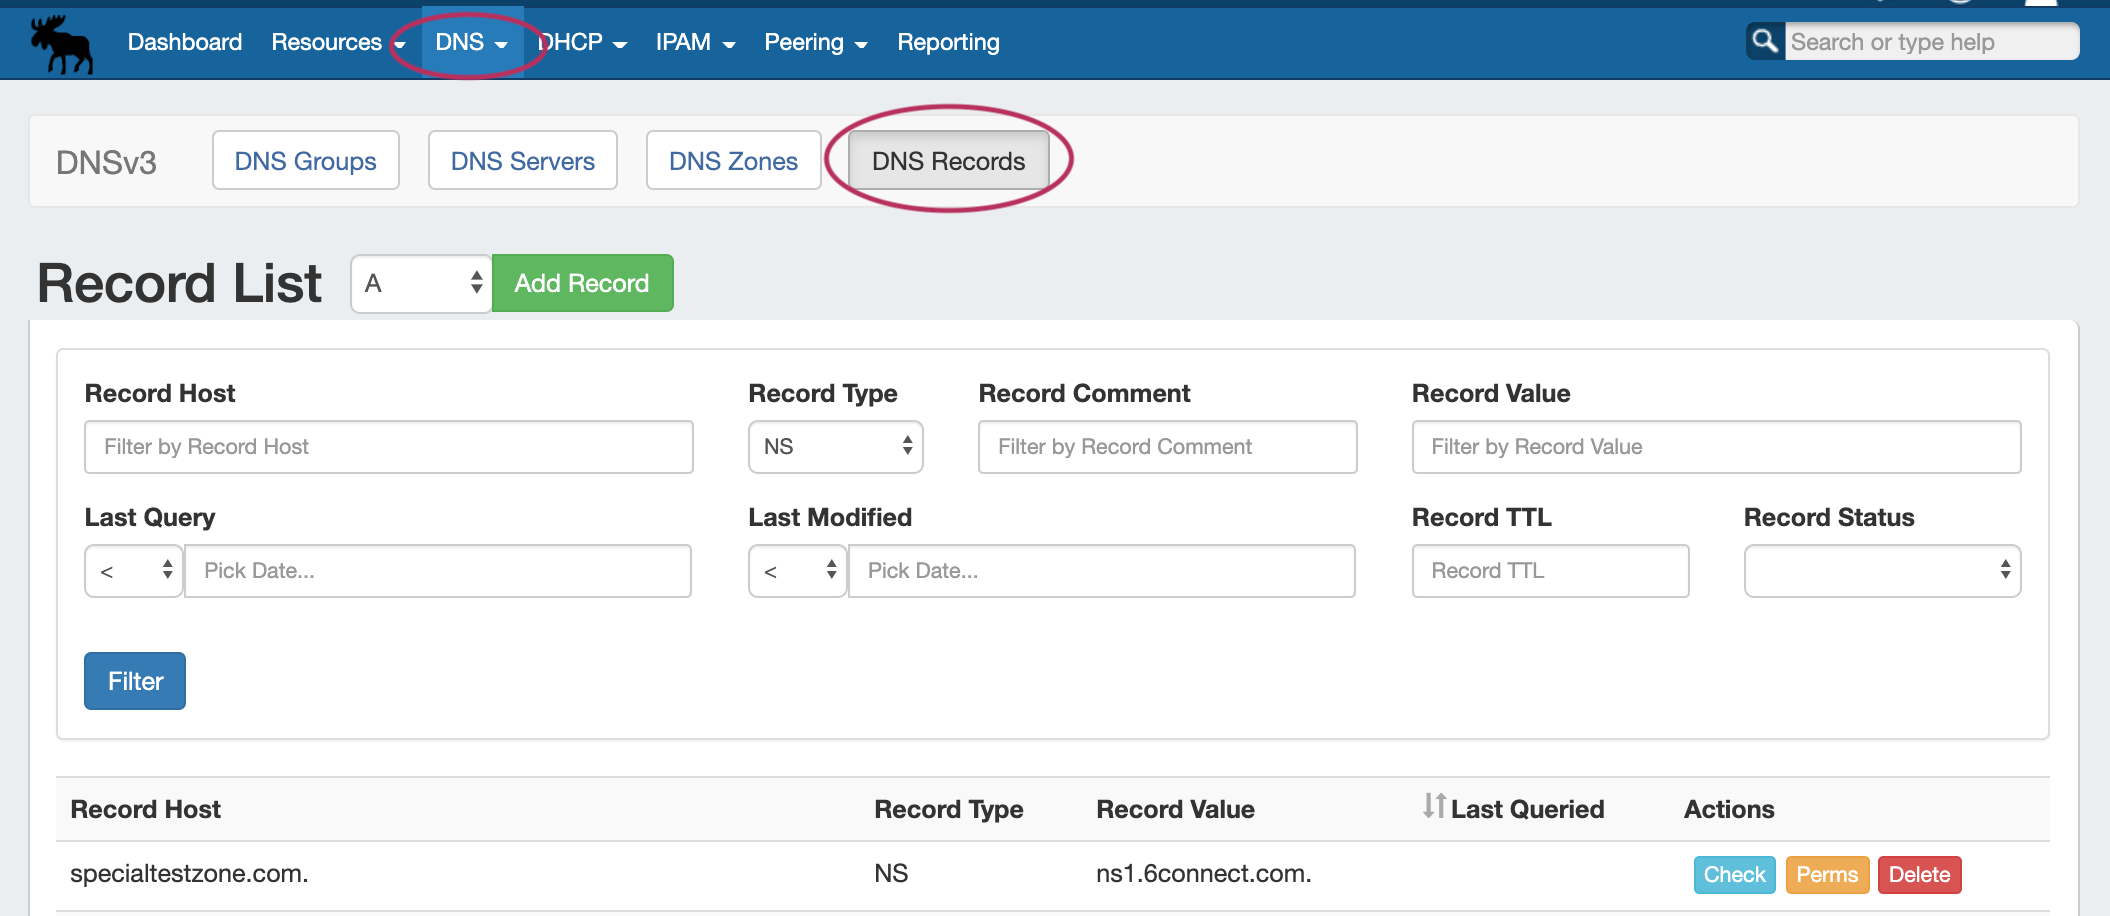
From the DNS Tab, click on the "DNS Records" sub-tab button, or select it from the DNS dropdown menu.
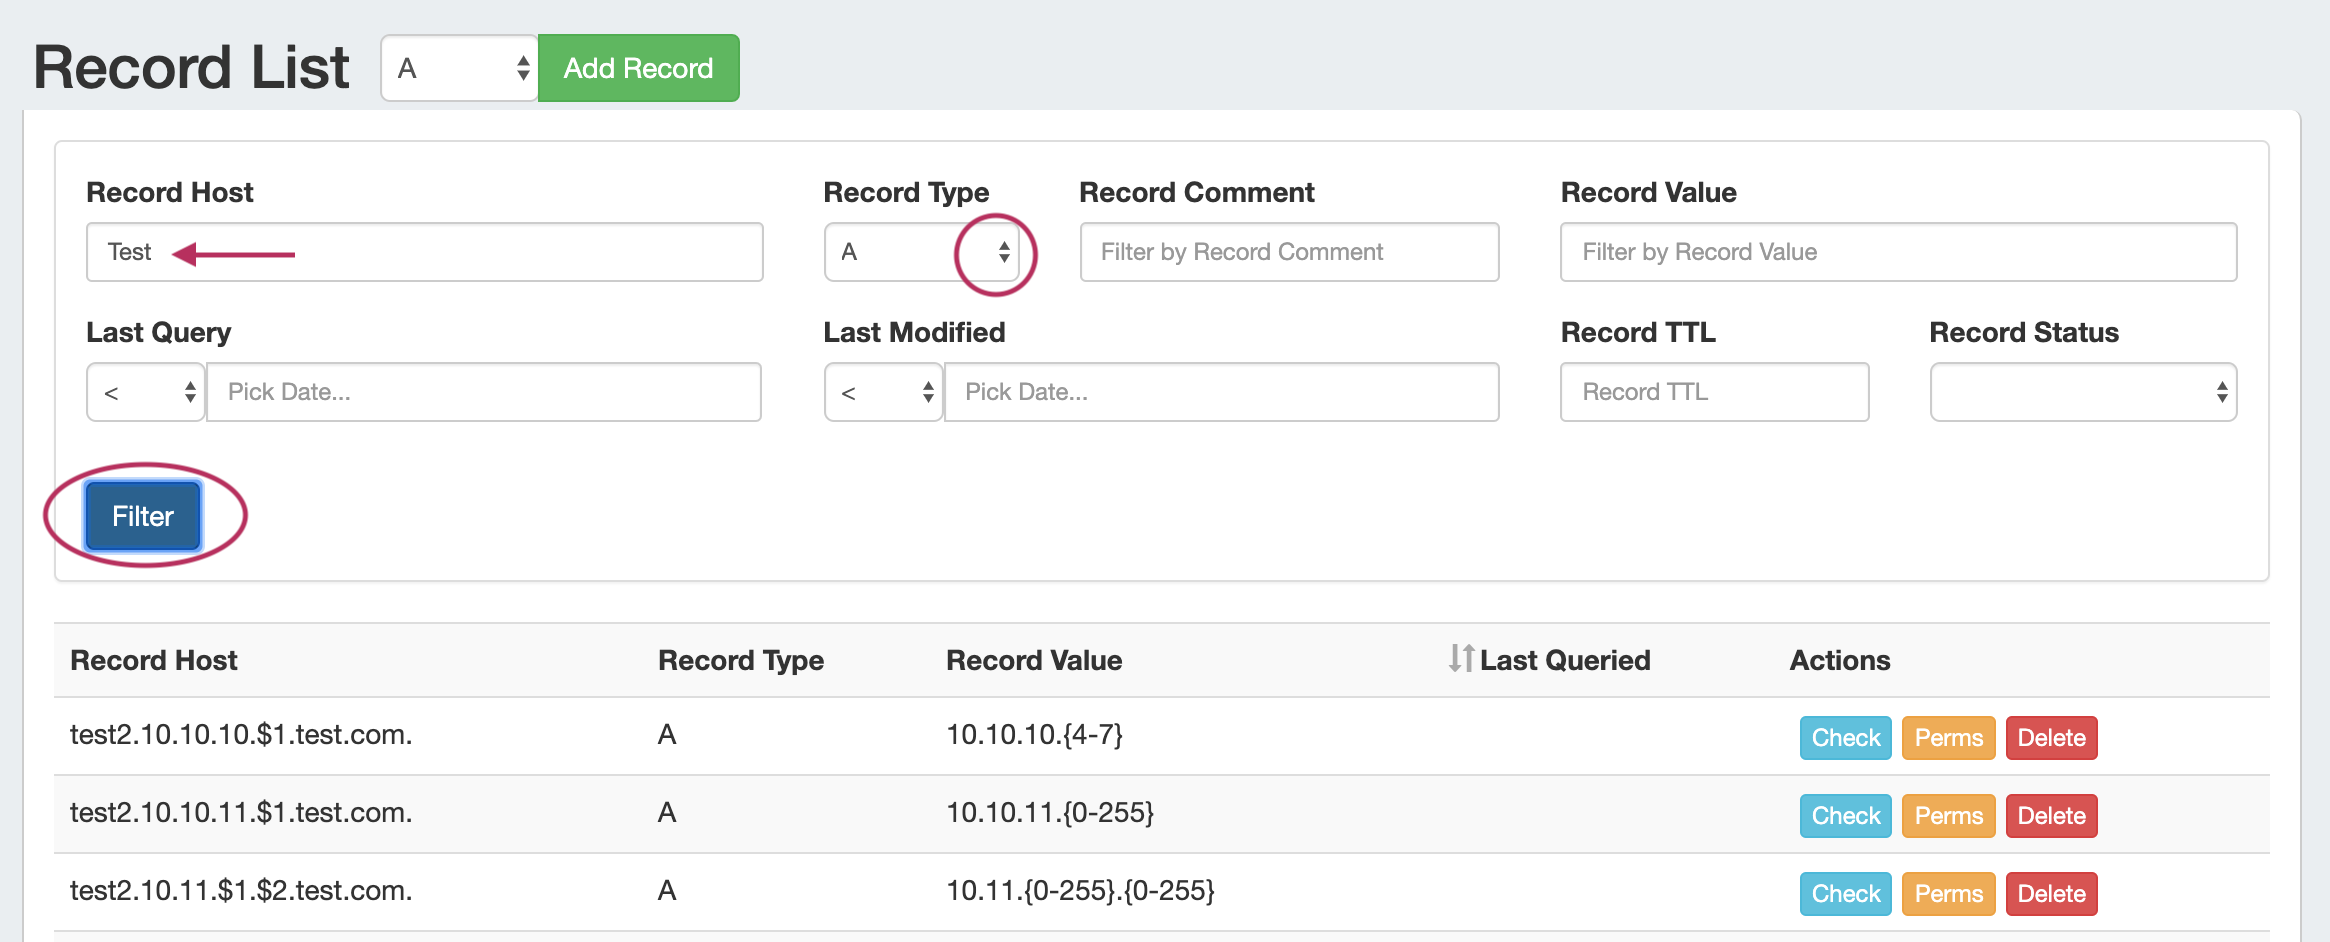
All DNS records available in ProVision displays in a single Record List, along with Host, Type, Value, and Last Queried information.
Filter Records
Search for specific records by filtering by Host, Type, Comment, Value, Last Query, Last Modified, Record TTL, or Status.
After entering your filter criteria, click "Filter".
Work with Records
For each record, you may:
-
Click the "Check" button to run an DNS Monitor error check on the record
-
Review or change record permissions by clicking "Perms" (Admin only)
-
Delete the record by clicking "Delete"
-
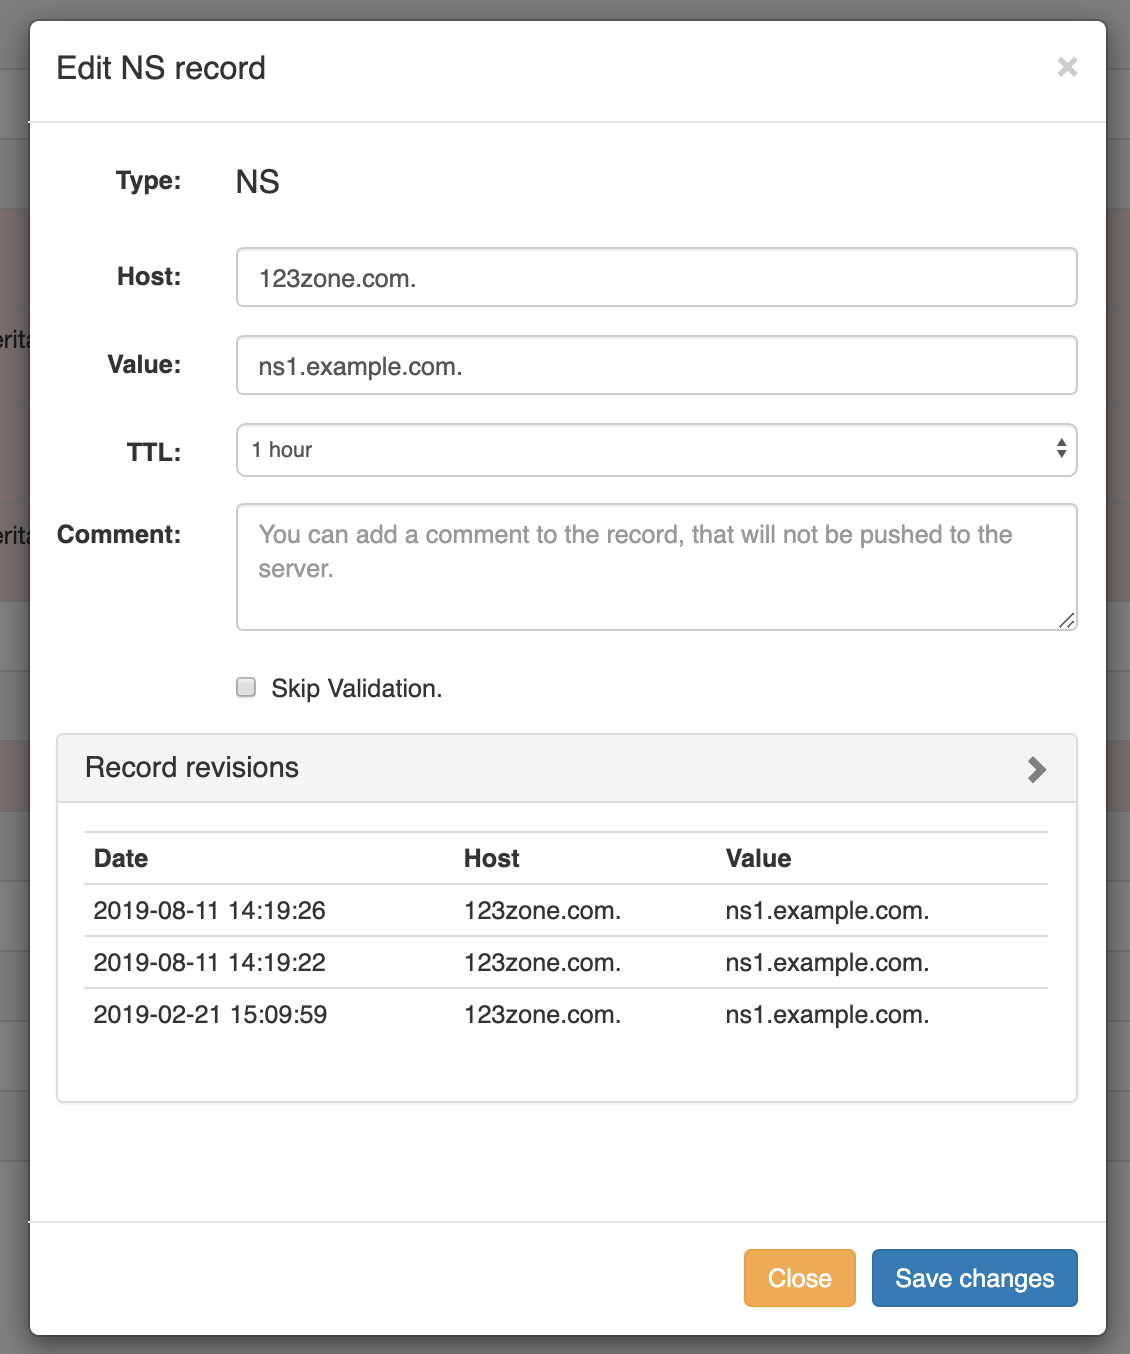
Review or Edit record details by double-clicking on the row for the desired record.
-
Review record revision dates or enter your desired edit, then click "Save changes" to complete.
-
Add a New Record
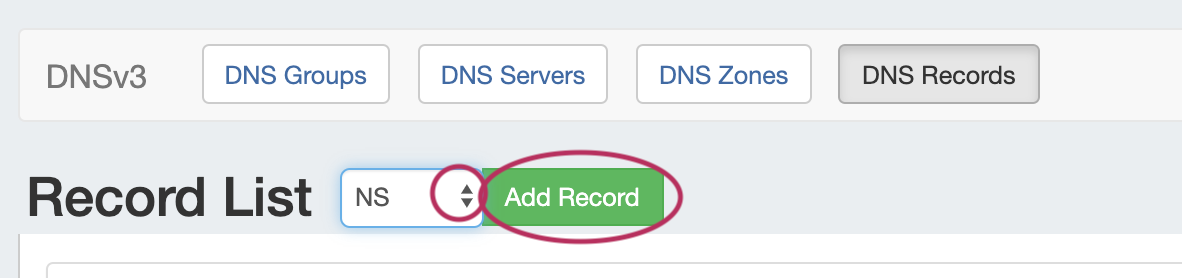
Next to "Record List", select the desired record type, then click "Add Record".
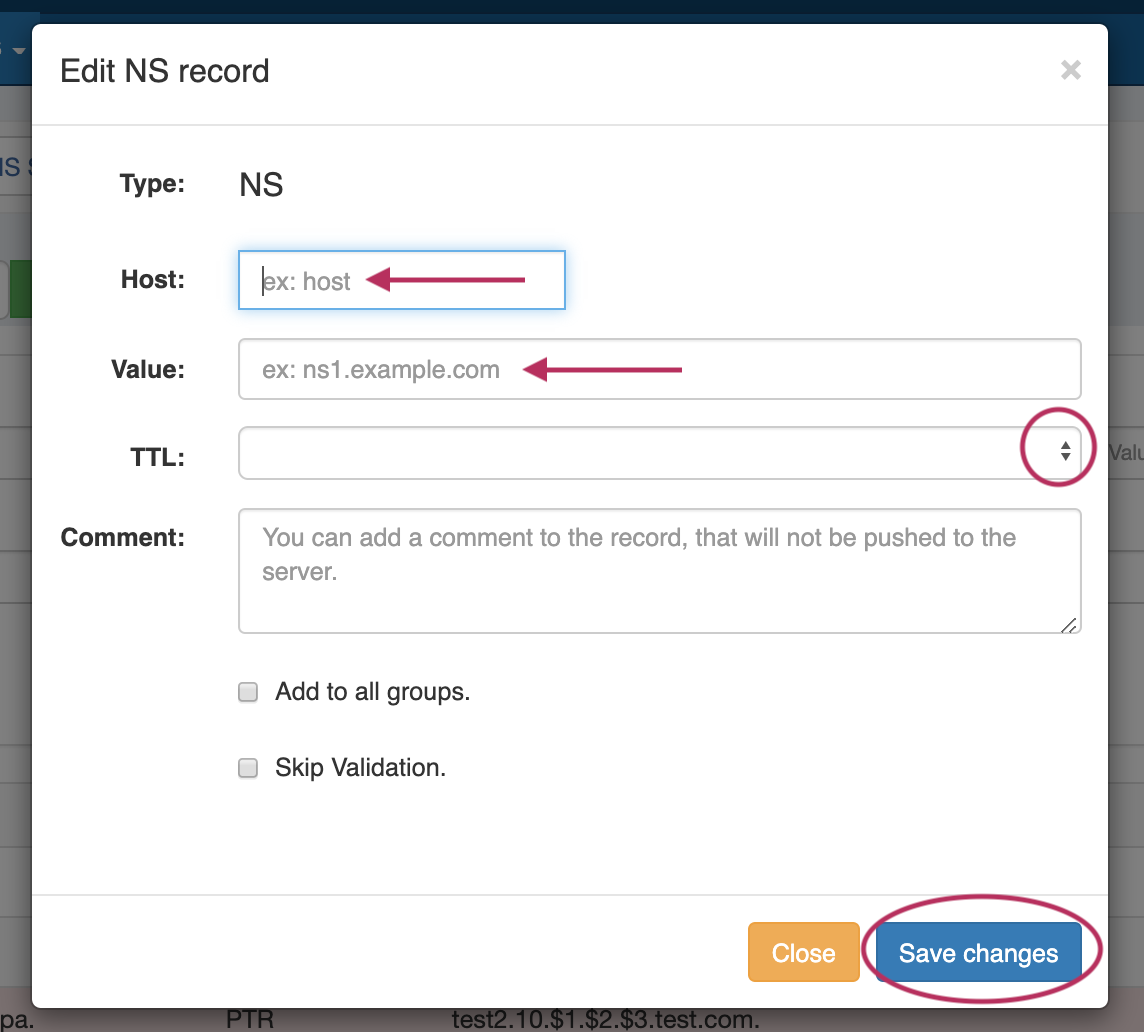
Enter the record information for the record type. When done, click "Save Changes".
Licensing
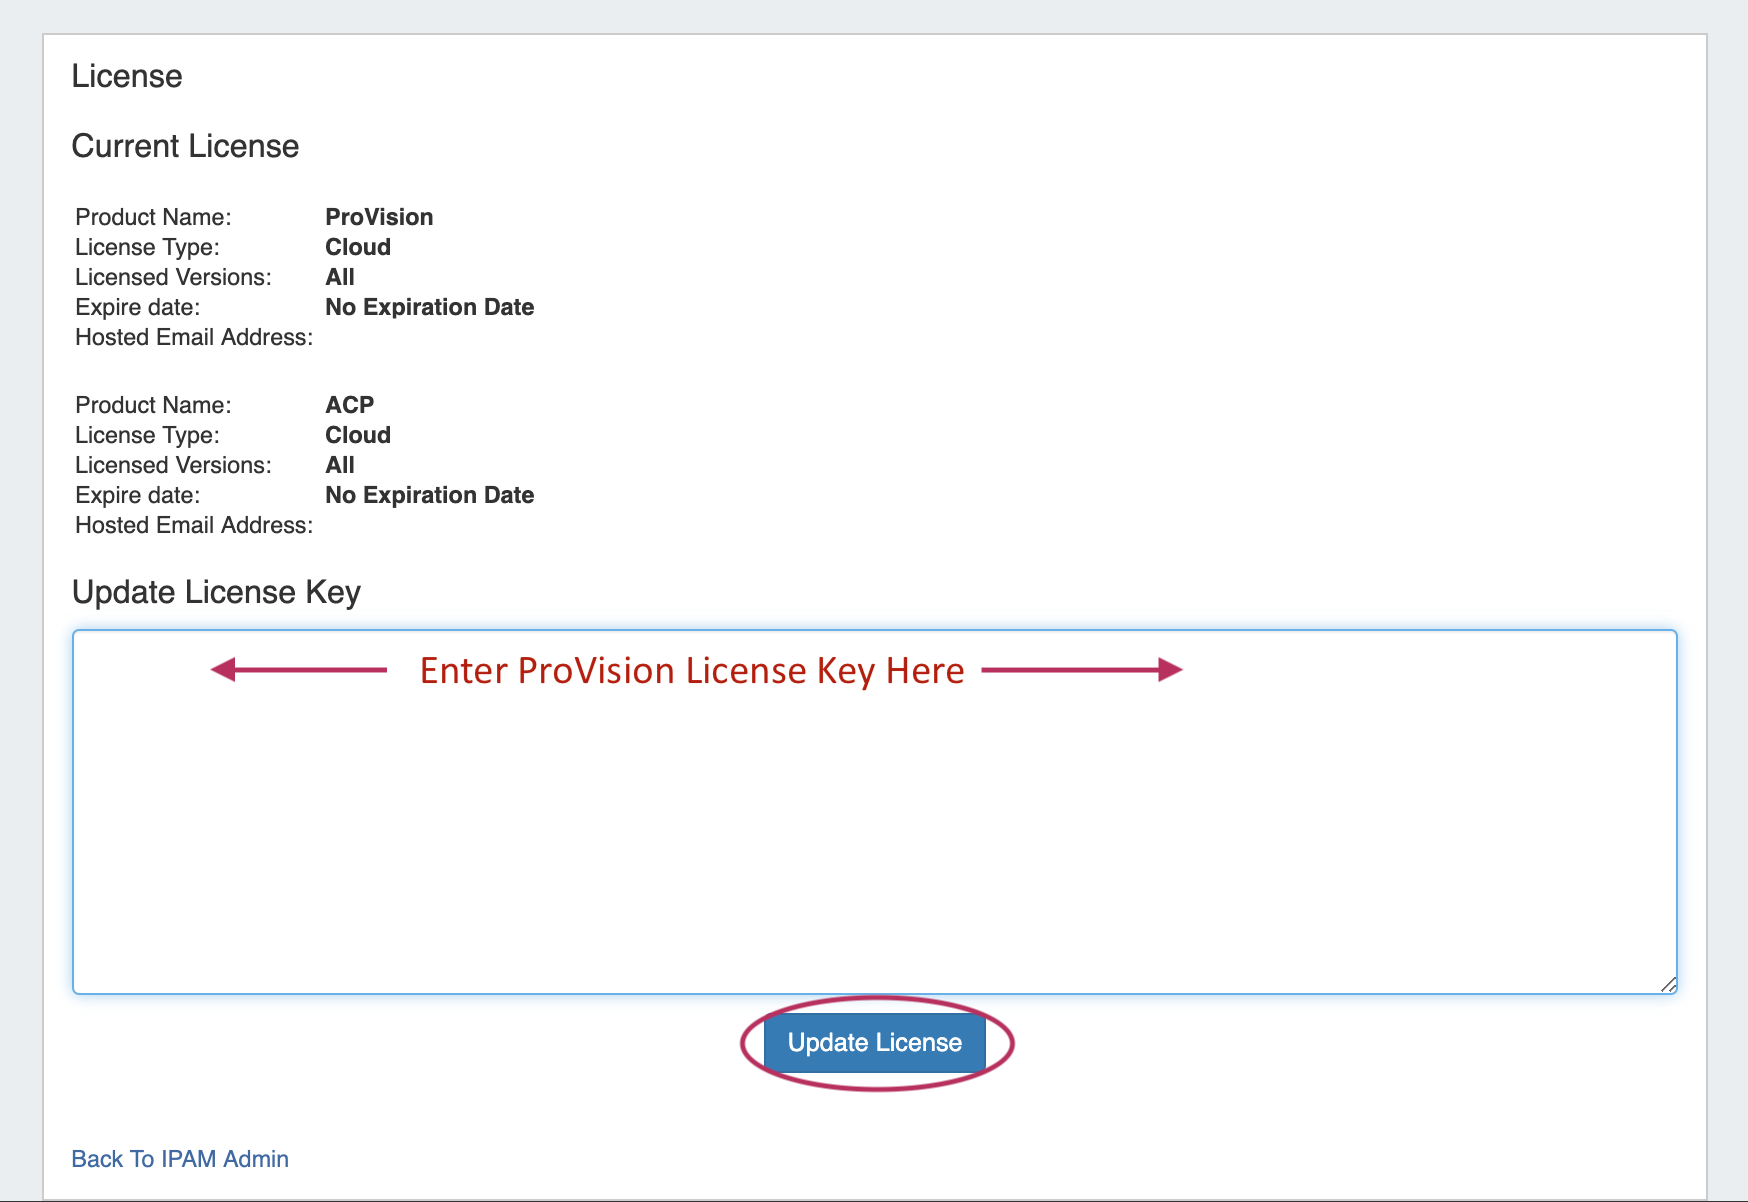
IM - 3356: Added a ProVision Licensing Management Page to Admin Settings
The License page displays current product license details such as Product, Type, Versions, Expiration, Email, and the option to add/update the ProVision License Key(s). See Admin Preferences.
From the Admin Settings page, click "Manage License".

Current license details for ProVision, and other affiliated products will display.
To add/update a License Key, paste the key provided into the "Update License Key" box, and click "Update License".
Additional Features / Improvements
IPAM Improvements
Multiple improvements have been made to the IPAM Manage interface, including:
'Important' Blocks
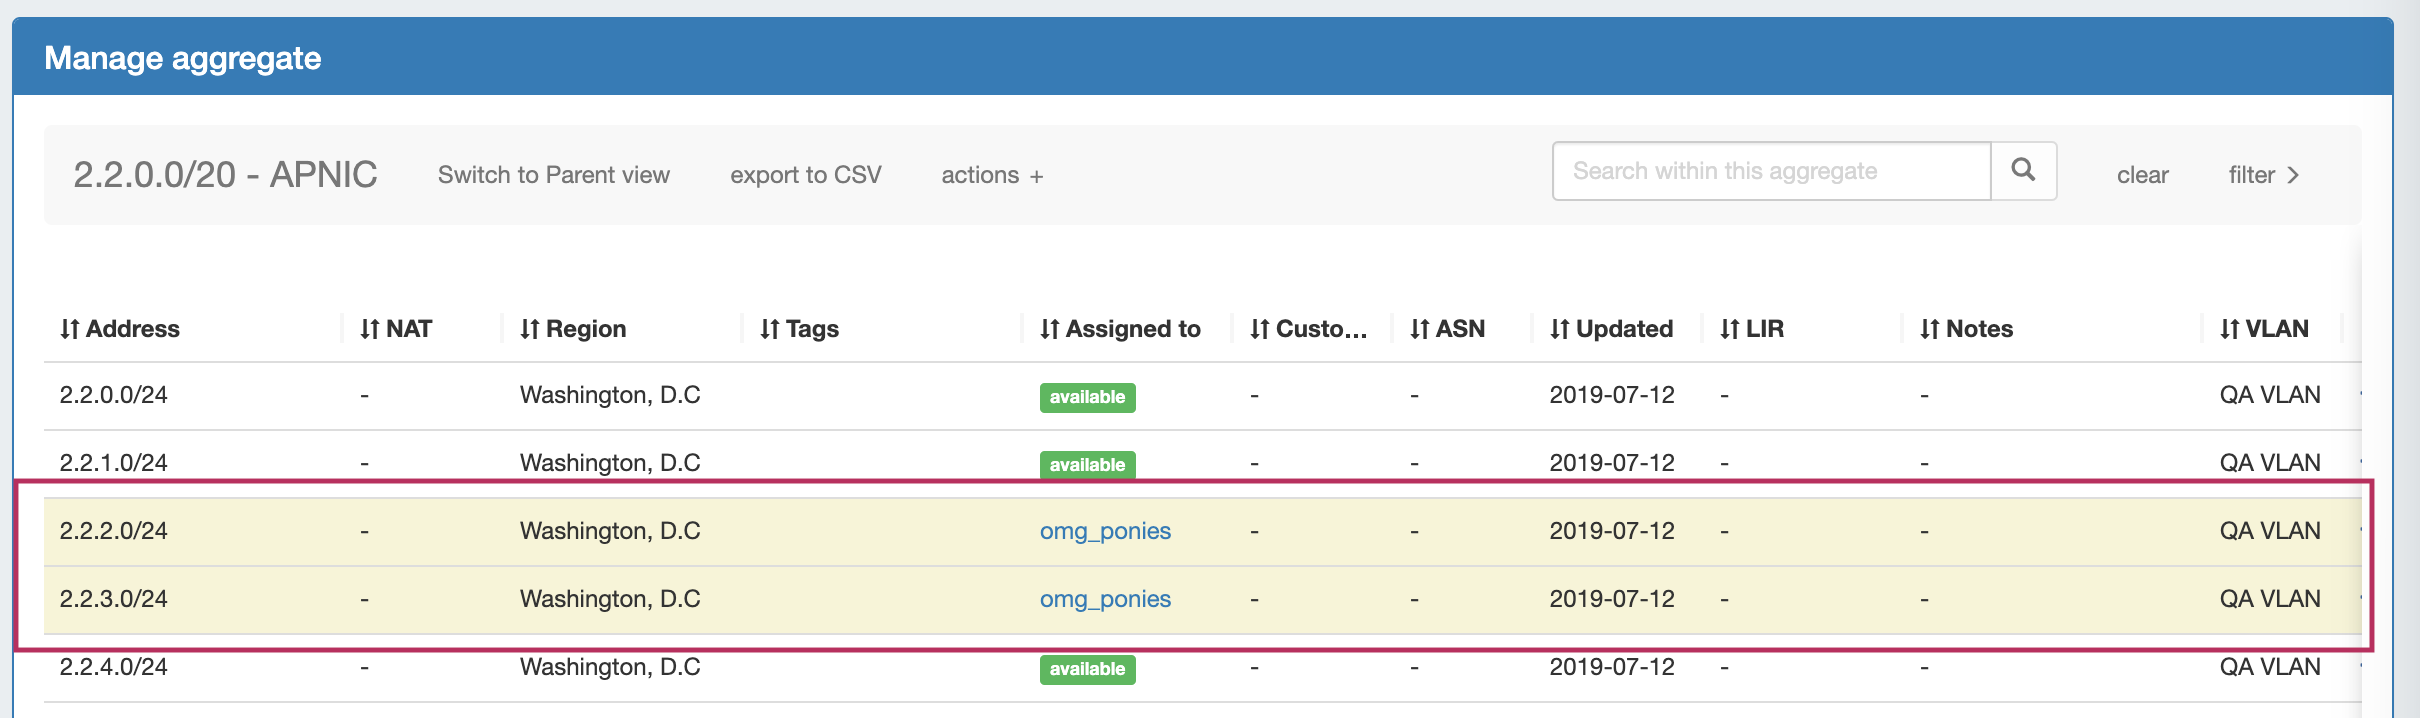
IM/CFR - 3301: Added the ability to mark a block as "Important".
"Important" blocks display with a yellow background highlight. By default, any block that has been manually assigned, unassigned, or other high-level interactions will be automatically marked as "important" . See Working with IP Blocks.
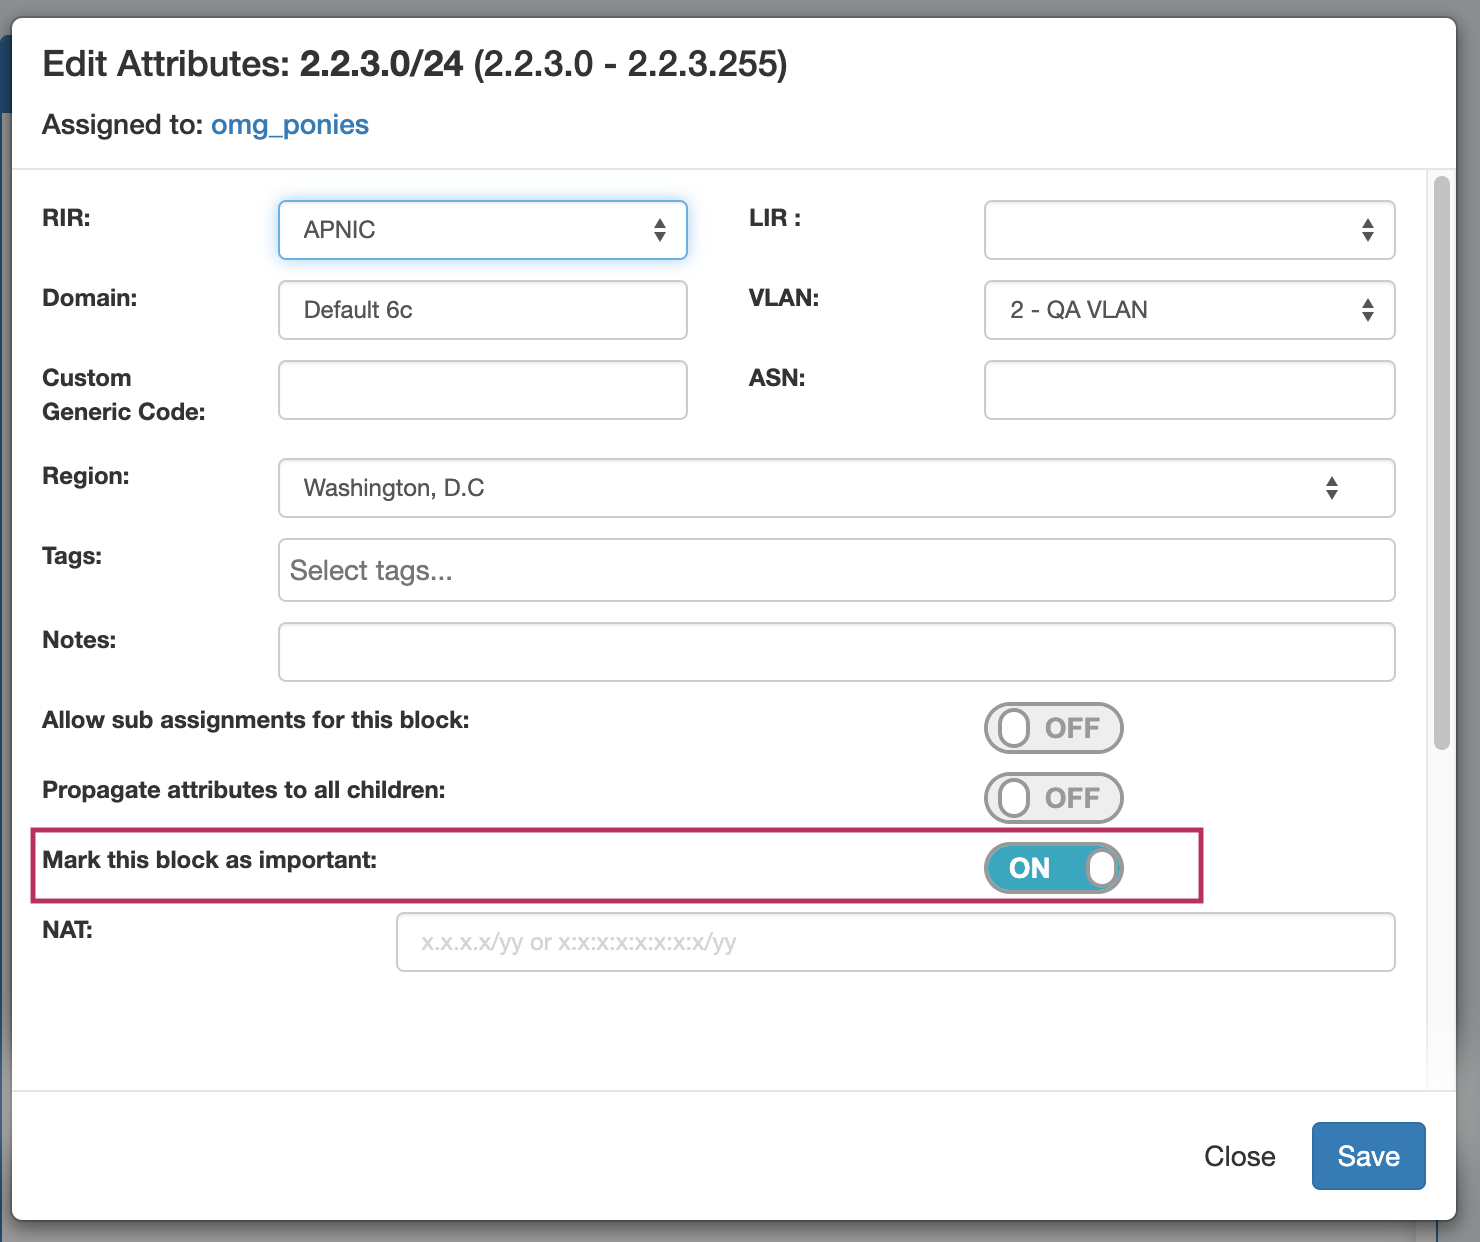
Blocks may be manually marked/unmarked as "Important" from the "Edit Block" interface or API.
Parent View Updates
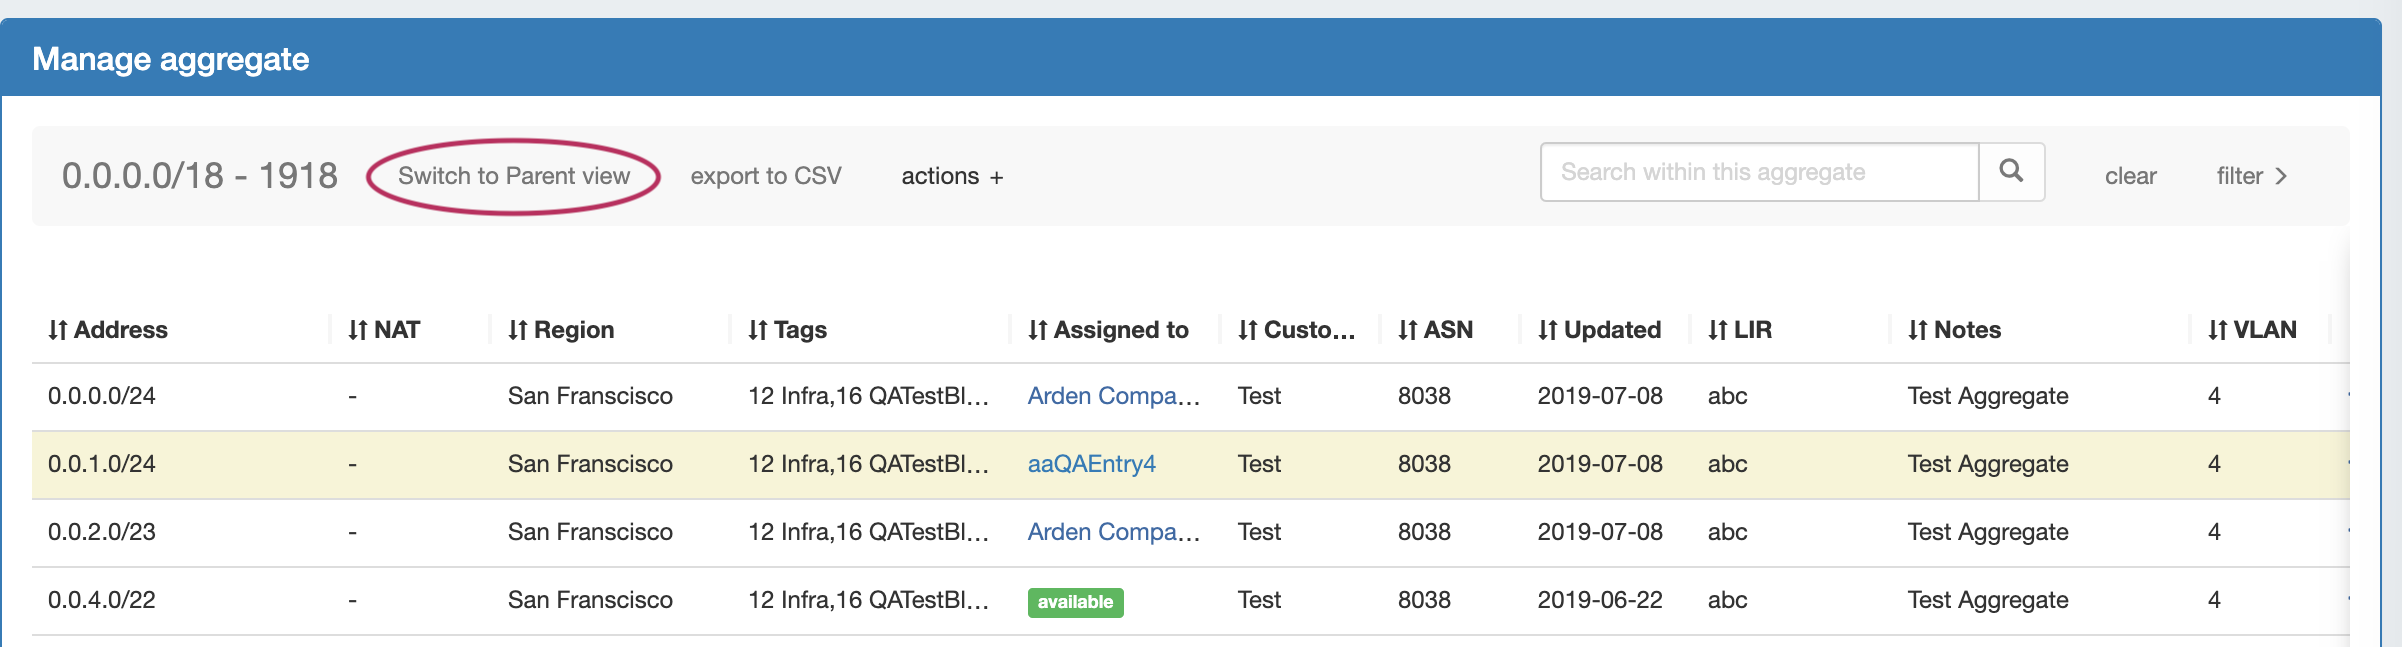
IM - 3308: Added toggle link to "Switch to Parent View" in IPAM Manage
Quickly Toggle back and forth between standard Block View and Parent View, where the parent block is displayed along with access to block tree and child assignment information. See Working with IP Blocks.
IM/ CFR - 3271: Updated the IPAM Manage "Has Children" status to include the associated resource name for the immediate child block.
Parent View now displays the resource assigned to immediate child blocks.

IM - 3307: Added Allocated/ sub-assignable block holders to the IPAM Manage Resource Block Tree.
From Parent View, click on any parent block to view the Block Tree with the assignment, allocated, and subassigned Resources.
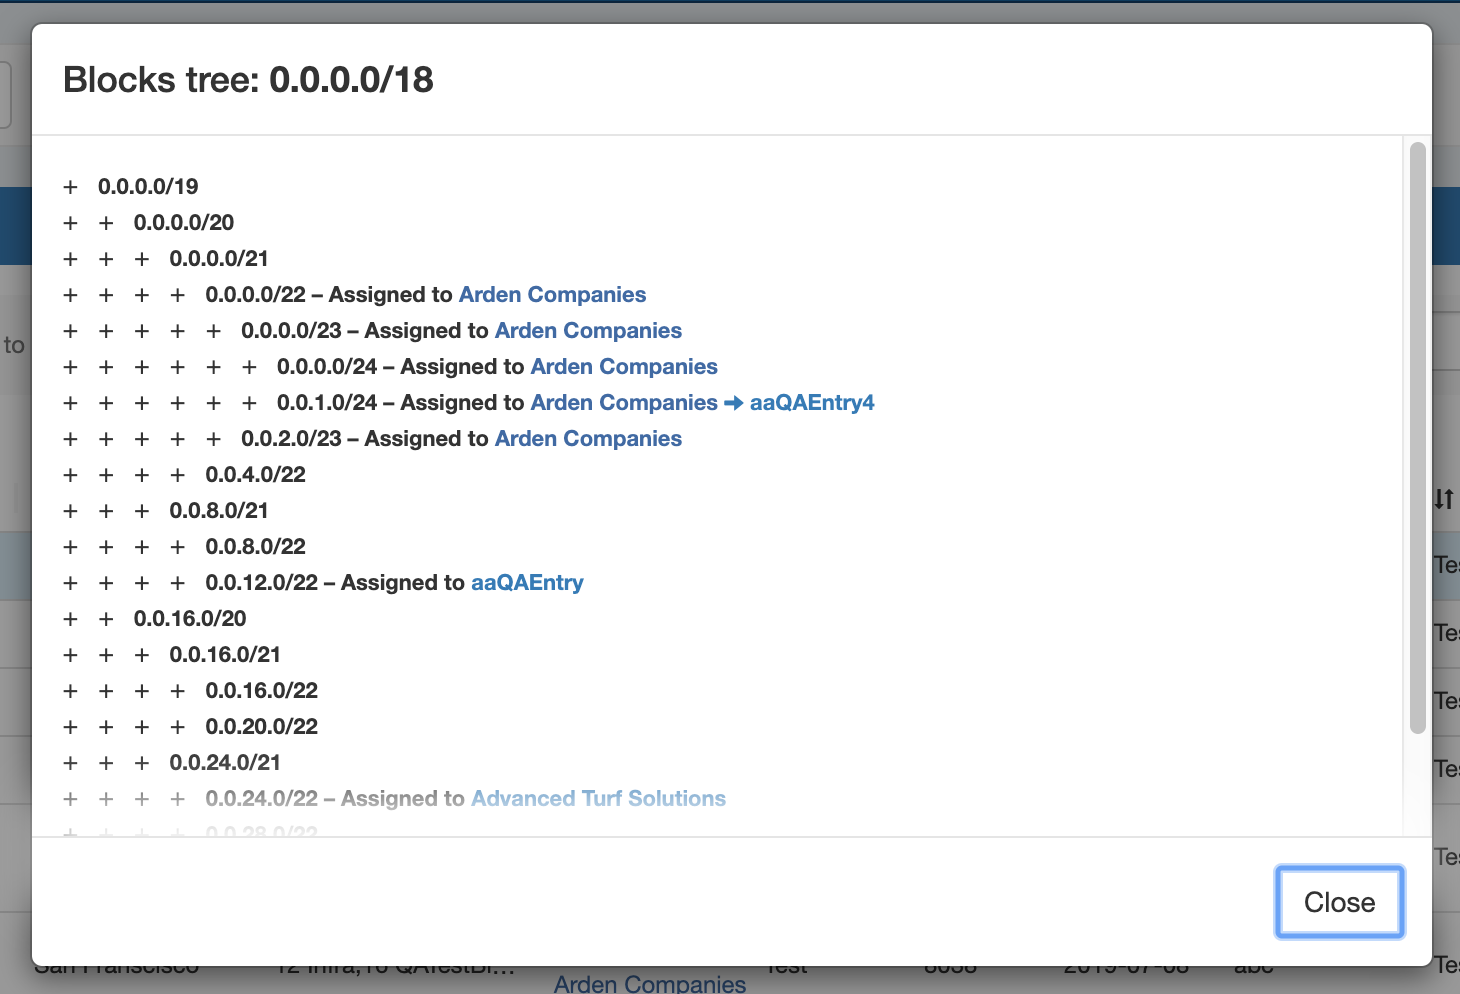
IM / CFR - 3272: Updated text descriptions on the IPAM Manage Auto-Split template
We now help you out by giving examples for "power of 2"!
Approvals Multi-Assign
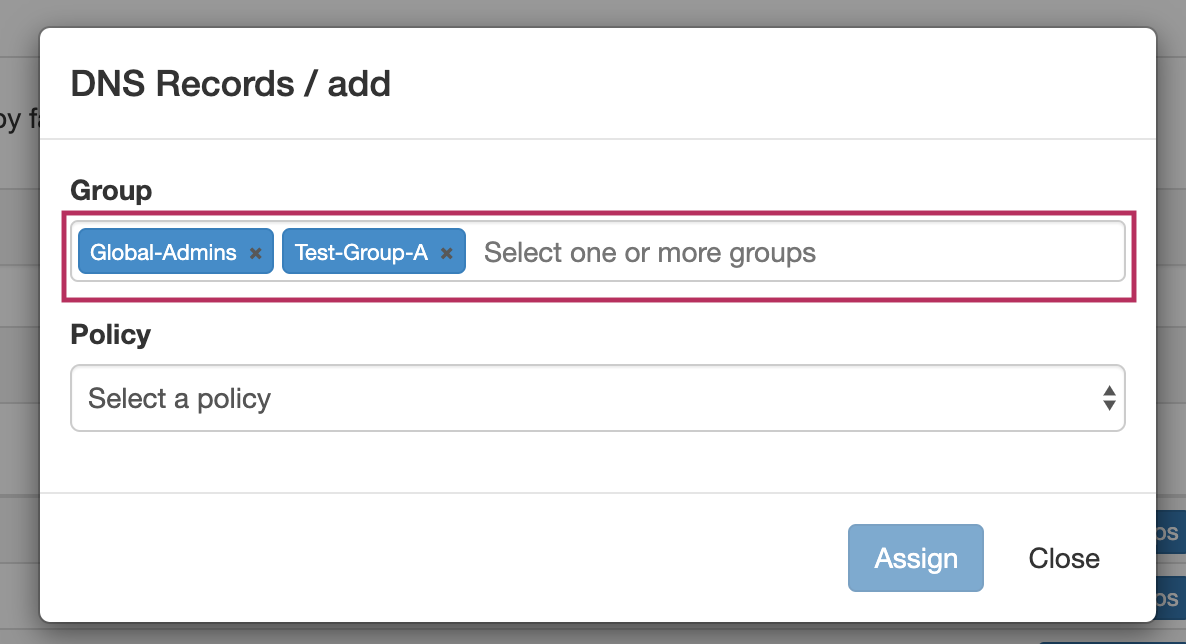
IM - 3303: Added the ability to assign multiple groups to an approval action.
From the Approvals Tab, select the Actions & Permissions sub-tab → Actions tab.
For any Action, click "Assign Group", then select one or more Groups to apply the action policy to.
Peering Improvements:
Local Peers
IM / CFR - 3289: Added "Local Peer" options to ProVision Peering
"Local Peers", peers that are 'private' or not registered with PeeringDB, may now be created in ProVision and used for session creation.
Local Peers will display in their own "Local Peers" list on the Peers page.
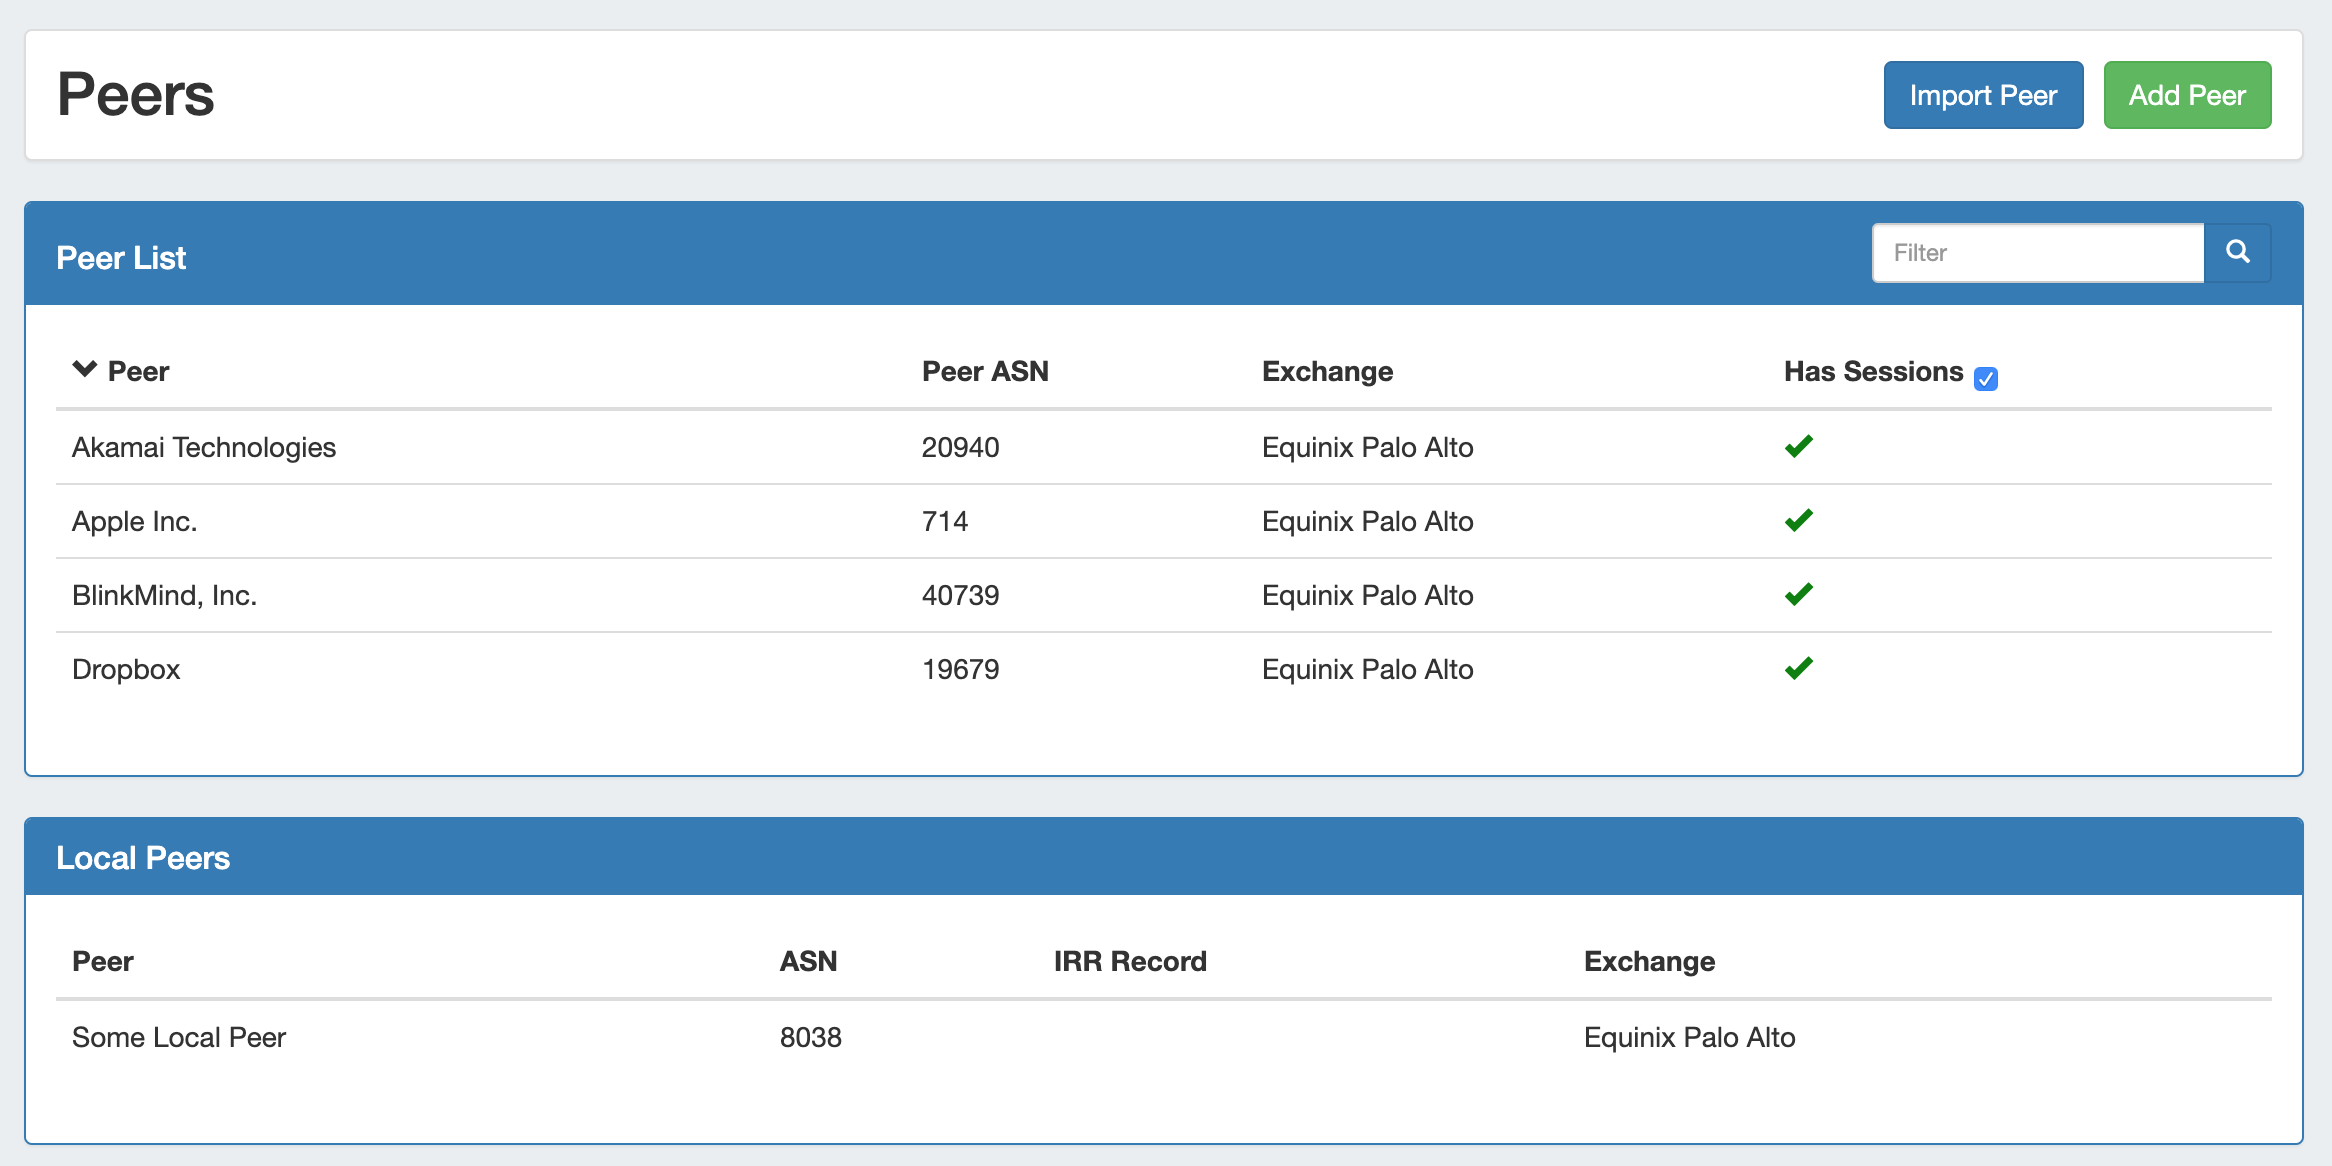
For additional information, see below, or view at Managing Peers.
Add a Local Peer
Add a new local peer by going to the Peering Tab → Peers subtab, and clicking "Add Peer".

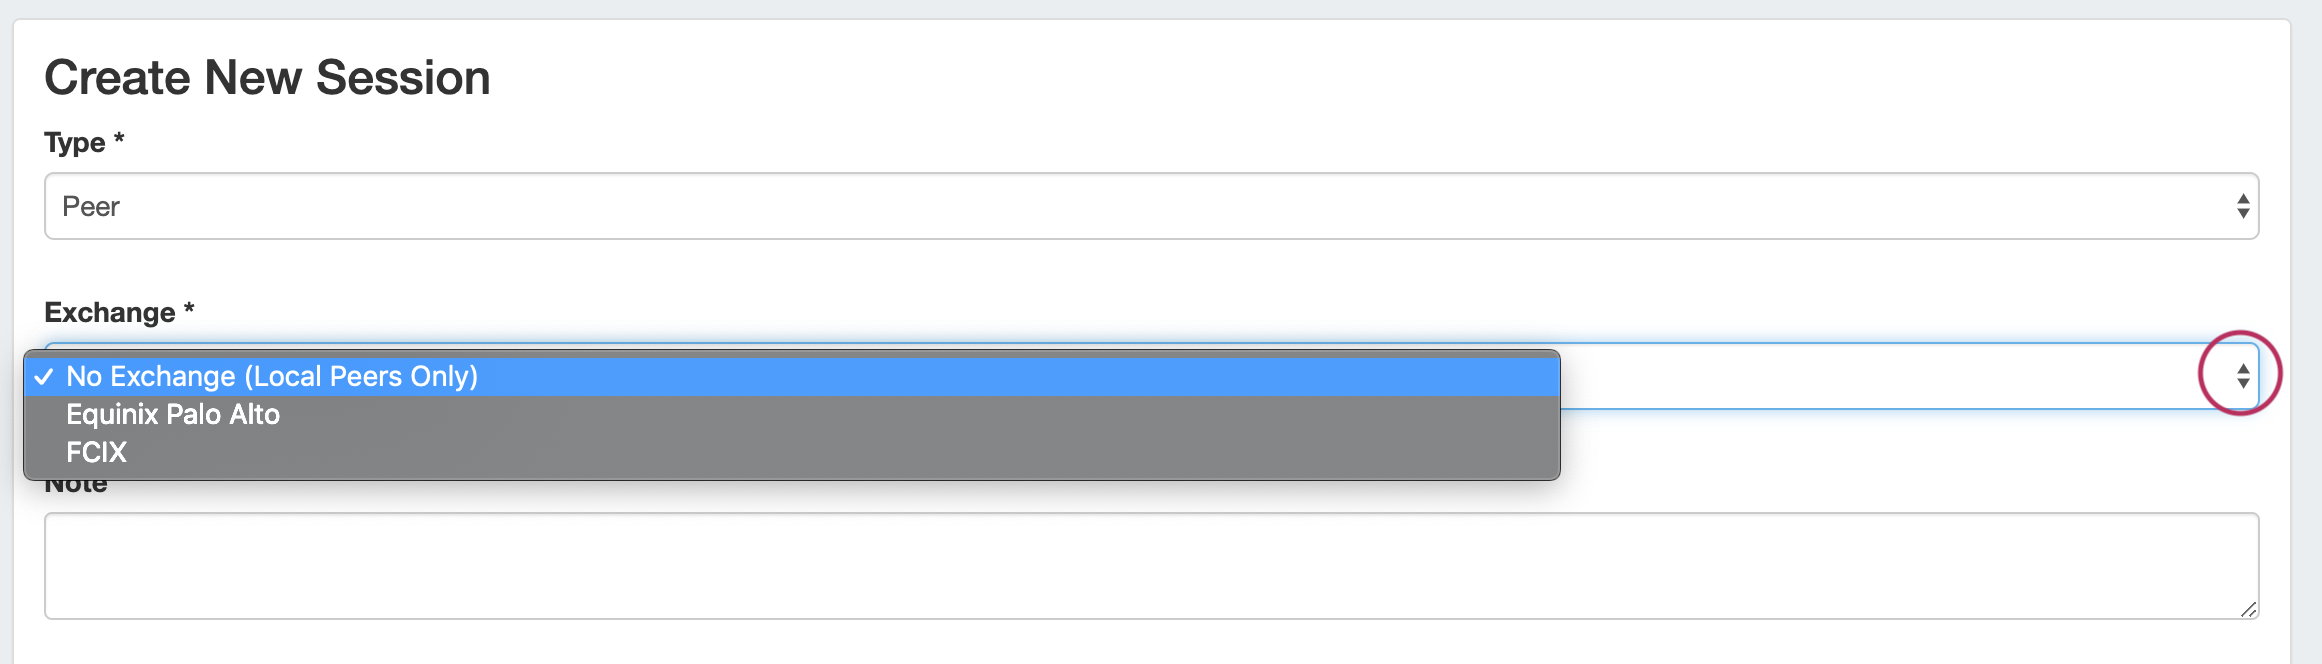
In the "Add Local Peer" form, enter the Peer details including Name, ASN, IPv4 or IPv6 Address, Route-Set, select an Exchange Option, and add notes if desired.
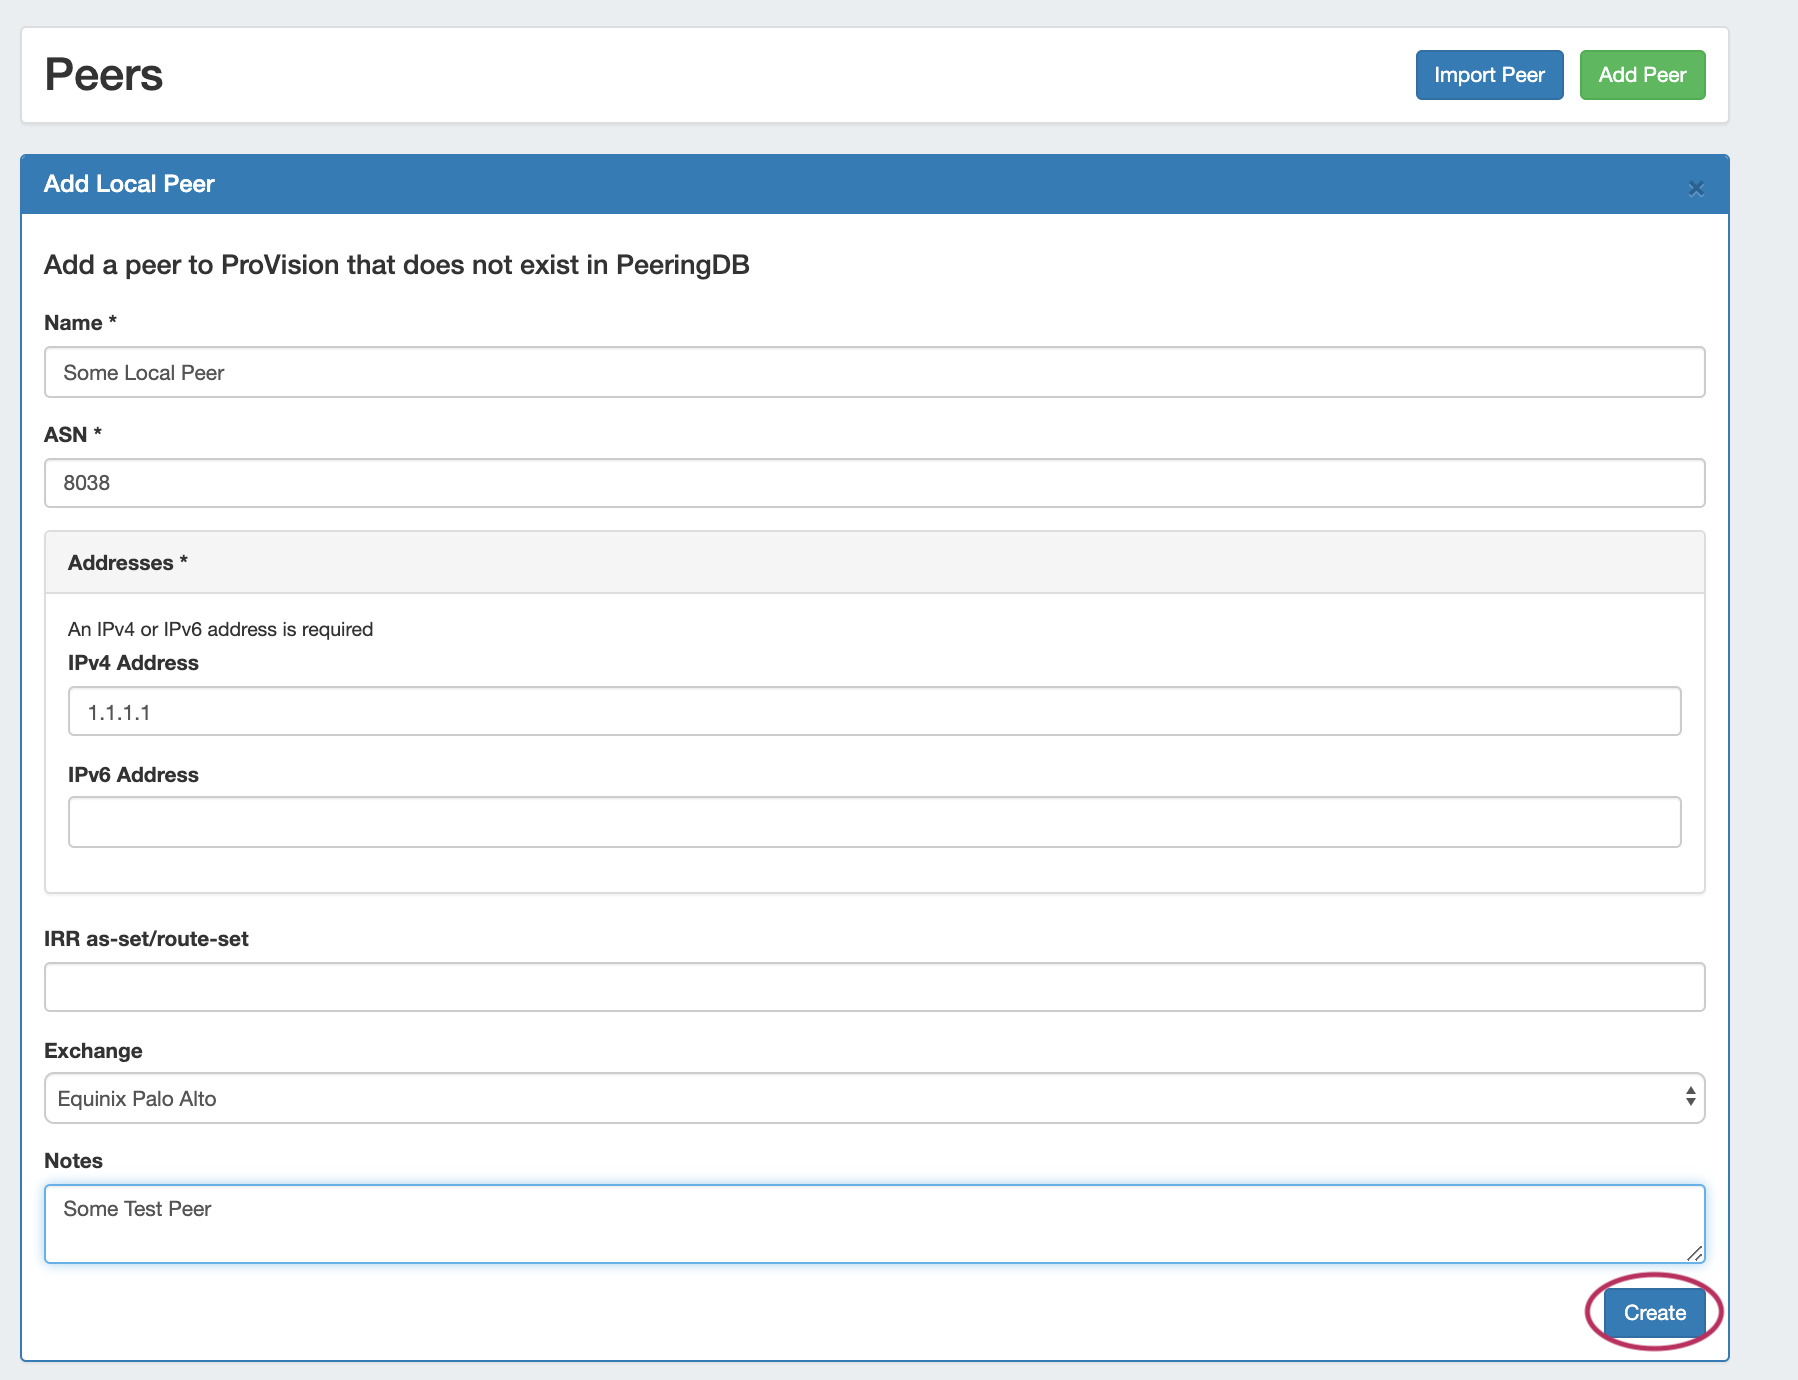
When finished, click "Create".
The Peer will be added to the "Local Peers" list, and be available to use while creating a session.

Use Local / Custom Peers for a Session...
You may use existing Local Peers when creating a new session, or create a new custom Peer from the Create Session page.
Click "Add Session" from the Peering → Sessions sub-tab.

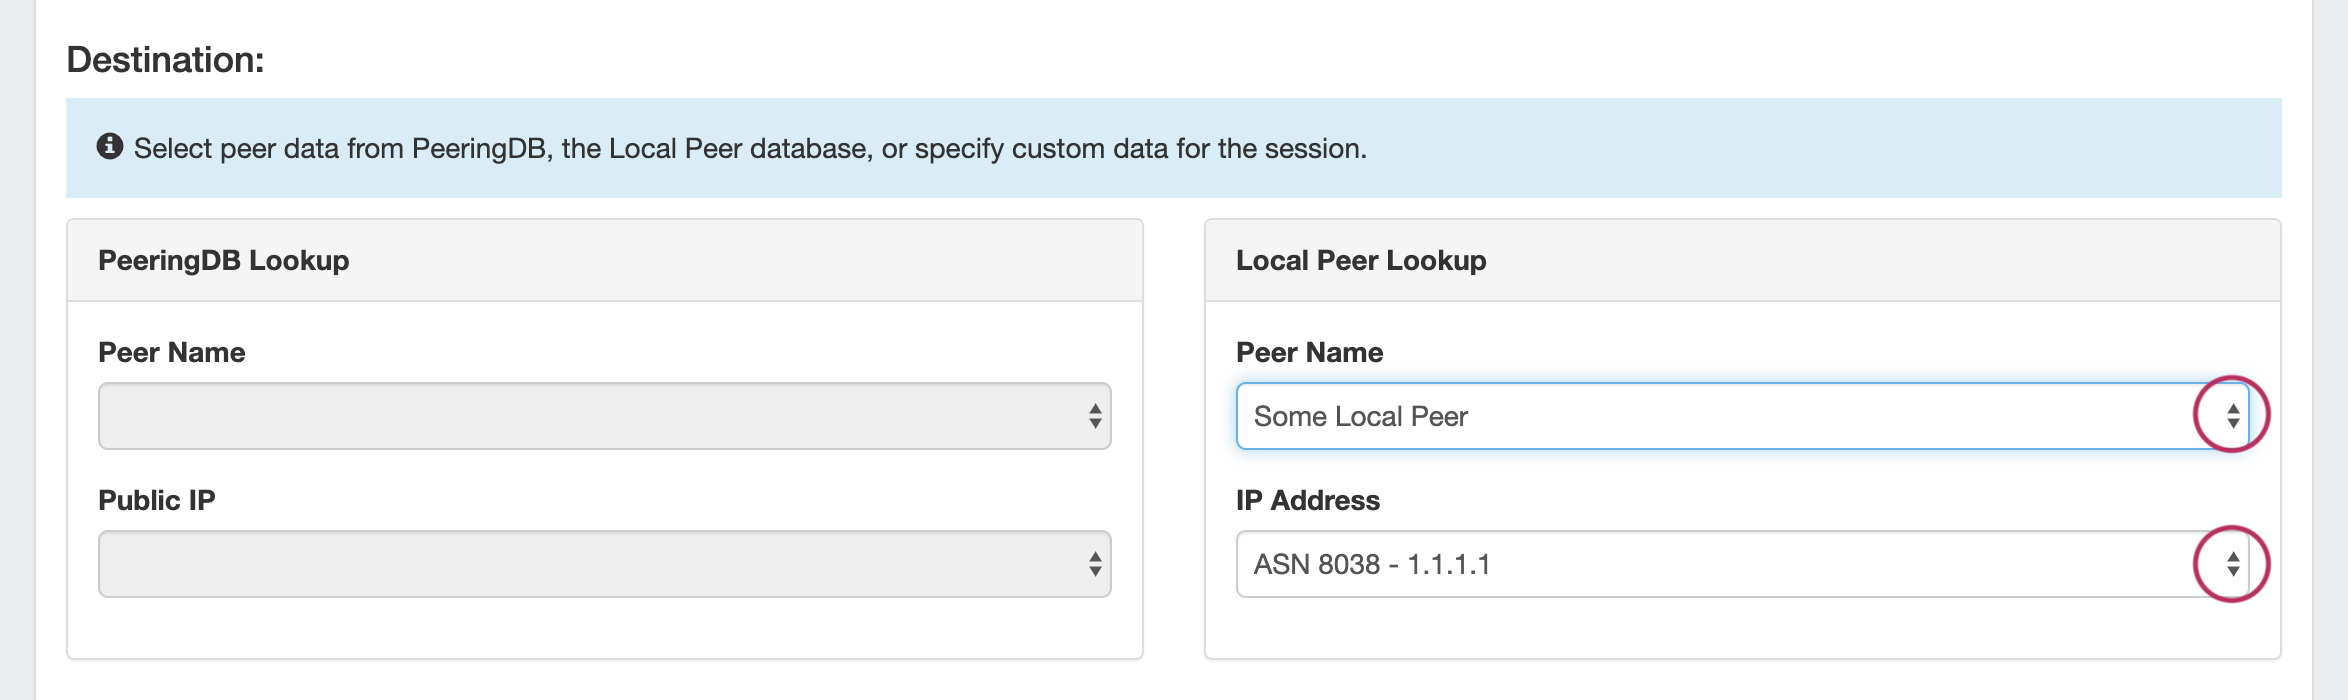
Under the Destination section, you may look up an existing Local Peer under "Local Peer Lookup" by selecting the peer name and address, and the destination fields will be automatically populated.
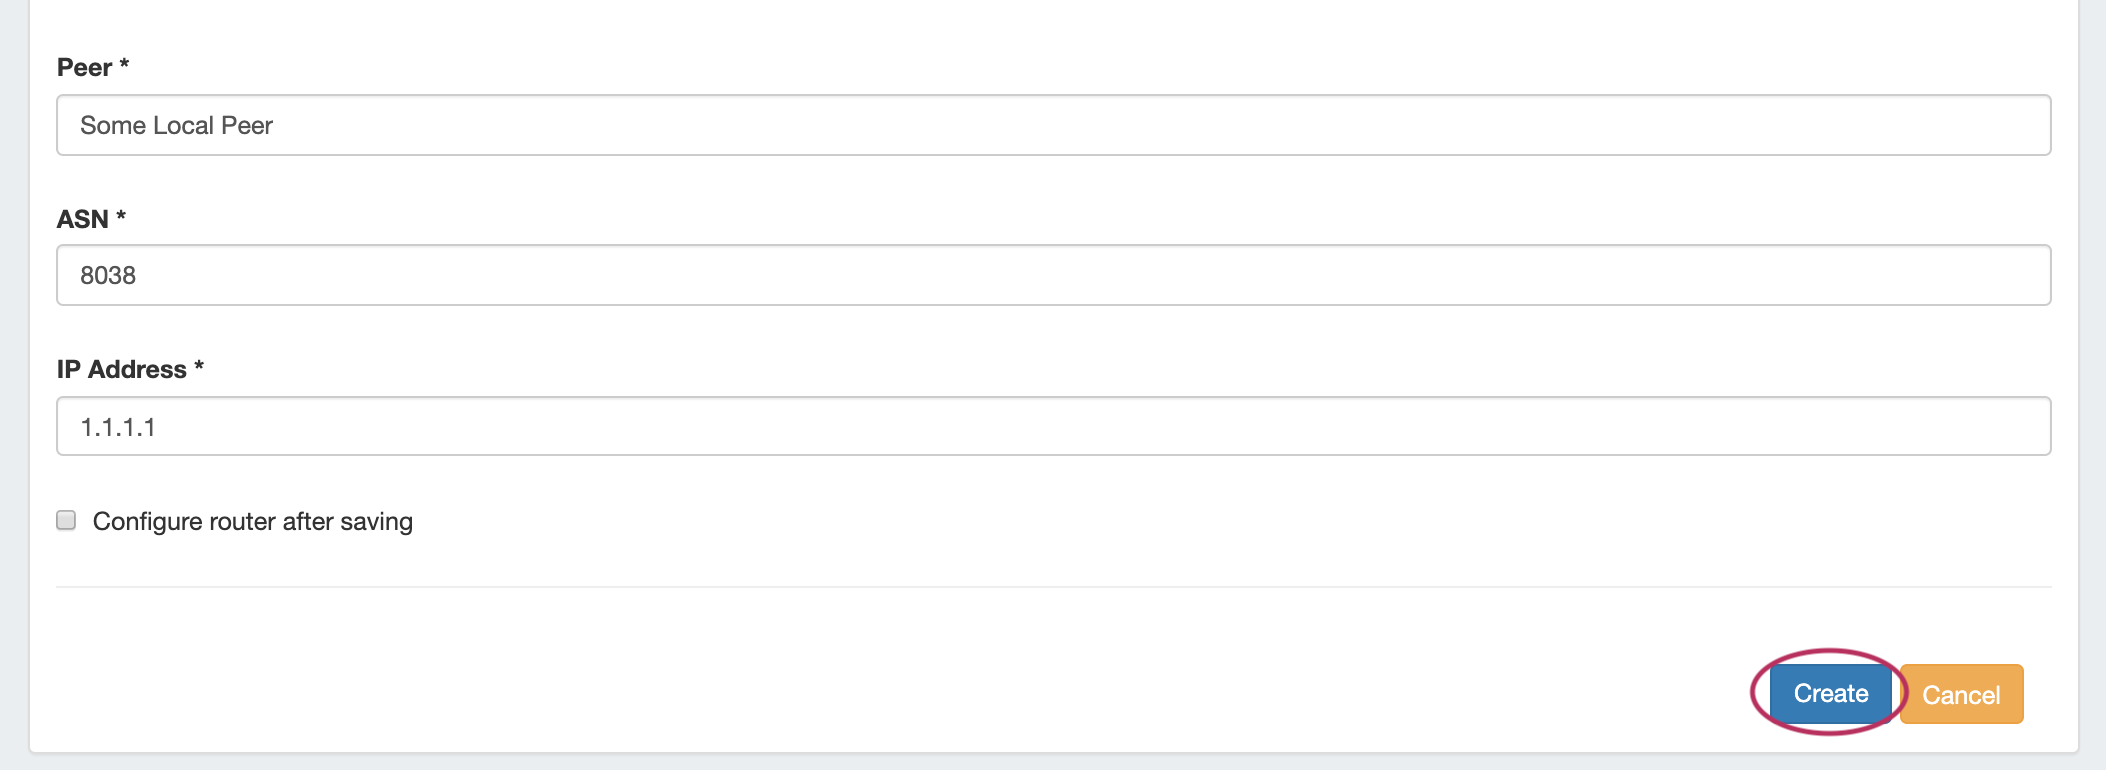
If the Peer does not already in ProVision, you may add a new Local or Custom Peer by directly typing the Peer Name, ASN, and IP in the Destination fields.
When complete, click "Create".
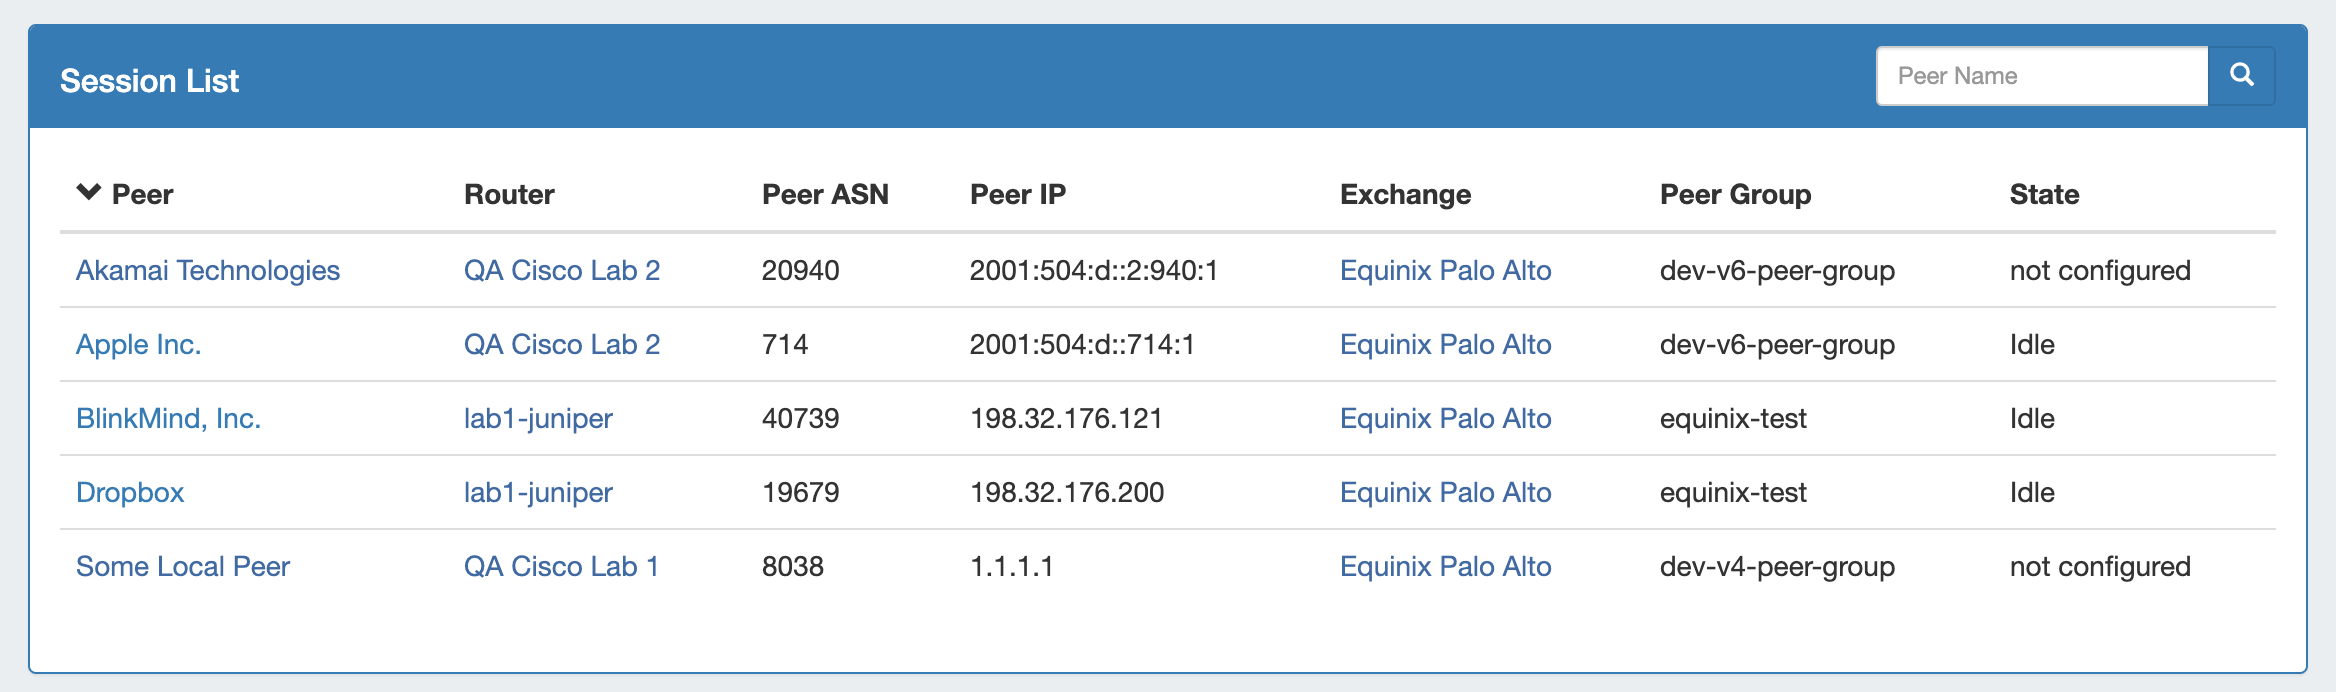
The Local Peer Session will be added to the Session List.
Expanded Router Edit
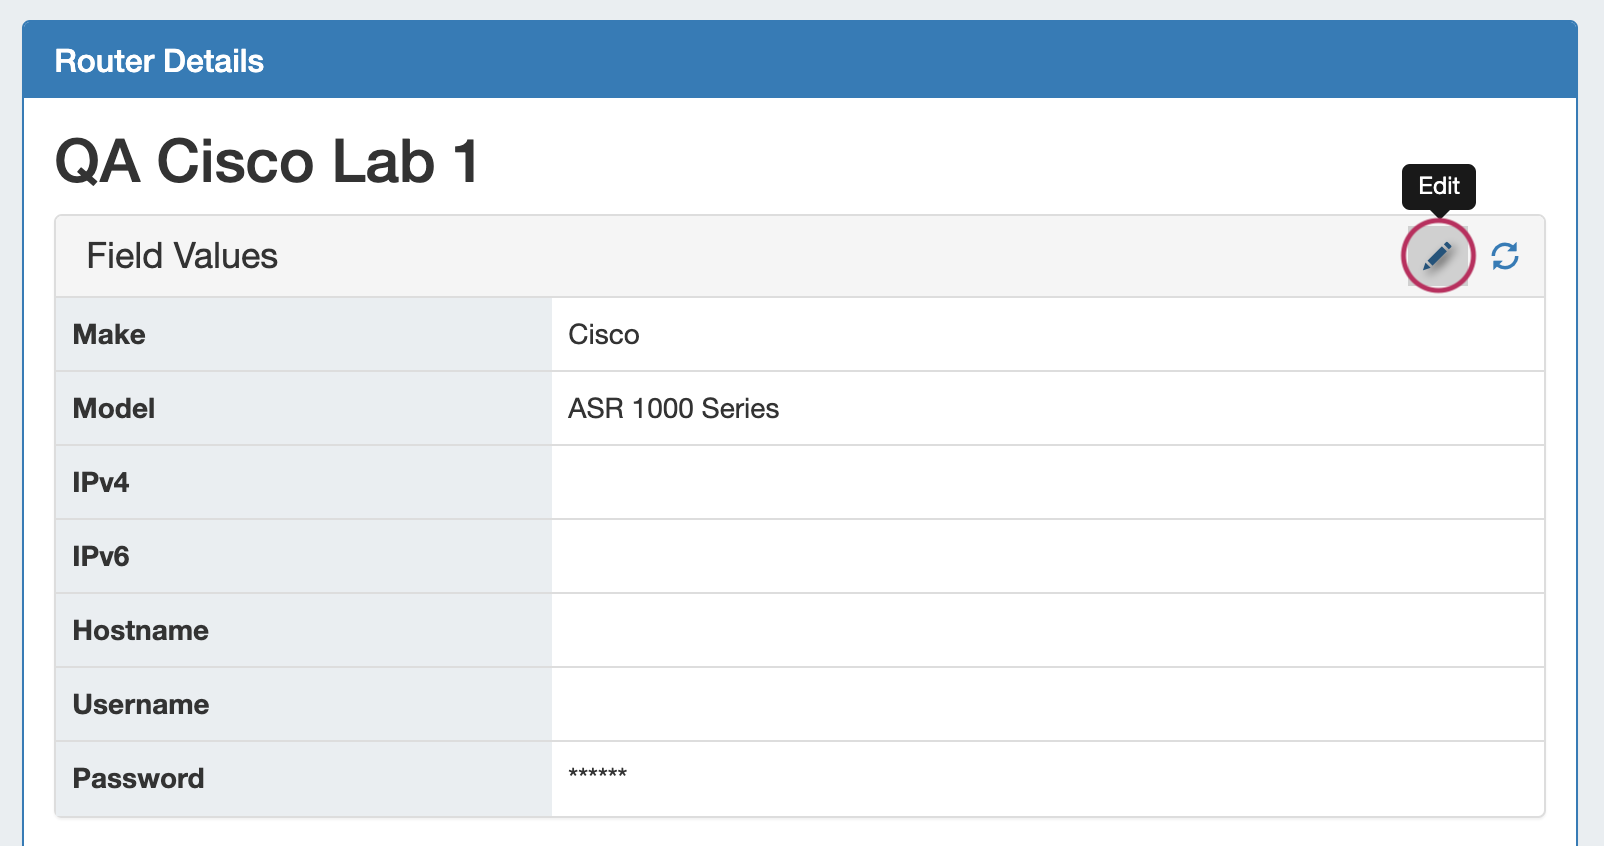
IM-3327: Added the ability to edit router information directly from the Peering → Router Details page.
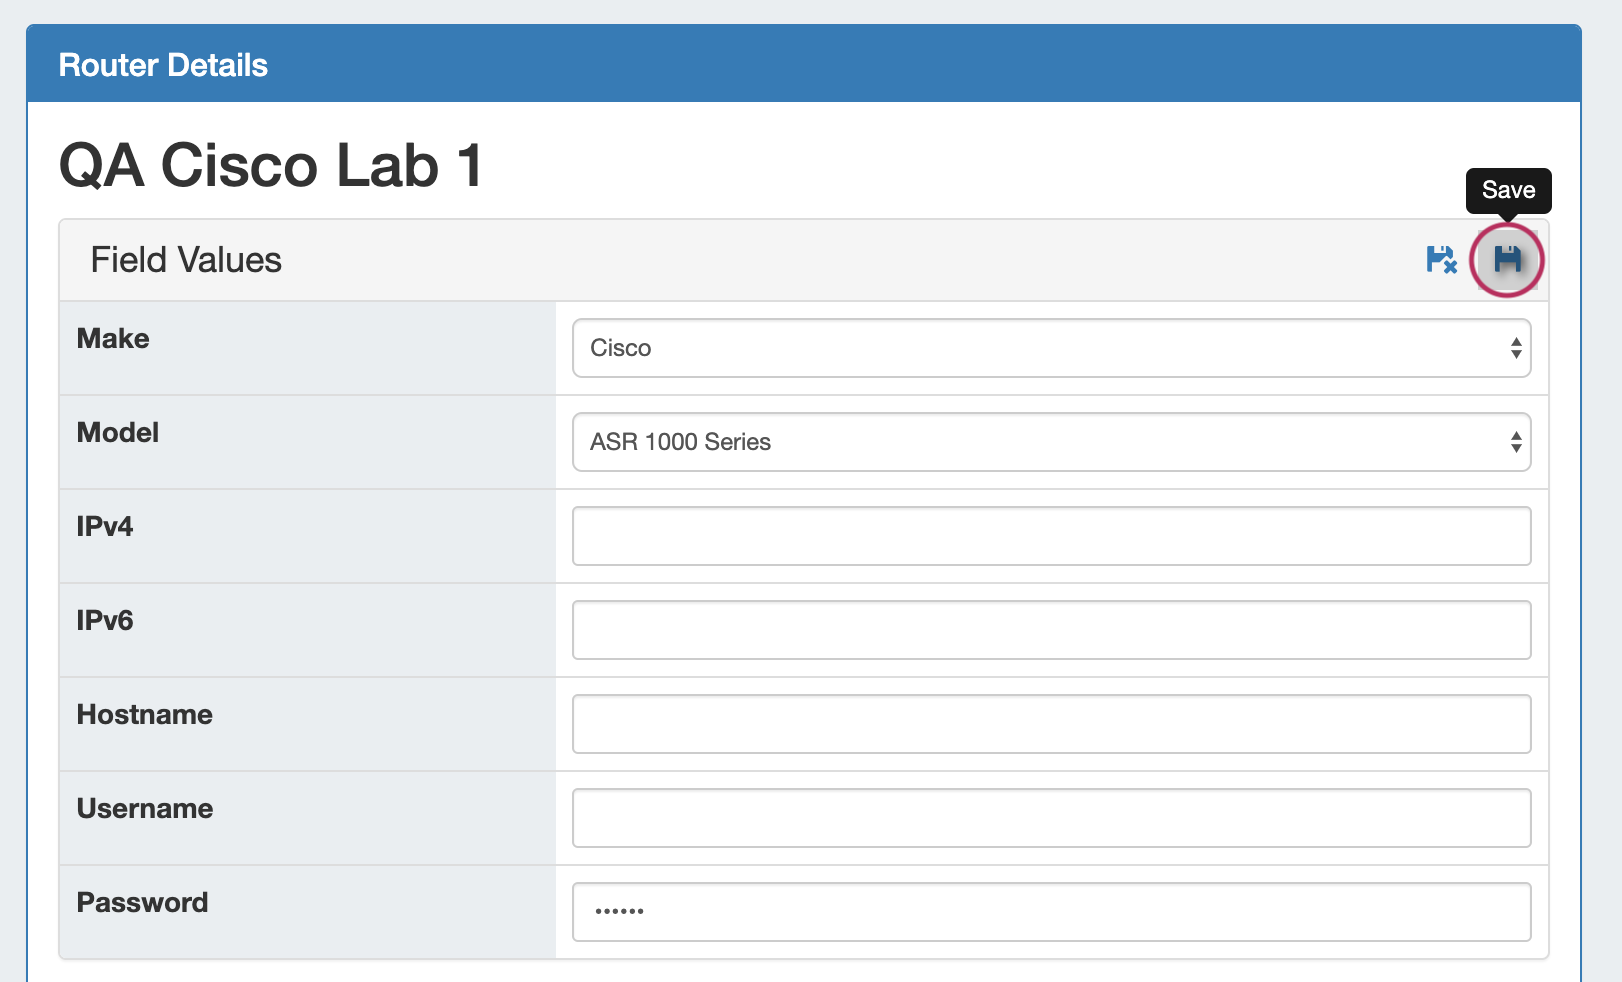
All router information fields - Make, Model, IP address, Hostname, Username, and Password - may be edited from the Peering Router Details page. See below for additional information, or go to Peering Routers.
Editing Router Details...
To edit a router field, click the "Edit" icon (pencil), and input the desired change.
When complete, click the "Save" icon.
Improved Messaging
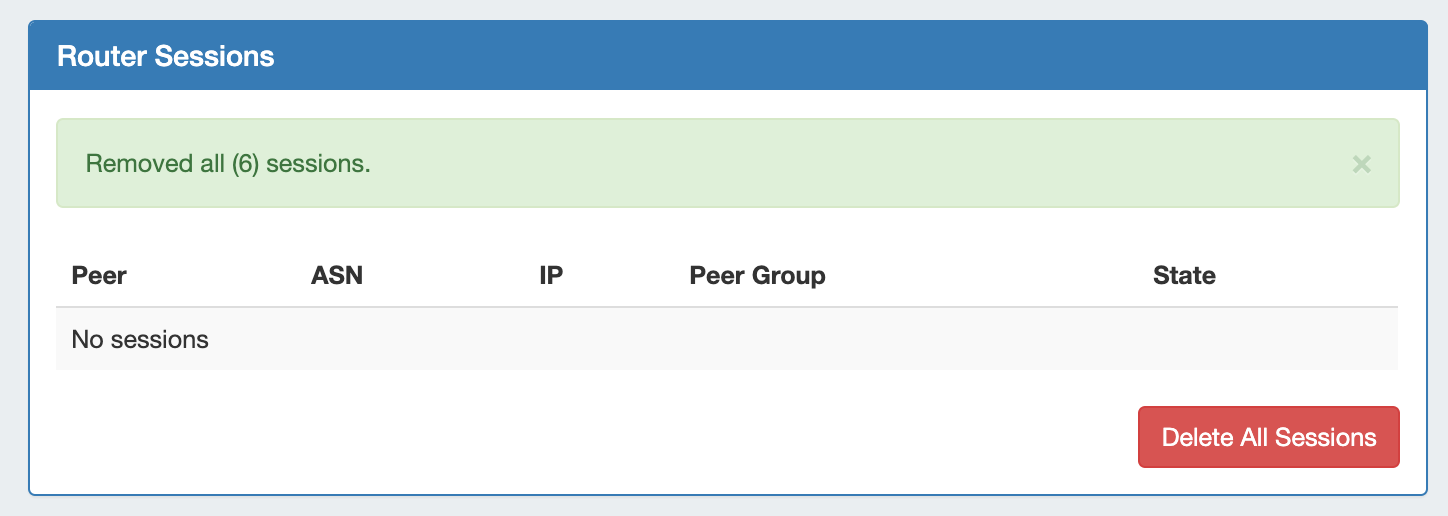
IM - 3429: Added Success/Fail Messaging to Peering → Router Sessions "Delete All" button.
APIv2 Updates
Follow endpoint links for detailed APIv2 Swagger documentation, updated once each release is live.
IPAM Generate DNS
IM - 2940: Added APIv2 endpoint: POST /ipam/netblocks/generate_dns
Automatically create a PTR record inside the proper zone, when provided IP and Hostname.
|
POST |
/ipam/netblocks/generate_dns
|
|---|---|
|
Description: |
Returns a list of dns zones and records. If dry_run is provided, no records and zones will be created. |
|
ipam_generate_dns |
{ |
|
cidr* |
[ The IP block in CIDR format string] |
|
group_id |
integer($int64) DNS Group ID |
|
domain |
string |
|
zone_types |
[ DNS Zone type. Use "forward", "reverse" or both string] |
|
record_types |
[ DNS Records type. Use "forward", "reverse" or both string] |
|
dry_run |
boolean Use this option in order to see if your request is acceptable without committing the changes |
|
} |
|
IPAM Soft Merge Netblock
IM-3275: Added APIv2 endpoint: PATCH /ipam/netblocks/{id}/soft_merge
Friendlier, gentler version of /merge API endpoint.This endpoint will merge as much as it can and skip over areas where it cannot cleanly merge blocks together. Returns whether it successfully merged every IP block or just partially, and list all unmerged blocks.
|
PATCH |
/ipam/netblocks/{id}/soft_merge Merges IP Blocks under an aggregate wherever possible and reports on outcome |
|---|---|
|
Description: |
Friendlier, gentler version of /merge API endpoint.This endpoint will merge as much as it can and skip over areas where it cannot cleanly merge blocks together. Returns whether it successfully merged every IP block or just partially, and list all unmerged blocks. |
|
soft_merge_netblock |
{ |
|
*id* |
integer($int64) |
|
*cidr* |
string |
|
stopOnResourceMismatch |
boolean |
|
stopOnTagMismatch |
boolean |
|
stopOnRegionMismatch |
boolean |
|
} |
|
Resource GET Attribute Updates
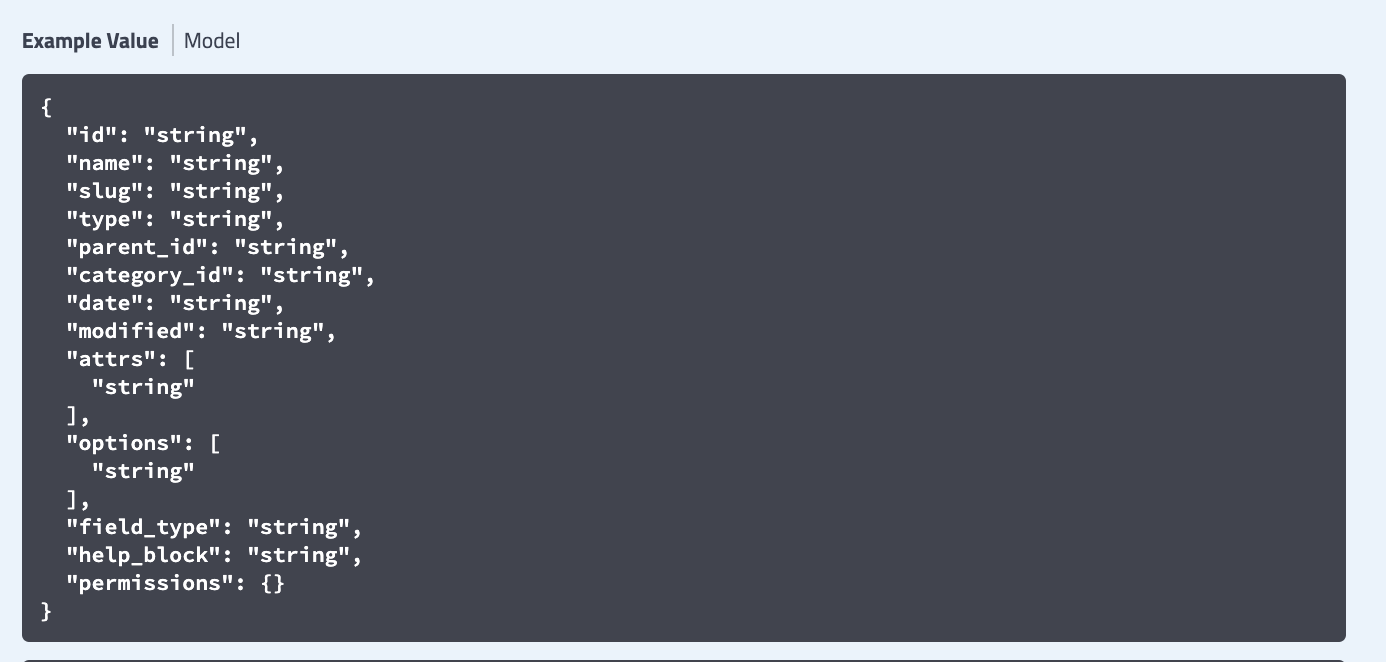
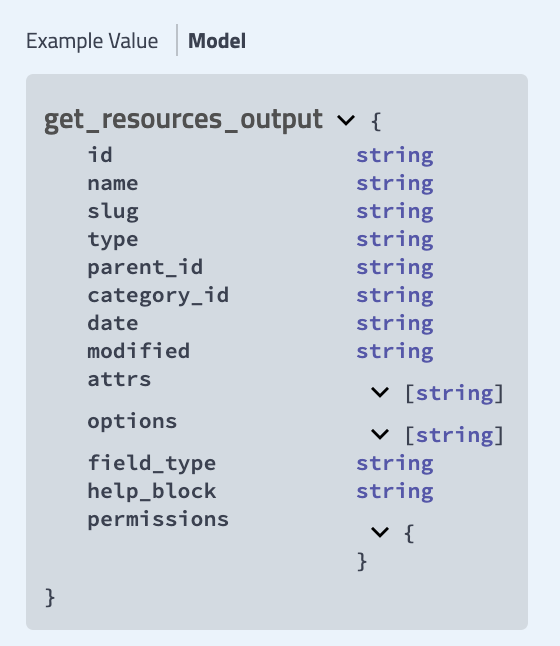
IM-xxxx: Updates to APIv2 endpoint: GET /resource/
GET calls to /resources have been updated so that the return will always be an array of resource objects. Previously, it was possible to phrase a call so that it returned a single resource not encapsulated in an array. For consistency, this exception to the normal return format has been eliminated.
Resource GET updated return model ...
Bug Fixes/Minor Improvements
IM - 2124: Updated IPAM to support aggregates of 0.0.0.0/n
IM - 3229: Updated User-Group permissions to prevent users from editing/deleting permissions on a User Group to which they belong
IM - 3243: Action buttons are now hidden in the Resource Linkage Gadget for Read-only users
IM - 3244: Updated the Notes Gadget to prevent edits by Read-only users
IM - 3260: Blocked the 'Remove' action for approval group assignments if a pending approval request is outstanding for the group
IM - 3300: Fixed a bug that would occur in the IPAM Gadget → Smart Assign when a resource was selected under advanced filter settings
IM - 3305: Resolved an export error in Logs where only the first log record would successfully export
IM - 3317: Minor text and layout updates made to the Admin -> IPAM Regions page
IM - 3318: Fixed an issue in IPAM Regions "Add Region" where a new single-word address value would disappear into the void. Regions may now be addressed as "Cher", "Bono", or "Adele" - we won't judge.
IM - 3320: Resolved an issue where certain IPAM aggregates would fail to display the "Ignore Assignments" checkbox while performing the "Clean Up" action
IM - 3348: The resource selector in IPAM "Add Aggregate" now displays a portion of the resource list prior to a search term being entered
IM - 3355: Minor text updates made to DNS error messages
IM - 3368: Scheduler tasks set for weekly repeat now run at the correct time for the specified timezone
IM - 3385: Updated IPAM Manage → Edit Block to include the ability to deselect the LIR value
IM - 3389: Reordered and updated the display names of the "Task" selector options under Scheduler → Add Task
IM - 3394: Resolved an issue where DHCP Pool assignments would fail if VLAN filter criteria were provided
IM - 3405: Updated the IPAM Manage "Assigned To:" resource filter option to include DHCP Pools
IM - 3428: IPAM Log timestamps now correctly display in Safari
IM - 3430: Peering IXs -> Communications Log timestamps now correctly display in Safari