
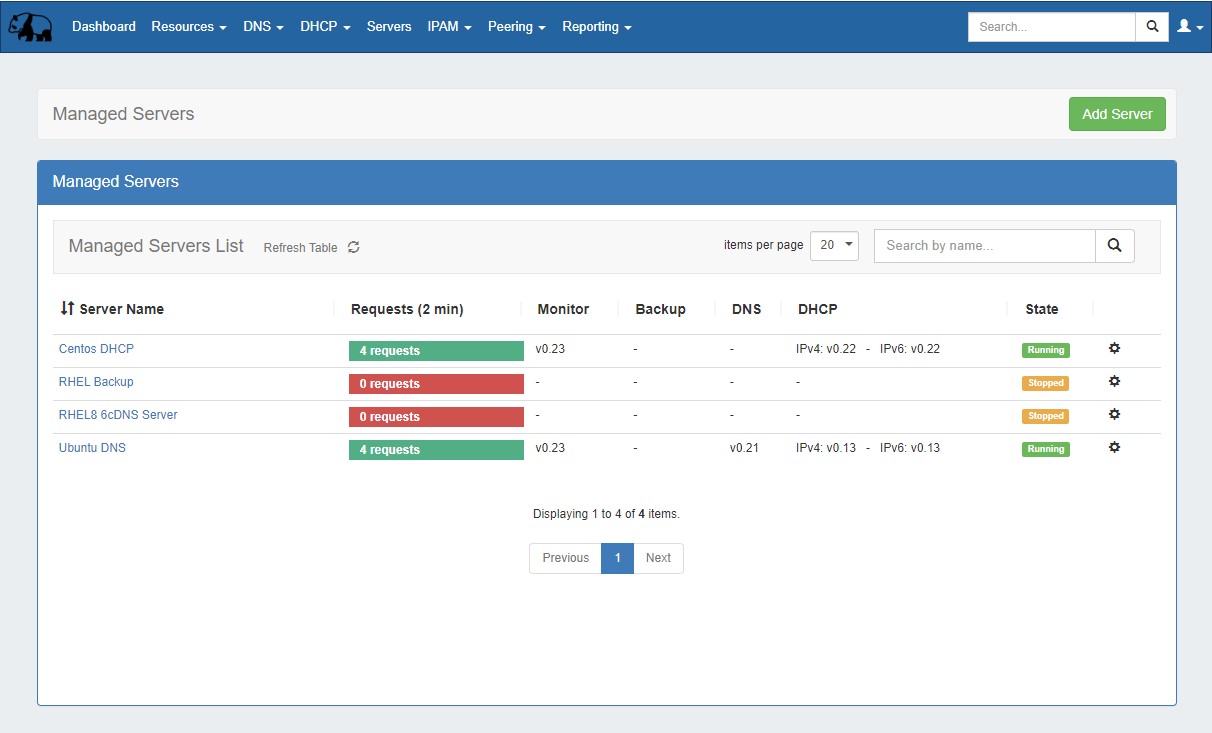
The Managed Server page is where you can add a new server, view the list of existing servers, and view monitoring data on each server. From here, you may also access server settings and details for each server.
Requirements
Note: Managed Servers requires Python3 and Docker to be installed to support this feature.
The Managed Server List Interface
The Managed Server Section List provides server and monitoring data for each managed DNS / DHCP / Backup server.
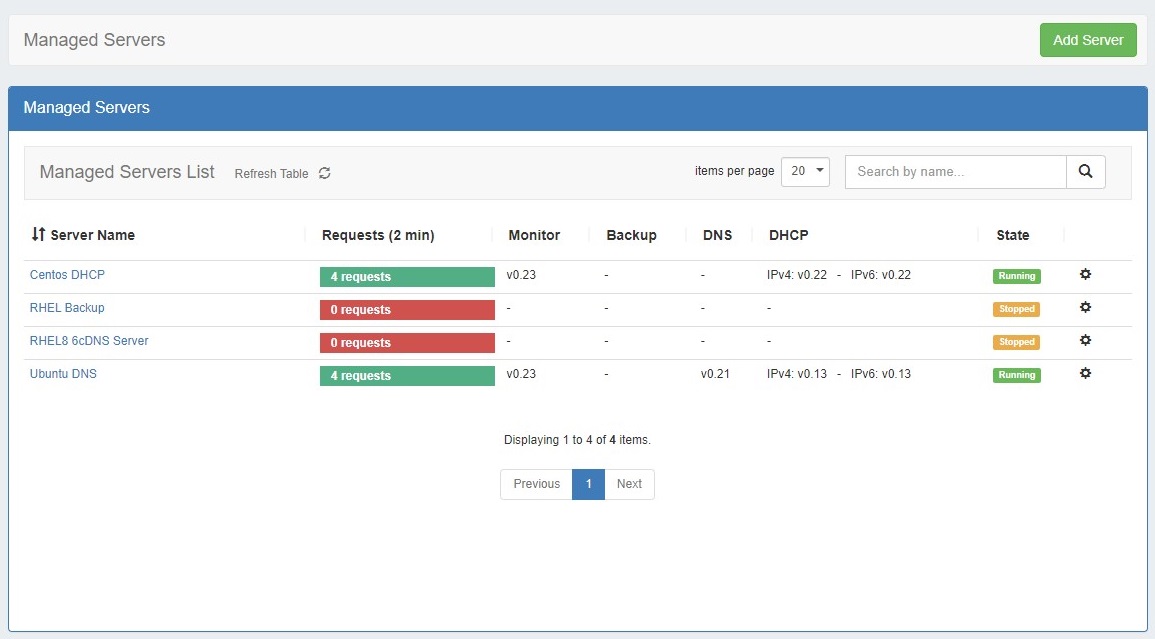
The list provides the following information:
-
Server Name: The server display name, set by the user during server creation. You may click on the server name link to view server details
-
Requests: Requests are the heartbeat notifications received in the last 2 minutes. Requests are sent every 30 seconds, so a display of 4 or 5 requests represents a satisfactory request connection, and the request bar will show in green. For any lower value, the color of the bar will show in red.
-
Monitor / Backup / DNS / DHCP: The version of the component running. If the server is not running, no version will display.
-
State: State shows the overall state of the server - the server may be running, but without any components started. "Running" will show in green, whereas "Stopped" will display as an orange bar.
-
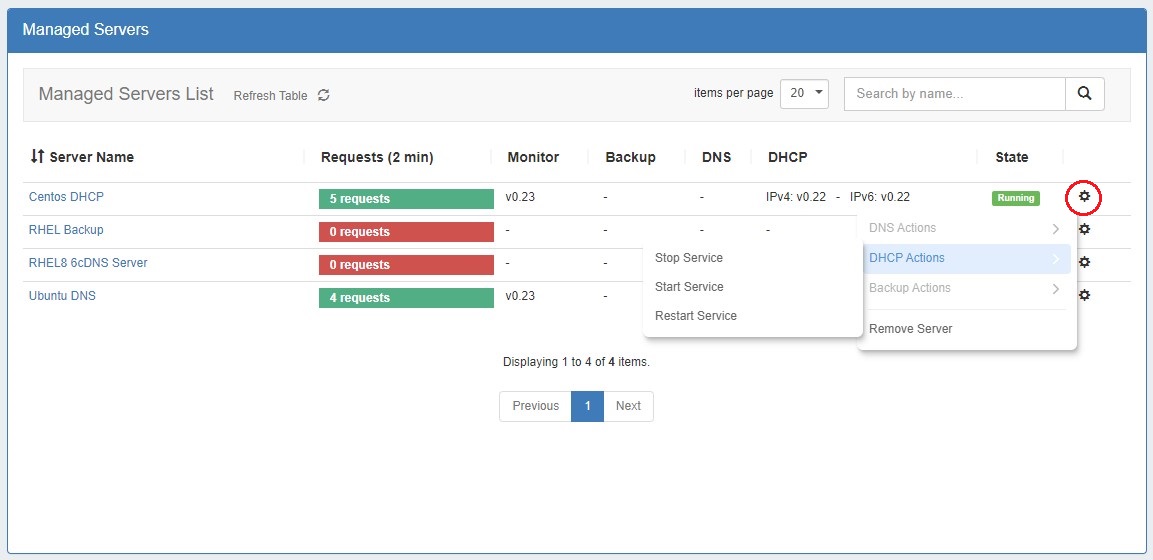
Action Menu (gear icon): Right click on the action menu (or anywhere on the row) to display available server actions
Working with the Managed Server List
The following actions may be performed when interacting with the server list:
-
Sort the list by clicking on the "Server Name" column, to view by Ascending / Descending order
-
Search / Filter the list for specific servers by entering a full or partial server name into the search box at the upper right of the list
-
Display more/fewer servers per page by clicking on the "Items per page" selector at the top right of the list, next to the search box
-
Refresh the list to check for updated information by clicking the "Refresh Table" button (rotating arrows)
-
Click on a server name to view / edit server details
Add New Managed Server (Setup Wizard)
Before you begin, you will need to know following connection information for the new managed server:
-
Server FQDN or IP (only required for automatic installation)
-
Desired server OS
-
SSH credentials and port
To set up a new managed server, click "Add Server" at the top right of the Managed Server Tab.

From there, proceed through each of the five steps of the Add New Server wizard, below:
Step 1: Common Settings
Step 1: Common Settings
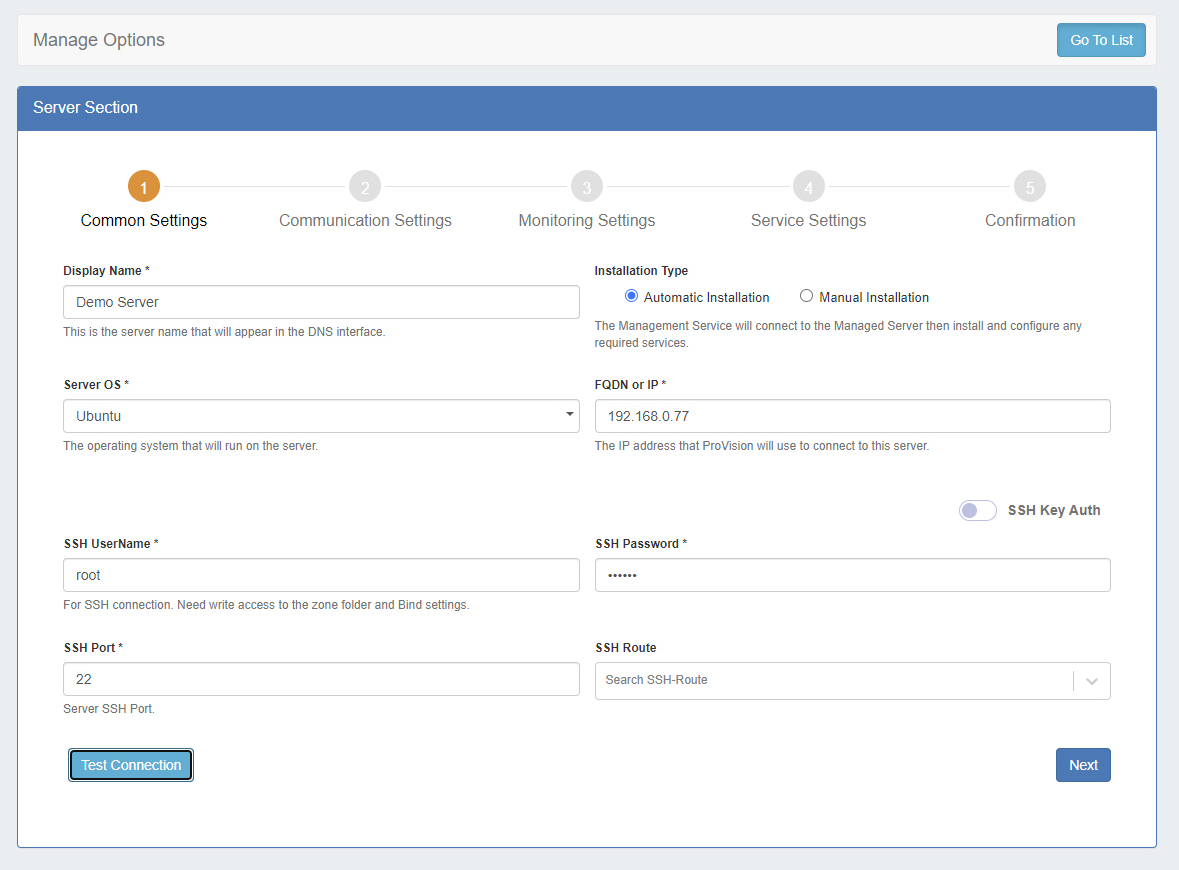
Enter the common settings for the new server:
-
Display Name: The display name for the server
-
Installation Type: You may choose either an automatic installation, where ProVision handles the installation, or perform a manual installation.
-
After selecting the installation type, enter the required fields for the server, depending on the selected install type:
-
Display Name (always required)
-
Server OS (always required)
-
FQDN or IP (required for automatic installations)
-
SSH Username / Password (required for automatic installations)
-
SSH Port (required for automatic installations)
-
SSH Route (optional)
After entering in the common settings, click "Test Connection" to verify the connection and authentication.
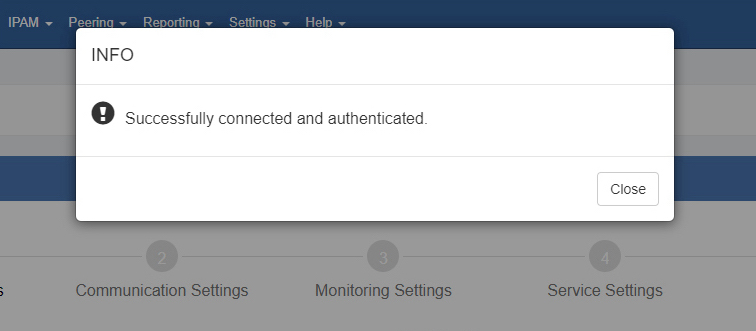
Once a connection has been confirmed, click "Next".
Step 2: Communication Settings
Step 2: Communication Settings
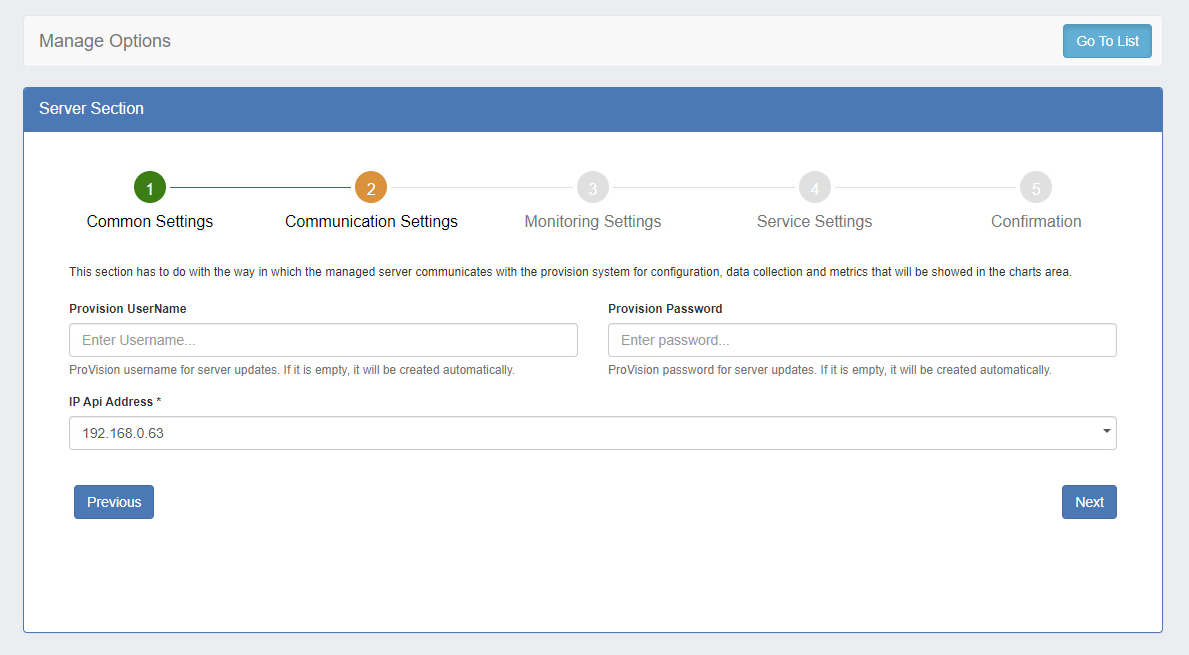
Managed servers require a ProVision user account and API IP in order to communicate configuration, data, and monitoring information.
-
ProVision Username / Password: You may enter a specific ProVision username and password, or allow one to be automatically generated. If you enter an existing ProVision user, please ensure that the user is included under the 6cservers group and/or has full C/R/U/D resource permissions on the "6c server" resource.
-
IP API Address: The API address the managed server should use. There are cases when the DNS servers are in different networks and should communicate with ProVision on different IPs.
Click "Next" to proceed.
Step 3: Monitoring Settings
Step 3: Monitoring Settings
Select the desired monitoring settings for the server. You may either accept the default settings, or click on the toggle for Custom Monitoring Settings to override default settings.
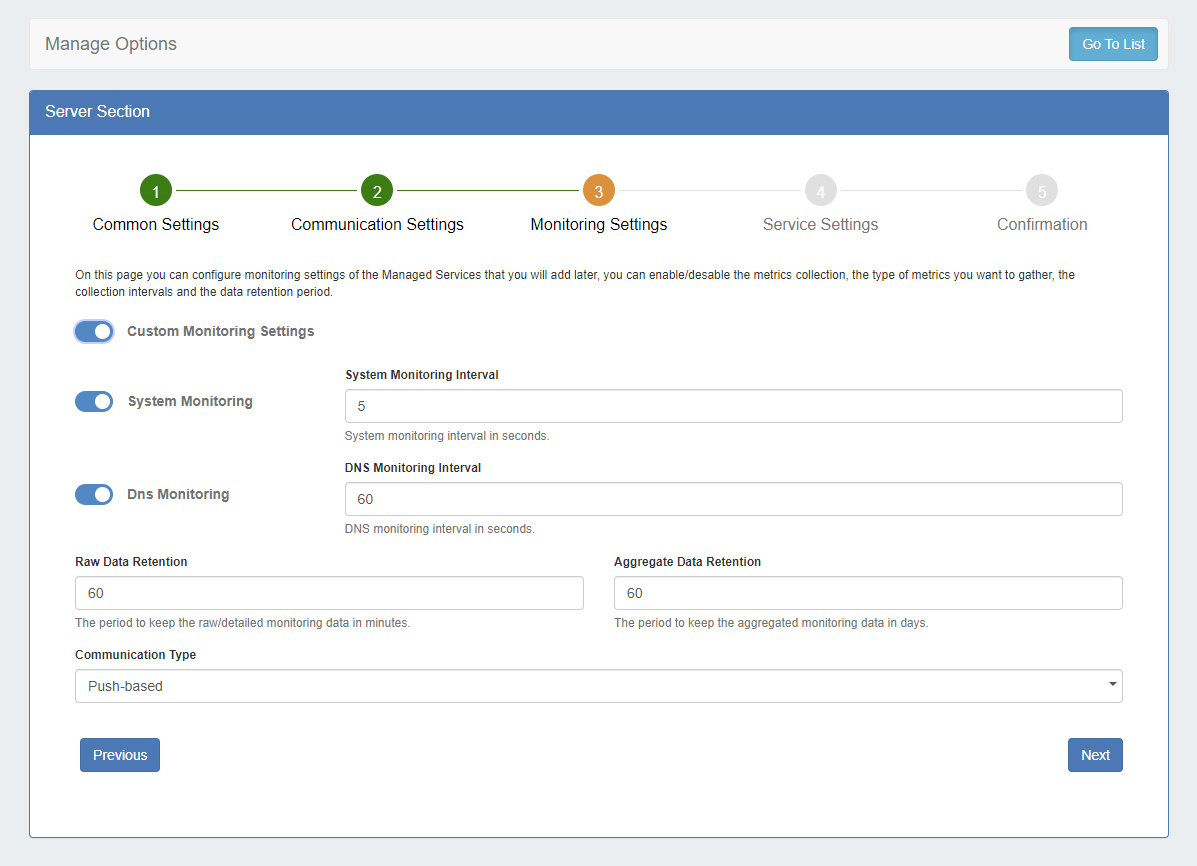
Options include:
-
System Monitoring: Enable / Disable monitoring for system statistics. If enabled, enter the desired System Monitoring Interval (in seconds). More frequent intervals require larger storage, but generates more data in cases where investigation is needed.
-
DNS Monitoring: Enable / Disable monitoring for DNS statistics. If enabled, enter the desired DNS Monitoring Interval (in seconds). DNS requests are collected for the set time interval, and then sent as an aggregated result.
-
Raw Data Retention: How long to keep the raw data, in minutes. This affects how far back you could investigate an incident using the detailed data. Raw data requires sizable storage needs; so the default setting is 1440 min (1 day).
-
Aggregated Data Retention: How long to keep the aggregated data, in days.
-
Communication type: Select either Push-based (when the server pushes data to ProVision) or Pull-based (when ProVision connects to the server and pulls the data). Push-based is the preferred method, but Pull-based may be desirable in cases where a firewall would not allow inbound connections to ProVision.
Click "Next" to continue.
Step 4: Service Settings...
Step 4: Service Settings
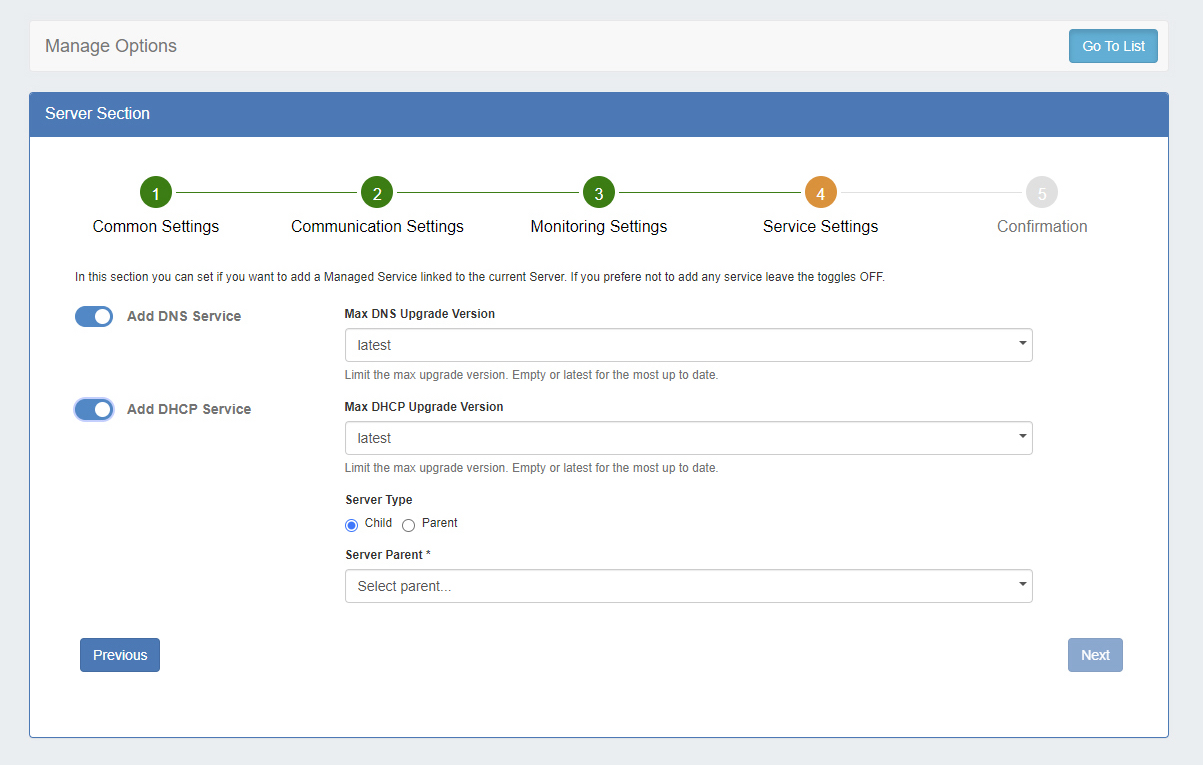
Here you can select which components to install linked to the current server. If you prefer not to add a service, both toggles may be disabled.
-
Add DNS Service: Enable / Disable to add a DNS Managed Service link. Options include:
-
Max DNS Upgrade Version: Select either "latest", or select a specific version to install and not upgrade beyond, in case of known issues or incompatibility.
-
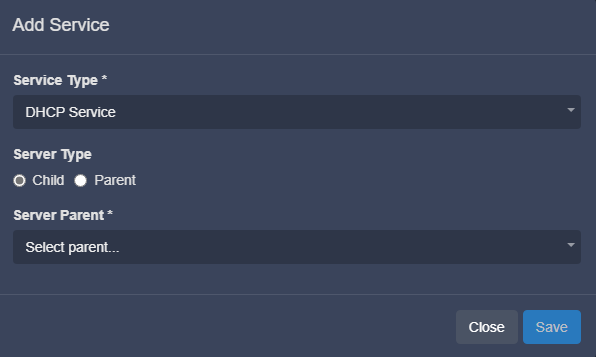
Add DHCP Service: Enable / Disable to add a DNS Managed Service link (Kea / MySQL DB). Multiple DHCP instances can connect to one database, organized as one parent with multiple children.
In ProVision, "1 database" = "1 dhcpmodule resource" , and only a "parent" DHCP can have address and credentials for the database. The children don't store any information about the database and the necessary data is taken from the parent; no "dhcpmodule resource" are created for the children.
Options include:
-
Max DHCP Upgrade Version: Select either "latest", or select a specific version to install and not upgrade beyond, in case of known issues or incompatibility.
-
Server Type: Select "Child" or "Parent".
-
Child: If "Child" is selected, then the parent server must be selected. On the managed server there will be an attribute to note that it will have DHCP component, but it would be a child one and which one is the parent. In this case the pv_mysql component is not installed as it is not needed - the DHCP will connect to another database
-
Parent (Default Configuration): By default, if "Parent" is selected then ProVision will set up pv_dhcp and pv_mysql components on the server and pv_dhcp will be configured to use this pv_mysql as database. The server will offer both IPv4 and IPv6 addresses.
-
Parent (Advanced Configuration): The main use case is when you don't want to put further load to the server by hosting the database or a database in a container might not perform good enough, you have this option to provide another MySQL instance. Using this the user can also modify the database name, user, password and if the server should serve IPv4, IPv6 or both. The user can also select the location of the database - local with pv_mysql component with the provided credentials or remote, which is completely remote database and no pv_mysql component will be set up.
-
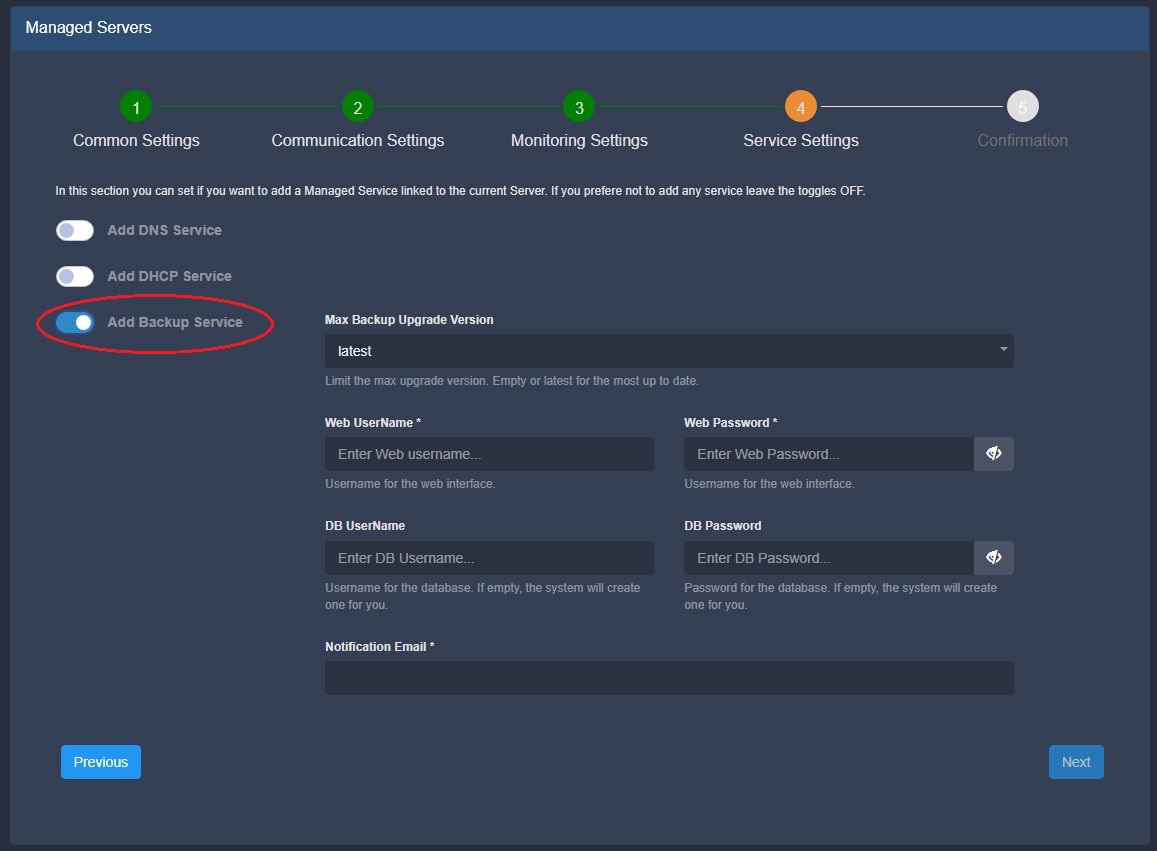
-
Add Backup Service: Enable / Disable to add a Backup Managed Service link. Options include:
-
Max DNS Upgrade Version: Select either "latest", or select a specific version to install and not upgrade beyond, in case of known issues or incompatibility.
-
Web Username / Password: Enter the Username and password for the ProVision Backup web interface.
-
DB Username / Password: You may enter a specific ProVision username and password, or allow one to be automatically generated. If you enter an existing ProVision user, please ensure that the user is included under the 6cservers group and/or has full C/R/U/D resource permissions on the "6c server" resource.
-
Notification Email: Enter an email to receive email about low disk space.
When you are done setting up service and database settings, click "Next".
Step 5: Confirm and Create...
Step 5: Confirmation
The last step to setting up a new managed server is review and confirmation.
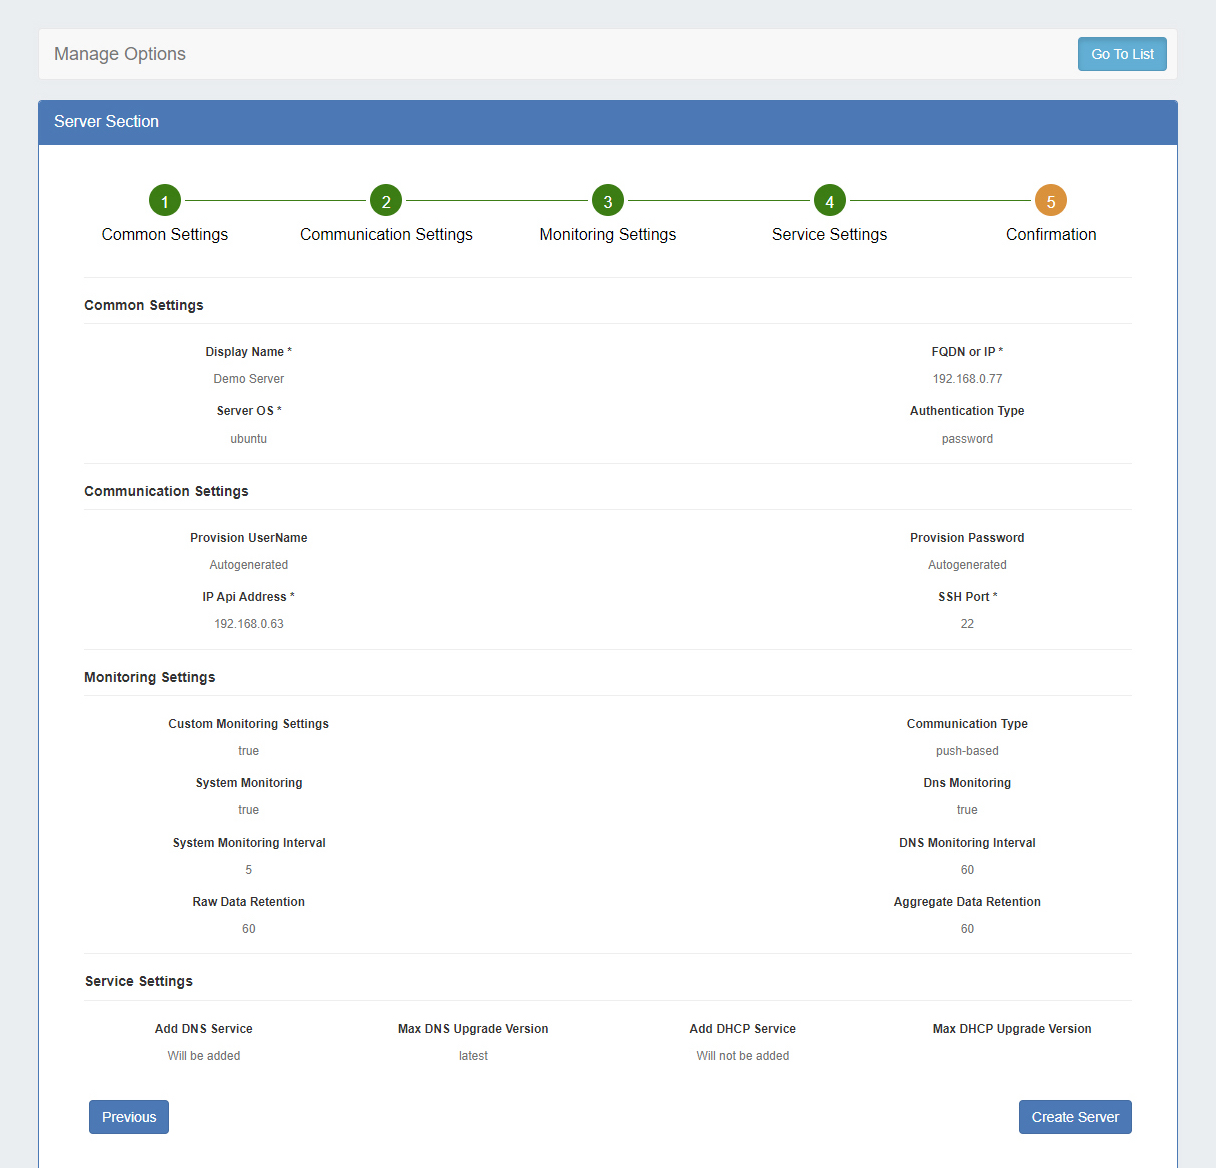
Options selected in previous steps will display on the page - review and confirm all settings, utilizing the "Previous" button if changes are needed.
Once settings are verified, click "Create Server" to complete the setup wizard.
The new Managed Server will display in the Managed Server list.
After a new server has been created, you may edit it by clicking on the server name, or view monitoring data from the Managed Server list.
View or Edit Managed Server Details
Click on a server name, or open the server action menu to view details for a managed server.
The details of a server are organized into tabs: Settings, Services, Monitoring, and RPS.
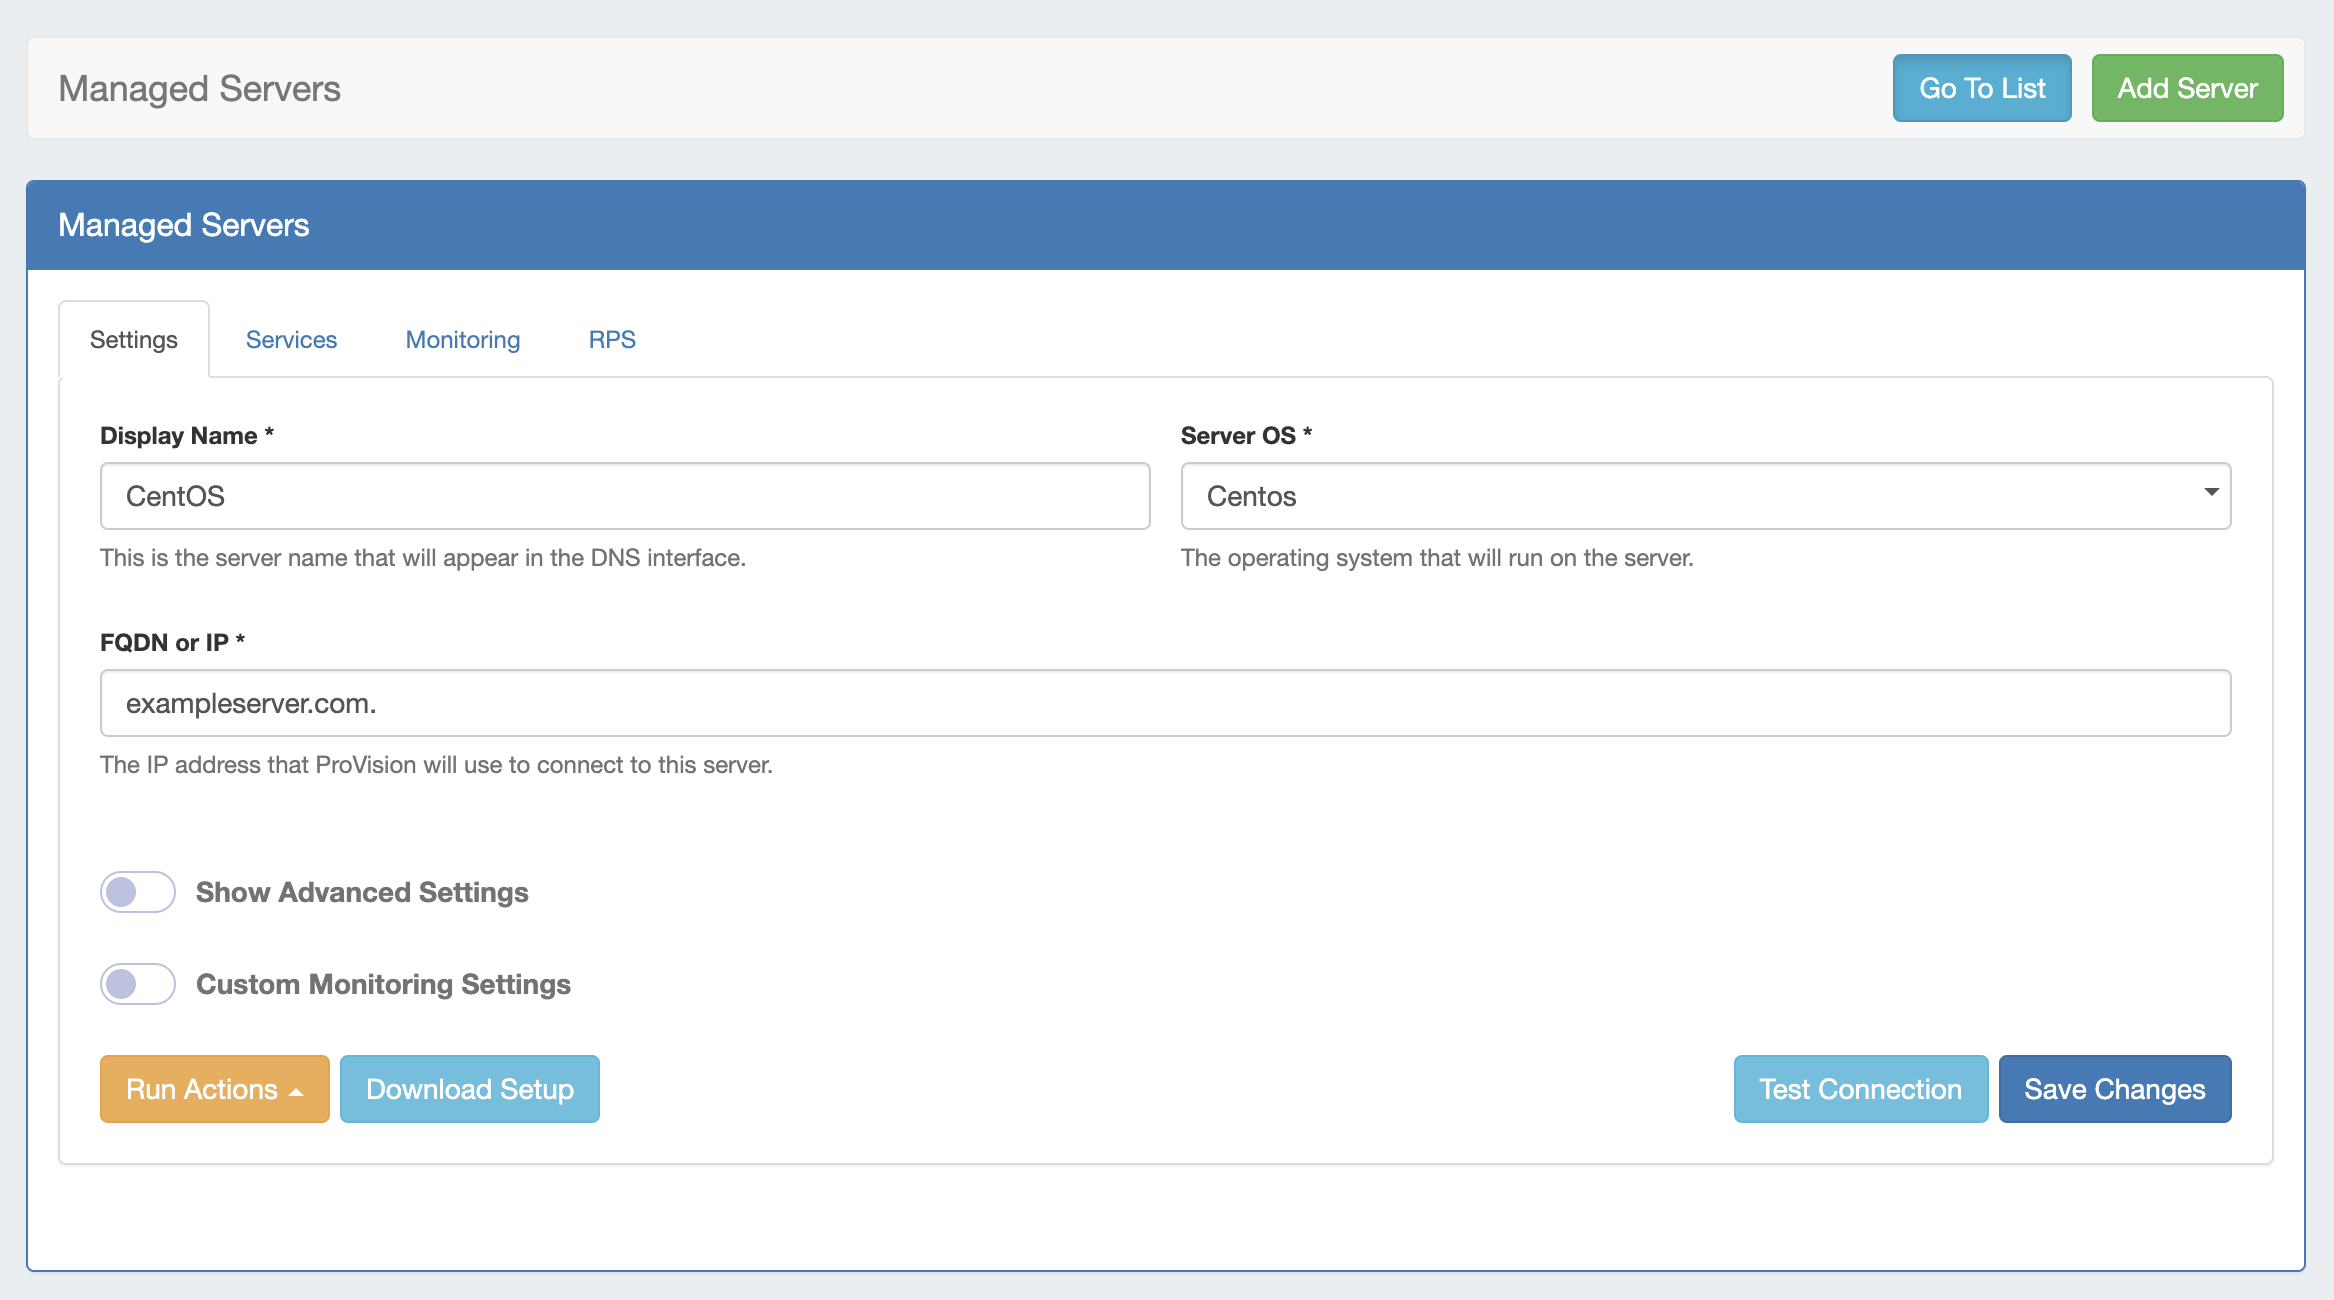
Settings
By default, only "Display Name", "Server OS" and "FQDN or IP" fields are shown.
Settings Details
Toggle on "Show Advanced Settings" to see the ssh credentials, "IP Api Address" and the max versions for each component:
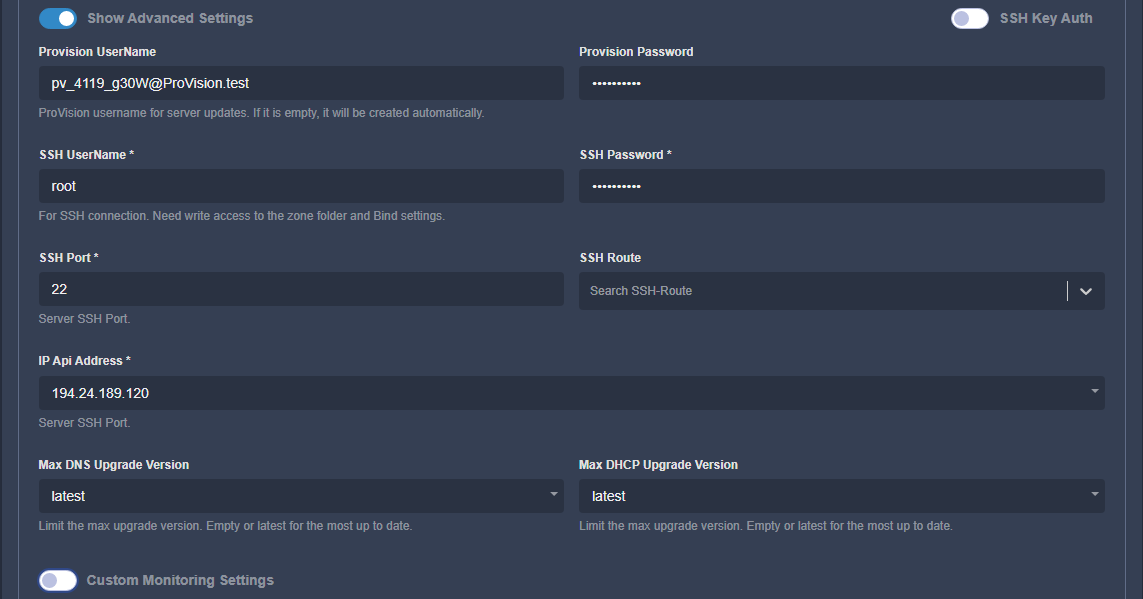
Toggle on "Custom Monitoring Settings" to view/edit the monitoring settings:
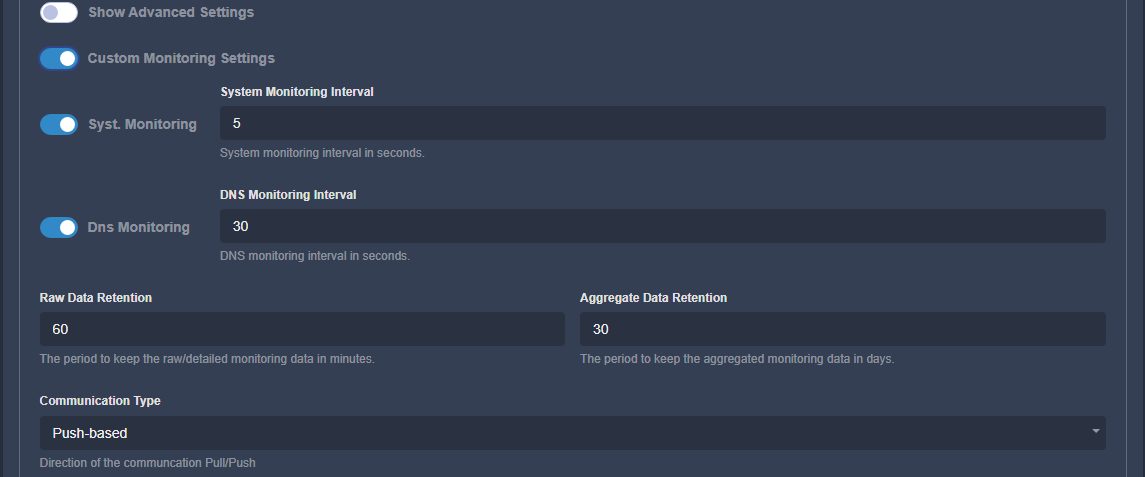
This will be toggled if the user has set custom settings earlier or during the setup. The fields are the same as in the Monitoring Settings step during setup and are described there.
At the bottom left of the settings module, two buttons are available: "Run Actions" (including Push Install, Push Update, and Run Diagnostic options) and "Download Setup".
On the bottom right, you may click "Test Connection" to test the SSH connection to the server.

When any edits are complete, click "Save Changes".
Services
Under Services, you can view the enabled components for this server.
Server Section
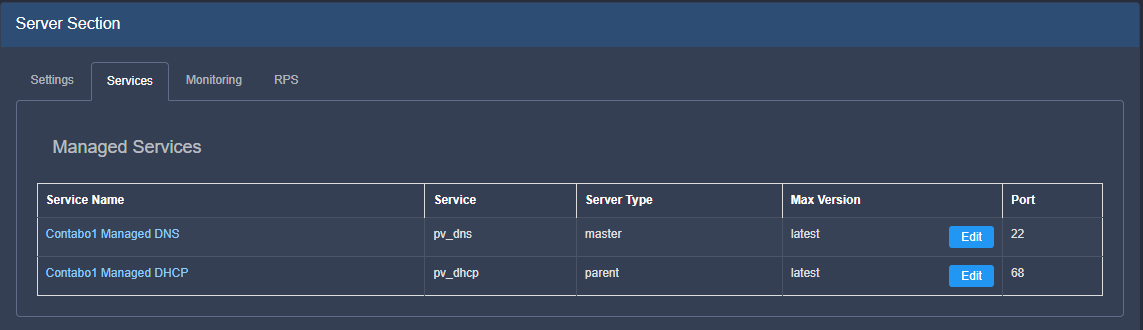
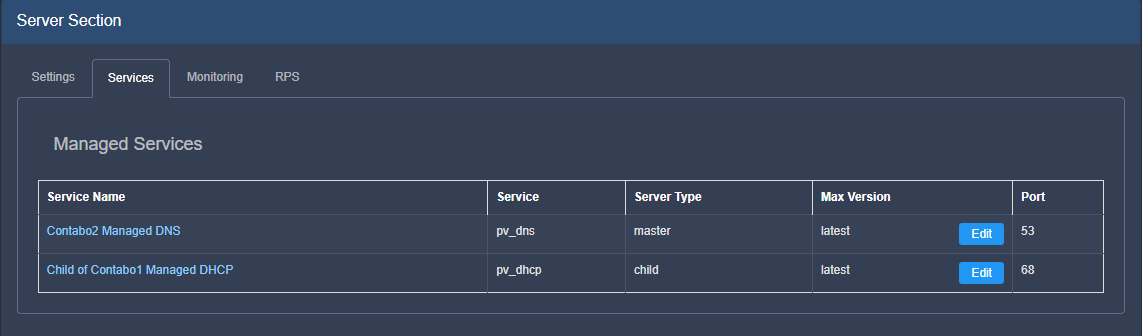
Click on a component to open a new tab with component details. In case of a "child" DHCP service, the link will lead to its parent.
Add Service
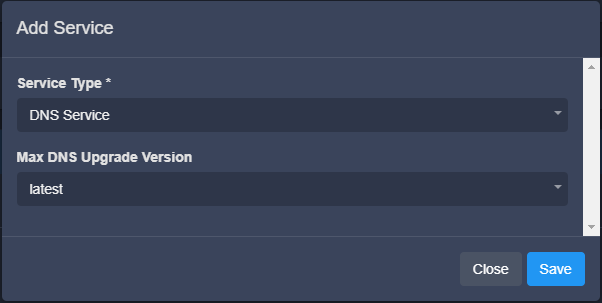
The "Add Service" button shows a popup to choose the service.
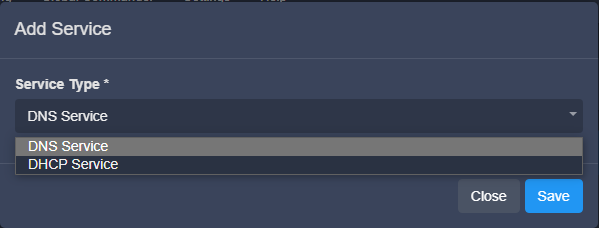
For DNS there is nothing to select:
For DHCP, the interface is the same as during the setup wizard:
Here, you may edit your settings if changes are needed.
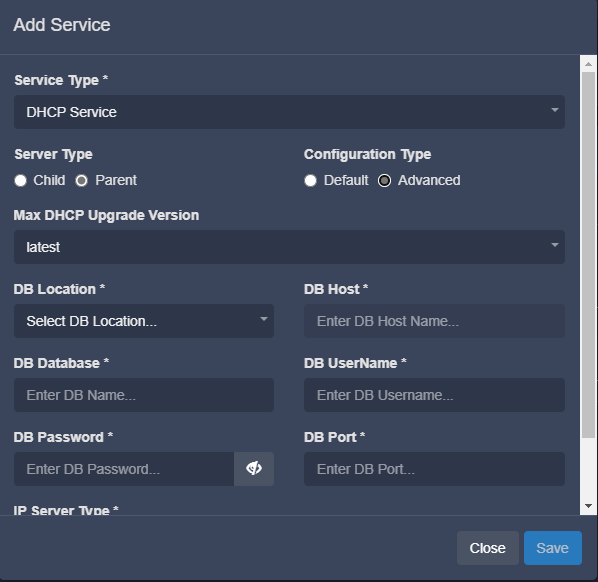
When done, click "Save" to ensure any changes are saved, or click "Close" to exit without saving.
Monitoring
Under Monitoring, you can see the aggregated system statistics + "DNS aggregate":
Monitoring
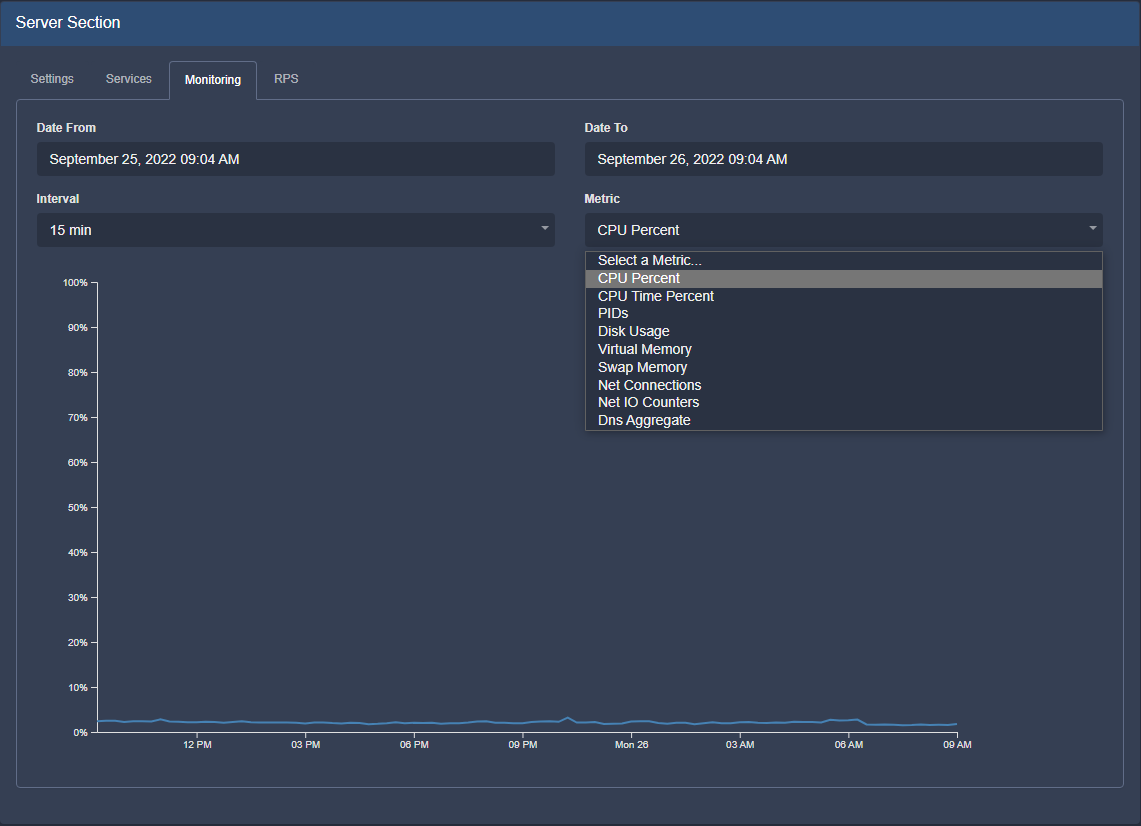
Select a certain time interval (by default, the last 24h) and aggregation interval (5 min, 15 min, 30 min, 1 hour). Note - the charts are different for the different metrics.
For example, selecting "Dns Aggregate" shows a different set of information:
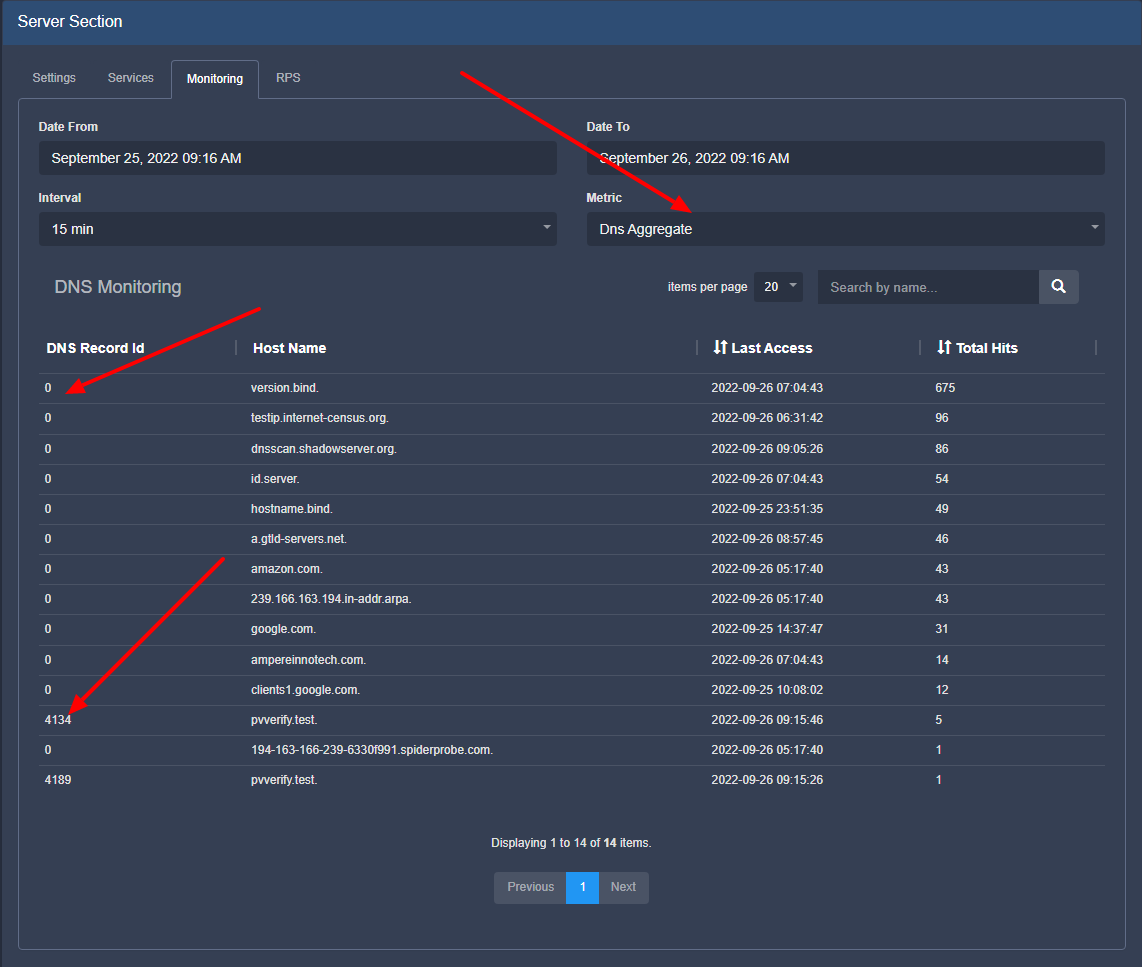
For the DNS records, we aggregate the overall total hits and the last time it was accessed. This is in order to be able to see the most/least used records and the ones which haven't been used for a long time and could be deleted. "Date From" and "Date To" here refer to the "Last Access".
If the request is for a record, for which we don't have resource, the ID will be 0. We have "pvverify.test" two times, because one of them is for "A" request and the other is for "TXT".
RPS (requests per second)
Under RPS, you can search for data for a given dns record.
RPS
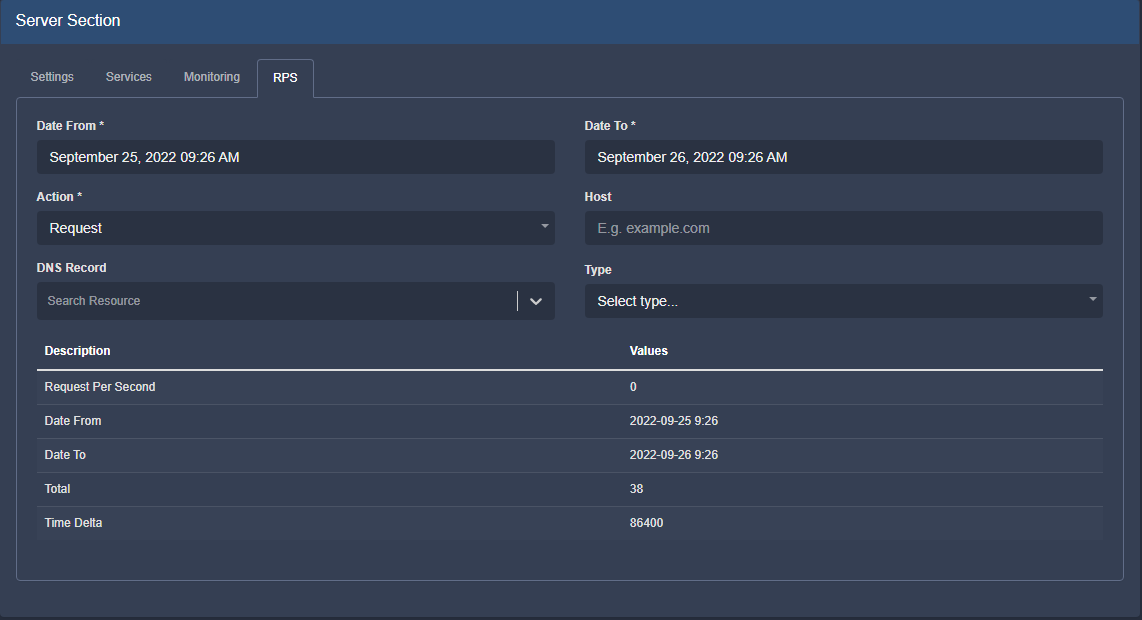
The following search filters are available:
Date From/ Date To: Time interval to search
Action: Request or response
DNS Record: Search for a specific resource
Host: Search by host
Type: DNS request type (A, AAAA, CNAME, MX, TXT etc.)
Update Managed Server
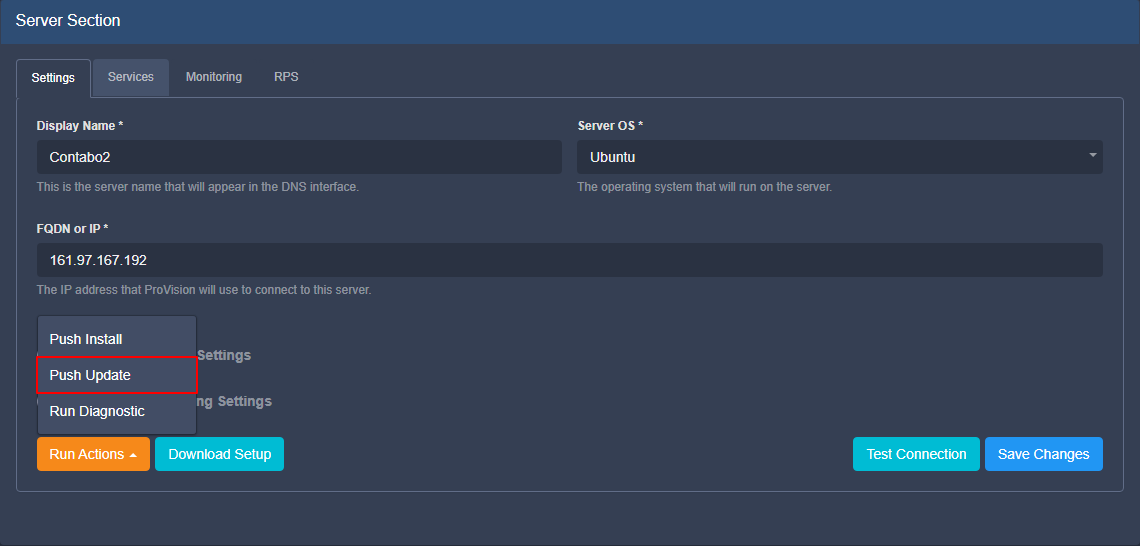
In ProVision's Managed Servers page, open the server details. Then, under the settings tab, click "Run Actions, and select "Push Update". ProVision will automatically create a backup file in /provision/backups/.
Managed Server Diagnostics / Debug
Automatic - GUI
The user can run some basic diagnostics from the Managed Serve details page, under the Settings tab. Click "Run Actions", then "Run Diagnostics":
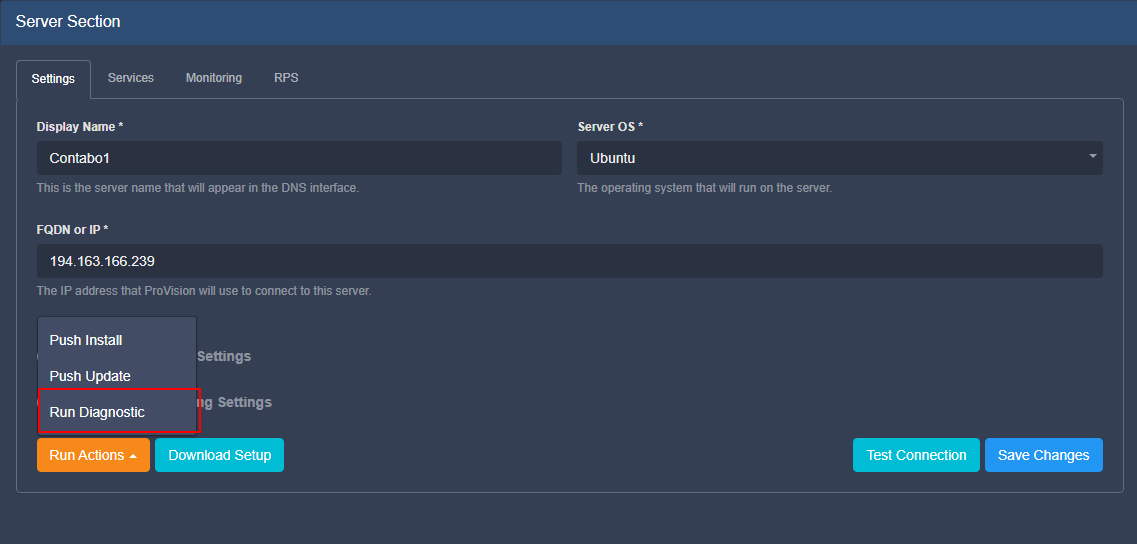
All the debug and diagnostic tools are in the monitoring component, thus it needs to be running in order to function.
After clicking the button, a confirmation dialog will be shown with the results:
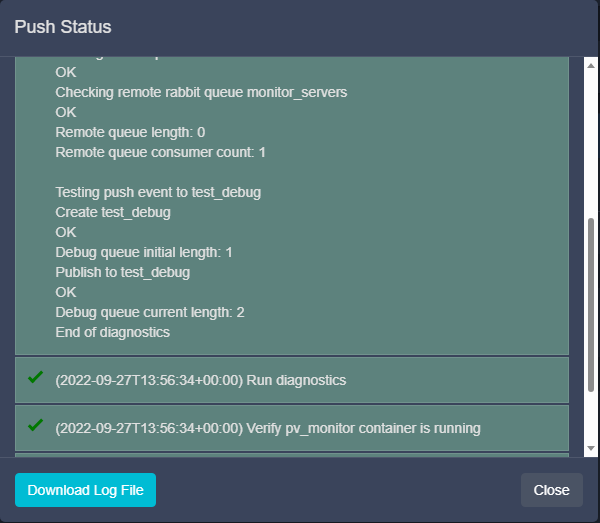
We verify if we have docker running, if the monitoring component is running and the RabbitMQ connection.
You may download the results by clicking "Download Log File", and "Close" when done.
Manual - Command Line Scripts
All the scripts are in "/provision/libs/".
All the scripts can be started with "-h" parameter to show relevant help.
-
pv_install.py - used for the whole setup. The process itself is broken into separate steps, which can be executed individually with "-e/--exec-only=". The steps can be seen from the help (-h). This should be used by developers and for debugging purposes
-
start_pv_*.sh - all these scripts are used to start given component. All of them support "-v/–version" to specify the version of the component to start and "-b/–bash" to start the container in debug mode. In debug mode the user will be logged into the container but without starting /start.sh (the entrypoint).
-
stop_pv_*.sh - all these scripts are used to properly stop given component/container
Local
In addition to logging into any of the containers (starting the relevant script with -b/–bash) few other files are included into the monitoring component:
-
mysql client for browsing the database
-
dhtest (link) for DHCP testing
-
dnsutils - dig, nslookup, nsupdate
-
telnet
Delete Managed Server
To delete a managed server, right click on the action menu/ row for the server, and select "Remove Server".
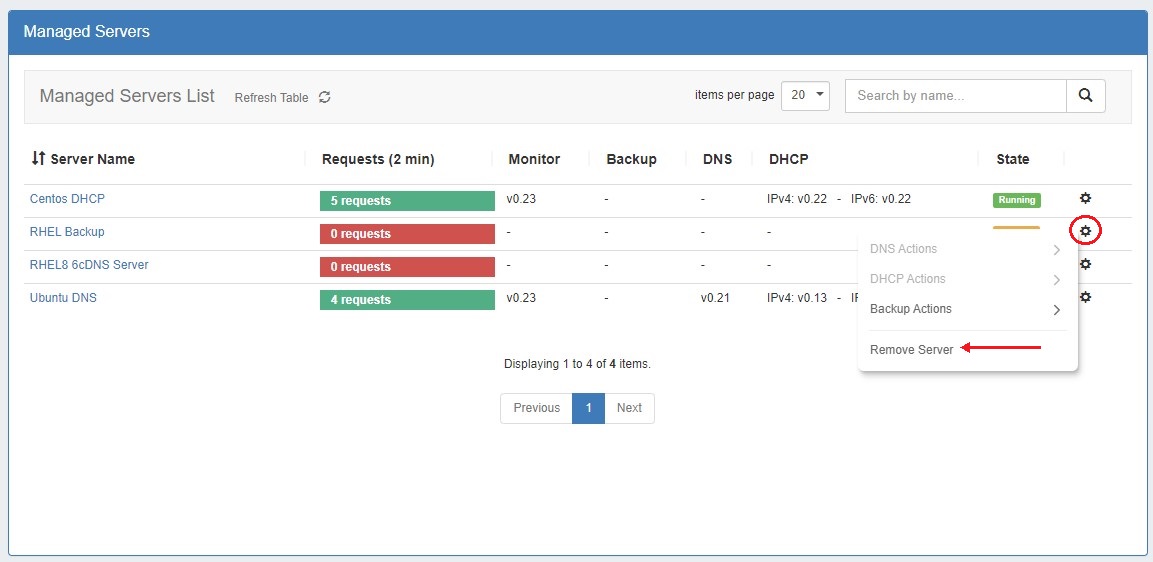
A modal will pop up to confirm the deletion. You may also delete the associated user.
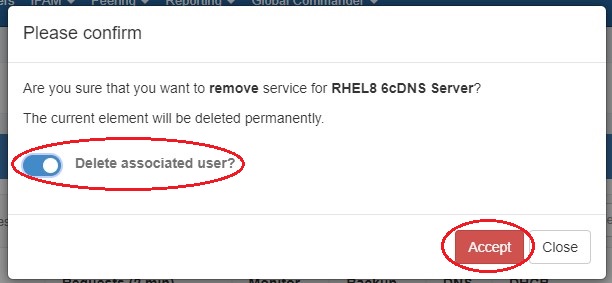
Use the "Delete associated user" function carefully! If the associated user is a standard ProVision user, not an automatically generated user, deleting it could cause problems. Be sure you know which user will be deleted.