
ProVision supports LDAP authentication (including Windows Server). To setup an LDAP server for authentication, you must perform the following procedures:
Configuring the LDAP functions on your Windows Server
You should confirm these steps with your LDAP admin - the purpose of this walkthrough is to provide some level of detail on how to extend LDAP functionality to support integration with an application like ProVision.
Step 1: Prepare to extend the Schema (See: How to Extend the Schema)
This is not a minor operation and requires interaction with various control modification areas of Windows Server:
-
If you have not modified the schema before, you will need to use the Active Directory Schema console on a DC (Domain Controller) to permit write access to the DC schema.
-
Since the schema object has dedicated permissions, admins must be a member of the Schema Administrator group (Schema Admins).
-
Note that the DC that is holding the Schema Master Role is the only one allowed to write to it.
Step 2: Decide on method for Installing/executing Schema Extensions (See: Installation of Schema Extensions)
If you have already used other AD integrations, this should be straightforward. We recommend using the LDIF script method
Step 3: Add and Modify a Schema Object (See: Adding and Modifying Schema Objects)
To add a new attribute to the schema, you first have to create a attribute object. The you will need to complete the following steps:
-
Select a name for the attribute (ProVision assumes that the name will be 'sixConnGroup')
-
Get a valid Object Identifier (OID) from an issuing authority (See: Obtaining an Object Identifier from Microsoft)
-
Document the attribute syntax
-
Confirm that the attribute should be single-value
-
Confirm the attribute indexing behavior
-
Decide if the attribute needs to be distributed to the Global Catalog
Configure ProVision for LDAP Authentication
Configure ProVision for LDAP Authentication
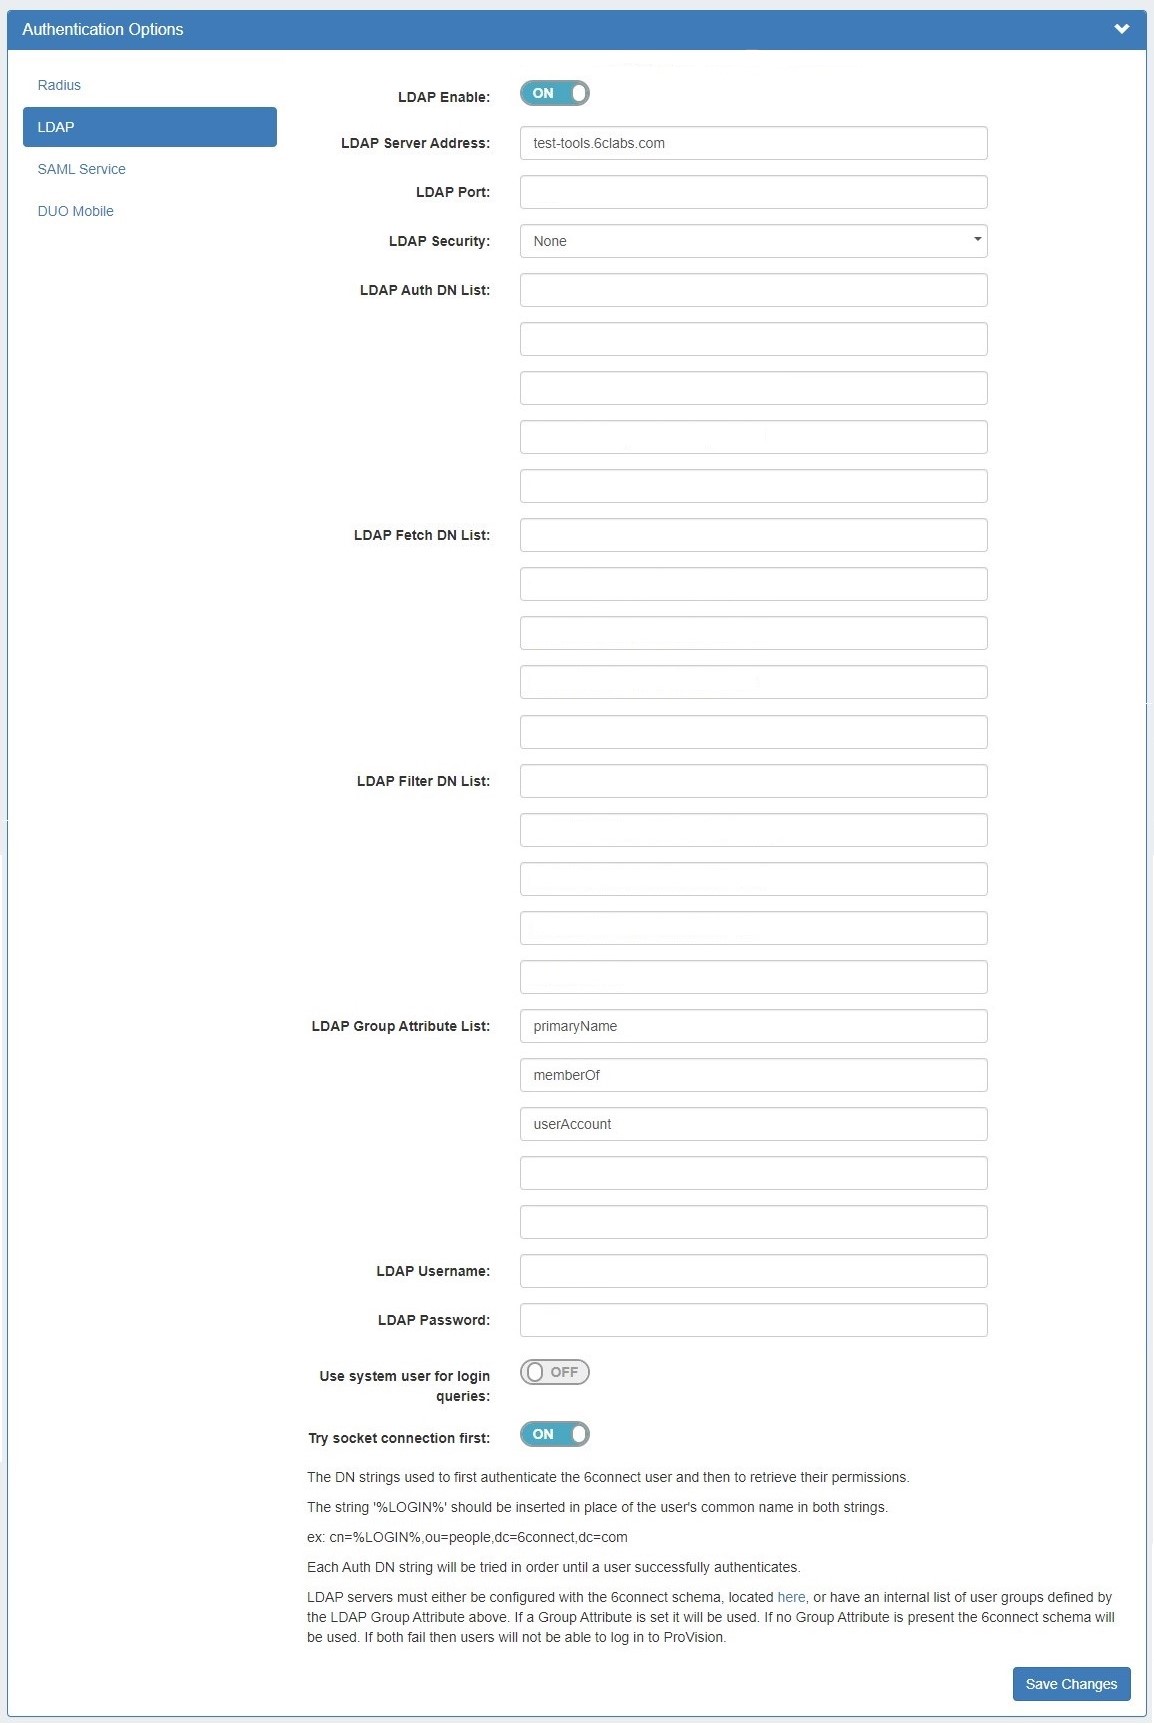
To configure the use of LDAP authentication with ProVision:
-
Log into ProVision
-
Go to Settings Tab → Admin Settings -> Authentication
-
Select LDAP under Authentication Options
-
Toggle the LDAP Enable selector to the "ON" position.
-
Fill in the hostname or ip address, authentication port, LDAP Security, Auth DN List, and Fetch DN, and LDAP Group Attribute.
Some example values in this case would be:
-
LDAP Enable: ON
-
LDAP Server Address: 52.240.195.12
-
LDAP Port: 389 ( or SSL/TLS port is 636)
-
LDAP Security: None
-
LDAP Auth DN: cn=%LOGIN%,ou=people,dc=6connect,dc=com
-
LDAP Fetch DN: cn=%LOGIN%
-
LDAP Filter DN: cn=%LOGIN%
-
LDAP Username / LDAP Password: Optionally, you may enter LDAP admin credentials to allow ProVision to import and sync LDAP contacts. See Contact Manager for details on LDAP contacts.
-
Click Save Changes.
NOTE: If you experience authentication errors at this step, confirm the LDAP settings using an LDAP Search, as described in the previous section.
Setting default login authentication options
The default login is 'Local", but the default login method displayed may be updated by performing the following steps:
-
In the ProVision directory, navigate to the /data/globals.php open the file in vi (or other text editor)
-
Add in the following text as the last line of the file (before the closing ?>)
define('DEFAULT_LOGIN_TYPE', 'ldap');-
Acceptable values are "local", "radius", "ldap" and "saml". If this line is not present in globals.php, the default option is "local".
-
Using SSL encryption
To use SSL encryption with LDAP, the ldap.conf file must be correctly configured on the ProVision server.
Typically, the LDAP configuration file is kept at "/etc/ldap/ldap.conf". Make sure the following line is present:
TLS_REQCERT allow
Then, restart the webserver.
Add or Update LDAP Settings
To view, add, or update LDAP settings, go to the Settings Tab → Admin to enter the Admin area of ProVision.
Then, click the "Authentication" sub-tab at the top of the Admin Settings page, and select the LDAP tab from the Authentication Options module.
The following settings are available to add or update:
-
LDAP Enable: check the box to enable LDAP functionality.
-
LDAP Server Address: Set the IP address of your LDAP server.
-
LDAP Port: Set the port for your LDAP server.
-
LDAP Security: Select the security method of your LDAP server - SSL, TLS or None
-
LDAP Auth DN/Fetch DN/Filter DN: These strings are used to first authentication the user and then to retrieve their permissions. The string '%LOGIN%' should be inserted in place of the user's common name both strings. (ex: cn=%LOGIN%,ou=people,dc=6connect,dc=com)
-
LDAP Group Attribute: If using an internal list of user groups instead of ProVision groups, enter the attribute name for the LDAP groups here. If a Group Attribute is set, it will be used first, otherwise the ProVision schema will be used.
-
LDAP Username / LDAP Password: Optionally, you may enter LDAP admin credentials to allow ProVision to import and sync LDAP contacts. See Contact Manager for details on LDAP contacts.
-
Use system user for login queries: Enable / Disable to use the system user for queries
-
Try socket connection first: Enable / Disable to attempt socket connection as the first method.
When done, click Save Changes.
NOTE: Mapping Permissions to ProVision schema: To integrate ProVision permissions with your existing directory structure then you will need the ProVision schema. It should snap in with any existing LDAP structure and allow you to assign ProVision permissions to your existing users. You can download a copy of the schema.
Adding a Secondary LDAP Server
Adding a Secondary LDAP Server
Once at least one LDAP server has been added, a list will appear at the top of the module. Add an additional server by clicking "Add new server".
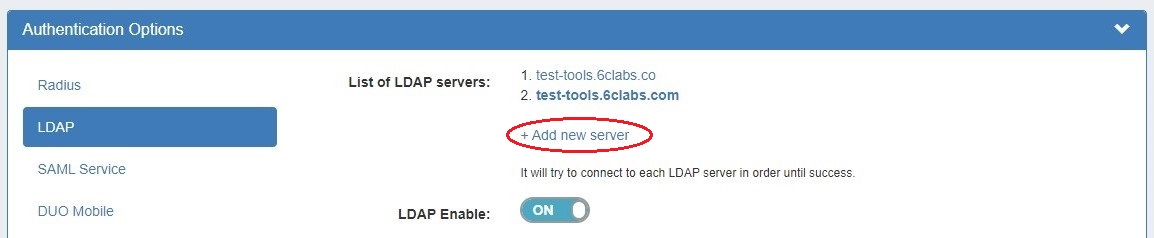
ProVision will try to connect to each server listed in the order listed, until a success is returned. Disabled servers will display in grey, and the currently selected server will display in bold.